| | | | Users browsing this forum: Collector#1, Google [Bot], tomcat Fanatic and 24 guests | | You post new topics in this forum
You reply to topics in this forum
You edit your posts in this forum
You delete your posts in this forum
You post attachments in this forum
| | Kit #05416-0379 175 brown styrene parts / tan and black rigging thread / anchor chain / vac-formed sails / paper flag Retail price @ 40 EUR The Yacht America achieved instant and long-lasting fame by winning the prestigious 100 Sovereign Cup of the Royal Yacht Squadron on 22 August, 1851, off the Isle of Wight. Later, the trophy was renamed America´s Cup in her honour. Today, it is still one of the most prestigious sailing trophies in the world. | | The vessel was built in Long Island, NY, with the express purpose of competing against European racing yachts and promoting American shipbuilding. After winning the cup, she was soon sold off and then had a chequered later career. She went through various European hands, was used as a Confederate blockade runner, scuttled, raised by the Union, armed, employed to intercept blockade runners, returned to yachting and occasional racing, until she fell into disrepair. During that time, her rig was modified several times. She was finally donated to the US Naval Academy, but never received proper care. In 1942, she was damaged beyond saving when her storage shed collapsed in a snowstorm. Today, there are several replicas of the Yacht, one of them, the Skythia, in Germany. | | The kit was first produced by Revell in 1969 and has been re-issued several times under various names. Originally named Yacht America, the 1974 armed re-issue was called Civil War Blockader, whilst the current (armed) incarnation is called USS America, respective of the vessel´s service on the Union side.
It is a pretty large model, at around 75 cm overall length and a height (stand included) of around 55 cm. The comparatively large scale and the limited rig of six sails make it the one of the easier Revell sailing ship kits. The styrene parts are nicely and crisply molded with fine copper sheathing detail on the lower hull, but lackluster deck planking. Some sink marks are found on the stronger parts, such as the masts and the guns. The kit has some nice details, but lacks any boat gear or hawsepipes, to name two items the original most probably had. The rigging thread is your typical Revell sort, I don´t like the inevitable kinks in the material due to how it´s rolled up. The provided anchor chain looks too strong for me.
It surely is a nice kit to be built straight from the box, but also a most helpful starting point for anyone aiming at more detail. Those who abhor the vacformed sails may take what is provided as templates, and the scale fits in with the widely available 54 mm figures if a crew is wanted. | | I decided to build the model full hull on a display stand. That would save on display space and also display the elegant lines of the hull (and the copper sheathing) to advantage. When I display models like this, I omit the crew and weathering, as opposed to displaying them waterlined in a seascape. | | I also decided to add deck planking as I didn´t see how I could make what was provided in the kit look the part. The detail was raised, and there were no demarcations between individual planks. It looked a bit like your Evergreen V-groove sheet. Moreover, I decided to replace the rigging thread and also buy wooden deadeyes for a more realistic look. I would retain the vacform sails, even though many serious modelers deeply dislike them. I expected them to be easier to work with than any replacement I could imagine. | | | I started the build by buying 1.5 mm welding wire. The material is quite stiff and I used it as reinforcement for the masts, gluing sections of it between the mast halves. Another piece was bent and glued into the hull to later connect with the stand. I made a building jig on which the hull was placed with its waterline parallel to the desktop. At a model show, I bought a wooden base of convenient size and fit brass tubing into it. Upon completion the locating wires could just be inserted into the tubing. | | | That done, I added the deck to the hull and proceeded to add the various deck houses. They were built in situ, apart from the round skylight. I took it upon me to open the individual panes with a fine saw. After cleanup the part was painted and the panes filled with clear PVA glue. This would be the very last part to be added to the model. | | | Parallel to work on the hull, the masts, booms and gaffs were cleaned up, assembled and painted according to the instructions. The numerous blocks were also prepared and pre-painted. | | | When all superstructure items had been added, the hull was primed. I prefer automotive primer from the rattlecan. After curing, the white areas (as in the waterline and parts of the superstructure) were sprayed white. In this project I used Vallejo white PU primer. It followed a succession of masking and painting, beginning with brown for the bases of the skylights and hatches and the inside of the bulwarks. The hull and the deck were then sprayed Vallejo black PU primer. The black deck would later darken any seams or gaps between the planks and hint at the dark caulking material. The lower hull was sprayed AK Xtreme Metal Copper. The cockpit area was painted in a wooden shade, with the leather cushions in a wine red washed with black. I tend to use acrylics and then accent with artist´s oils. | | | | | | | Now came the real fun part of this project, planking the deck. I had looked up plank sizes and available styrene formats, only to resort to cutting all the planks from .25 mm sheet material. That was for sure the cheapest option. The numerous planks (2.5 mm in width and 100 mm long) were individually cut to size and mounted on kabuki tape on foam blocks. | | | They were then scored lengthwise with a coarse-grained sanding stick, to add some surface texture and allow the oil paint to grip. The planks were then primed and sprayed in two acrylic shades, to add some variation. Finally, they were drybrushed with artist´s oils to achieve a restrained wooden look. I aimed at a blonde look of the deck planking. | | | That done, all points where blocks would have to mounted on the deck were marked, and I started planking. The planks were glued with CA glue, in order to avoid the glue to destroy the painted surface. They were individually cut to size, over several days, until the deck was done. | |
Completing the deck fittings, the blocks to be used on deck were rigged with .3 mm black copper wire from my stash, and glued in place on the deck with CA. The massive bitt / windlass was placed into a cutout in the planking, same as the two catheads /anchor cranes. I had painted them using AK interactive Tru Metal in Gun metal. The hawsepipe locations were drilled open and sections of plastic tubing inserted representing the hawsepipes. The hawsepipes were also painted Gun metal. The anchors were now also added, and rigged using a thinner chain than the one supplied in the kit. | | | I had sprayed the six sails in a canvas colour, and cut them out of their sheets. The next tedious but necessary work was to add reefing points to the sails. They are indicated in the vacform, but I felt having them for real would improve the look of the model. So off I went, drilling more than a hundred holes, tying the reefing points, cutting them to size and fixing them. That did take some effort until it was done. | | Now it was time to test fit the pre-painted bowsprit and the two masts. I then properly realized how large and tall this model would be, and I was dissatisfied with the bowsprit´s angle. It was to be mounted into a cutout in the windlass and would only fit this way, but end up parallel to the waterline. That did not look right to me.
I did not feel comfortable with the model´s look, and at this point the project stalled for several months. For a variety of reasons I did not feel up to continuing the build. | | In the end, there came a point when I forced myself to continue the project. I started by rigging the sails to the masts, only to find out that the mainsail would not fit between its boom and gaff. I definitely hadn´t expected that. In the end I removed the gaff and re-attached it lower down the mast to achieve a better fit. That meant a good amount of work: Sawing, drilling, adding reinforcements from wire, supergluing and puttying, until it was done.
Attaching the sails meant drilling yet more holes into them and kind of sewing them to the gaffs. Where the sails were attached to the masts, I used circles I had wound and cut from blackened wire. That looked better than what the instructions recommended, as in tying the sail to several eyelets molded on to the mast. I removed most of those, just retained a few to enhance stability. | | Now I needed to start rigging seriously. I started with the bowsprit I had securely glued to the windlass, sat back, revisited it and liked it even less than before. So off I went to the computer screen and looked at scores of images of the America. In all of them the bowsprit followed the graceful lines of the hull and rose from the waterline by a few degrees. I have no idea where I went wrong, but there was no way I could have mounted that bowsprit differently.
But it had to be corrected, so I broke it off and reattached it so that it sat on the deck. Now it had a much more right looking and pleasing angle, and I felt confident to continue. | | | But upon starting the rigging, I found that I had somehow lost rigging blocks and wouldn´t be able to complete the project. I wrote to Revell and they helped me out - free of charge and in under two weeks, thanks a lot for that! | | | The rest of the project went surprisingly well and fast, with only minor glitches. I´ve always been unhappy with plastic sailing ship models due to the lack of stability of masts and yardarms. They so easily bend and misalign. So in this case I added the standing and then the running rigging successively, but did not finally belay it. I added clothes-pegs to the loose ends to give some pull on them and concentrated on counterbalancing the pull of the various rigging threads. I really did get the masts and yardarms / gaffs / booms properly aligned, but nonetheless found that both gaffs had broken under the strain. Surreptitious administration of liberal doses of CA glue fixed the problem. | | | Having added all the rigging, I started belaying individual threads using CA glue, and then cut them off. That went quite well, and pretty soon all the clothes-pegs were gone. I then spent an afternoon making coils of rigging thread, which I added to the belaying points. That done, the model received a final flat coat (save the lower hull) to hide any glue stains, and the skylight was added using flat-curing PVA glue. The model was then placed on its permanent base, and an acrylic display box ordered at considerable cost. | | | | | | | | USS America Test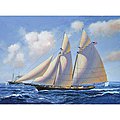 USS AmericaAbout this item, product details, product rank. One plastic model Highly detailed plastic pieces. Requirements & Suggestions- Modeling Knife ( EXL16001 ) ( XACX3627 ) ( EXL16018 )
- Plastic cement ( TES3501 ) ( PLS00002 ) ( TAM87012 ) or glue ( HLC107 )
- Sprue Cutter ( XUR410A ) ( EXL55594 )
Due to small parts that could cause a choking hazard please kee away from children 3 years of age and younger. Specifications- Scale: 1/56
- Length: 25.7" (653mm)
- Height: 20.86" (530mm)
- Skill level: 4
You Might Also Like Others Ordered - Скидки дня
- Справка и помощь
- Адрес доставки Идет загрузка... Ошибка: повторите попытку ОК
- Продажи
- Список отслеживания Развернуть список отслеживаемых товаров Идет загрузка... Войдите в систему , чтобы просмотреть свои сведения о пользователе
- Краткий обзор
- Недавно просмотренные
- Ставки/предложения
- Список отслеживания
- История покупок
- Купить опять
- Объявления о товарах
- Сохраненные запросы поиска
- Сохраненные продавцы
- Сообщения
- Развернуть корзину Идет загрузка... Произошла ошибка. Чтобы узнать подробнее, посмотрите корзину.
Oops! Looks like we're having trouble connecting to our server.Refresh your browser window to try again. Rigging question -- yacht AmericaBy gsdpic January 19, 2021 in Masting, rigging and sails - Reply to this topic
- Start new topic
Recommended PostsI am working on Bluejacket's America 1/48th scale. I am getting close to rigging and have started studying the rigging plans, such as they are. I am not a sailor by any stretch of the imagination, and am a bit unsure of a couple things I see. Most of the running rigging I can figure out...I can see how pulling a line here moves that thing up there. But there are a couple places where there are a couple blocks that appear to just be there to tension standing rigging and it is not at all clear how/where the line terminates. For example, see the two pictures below. One is the top of the fore mast the other is obviously the bowsprit. In these cases you can see the line through the blocks (or bullseye in one case) but the line just appears to be a loop, it does not terminate anywhere. At least in a couple cases it is obvious the line starts off tied to the first block, but then where does the other end go? Maybe it is tied off to the other block, or to the line the block is attached to (similar to the lanyards for the shrouds)? Looking at the build logs for the Mamoli America kit, it looks like they have those lines by the bowsprit go back through a hole in the bulwark to a cleat on deck, but that looks rather clumsy. Any help or suggestions would be greatly appreciated. I am not really concerned about hyper realism, mostly just curious about this. Thanks for taking the time to read and reply. 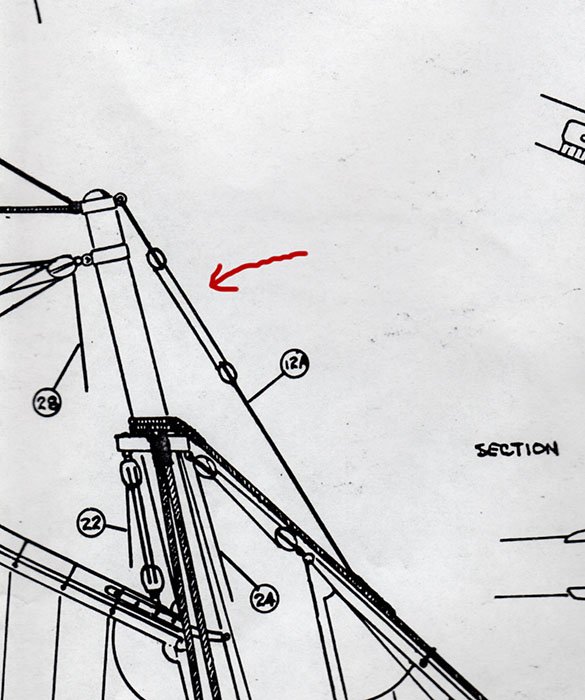 Current Build: Artesania Latina Sopwith Camel Completed Builds: Blue Jacket America 1/48th Annapolis Wherry Link to commentShare on other sites.  I hope my response is not too late to be helpful. I finished the Model Shipways yacht America about a year and a half ago. The plans were more helpful that the ones you are working off of (at least what you have shown us), and I simply followed the plans. Below are photos that might help. The first three I took a few minutes ago, the final one two years ago. What your plans show as a couple of blocks at the top of the mast my plans identified as a "rigging screw", and depicted what I have always known as a turnbuckle. I have done a lot of sailing over the years, and seen many boats with headstays, shrouds and the like tensioned with turnbuckles at either end of the cable, but I've never seen an arrangement quite like what the America apparently had. The kit didn't come with a tiny turnbuckle, so a fashioned a reasonable imitation out of wire. What appears to be the one of two bobstays that is not adjustable is actually the lower end of the headstay, which runs through a sheave (I just drilled a hole) in the bowsprit. I don't know why the other one is adjustable; I can't think of any reason to have it anything other than very taut. 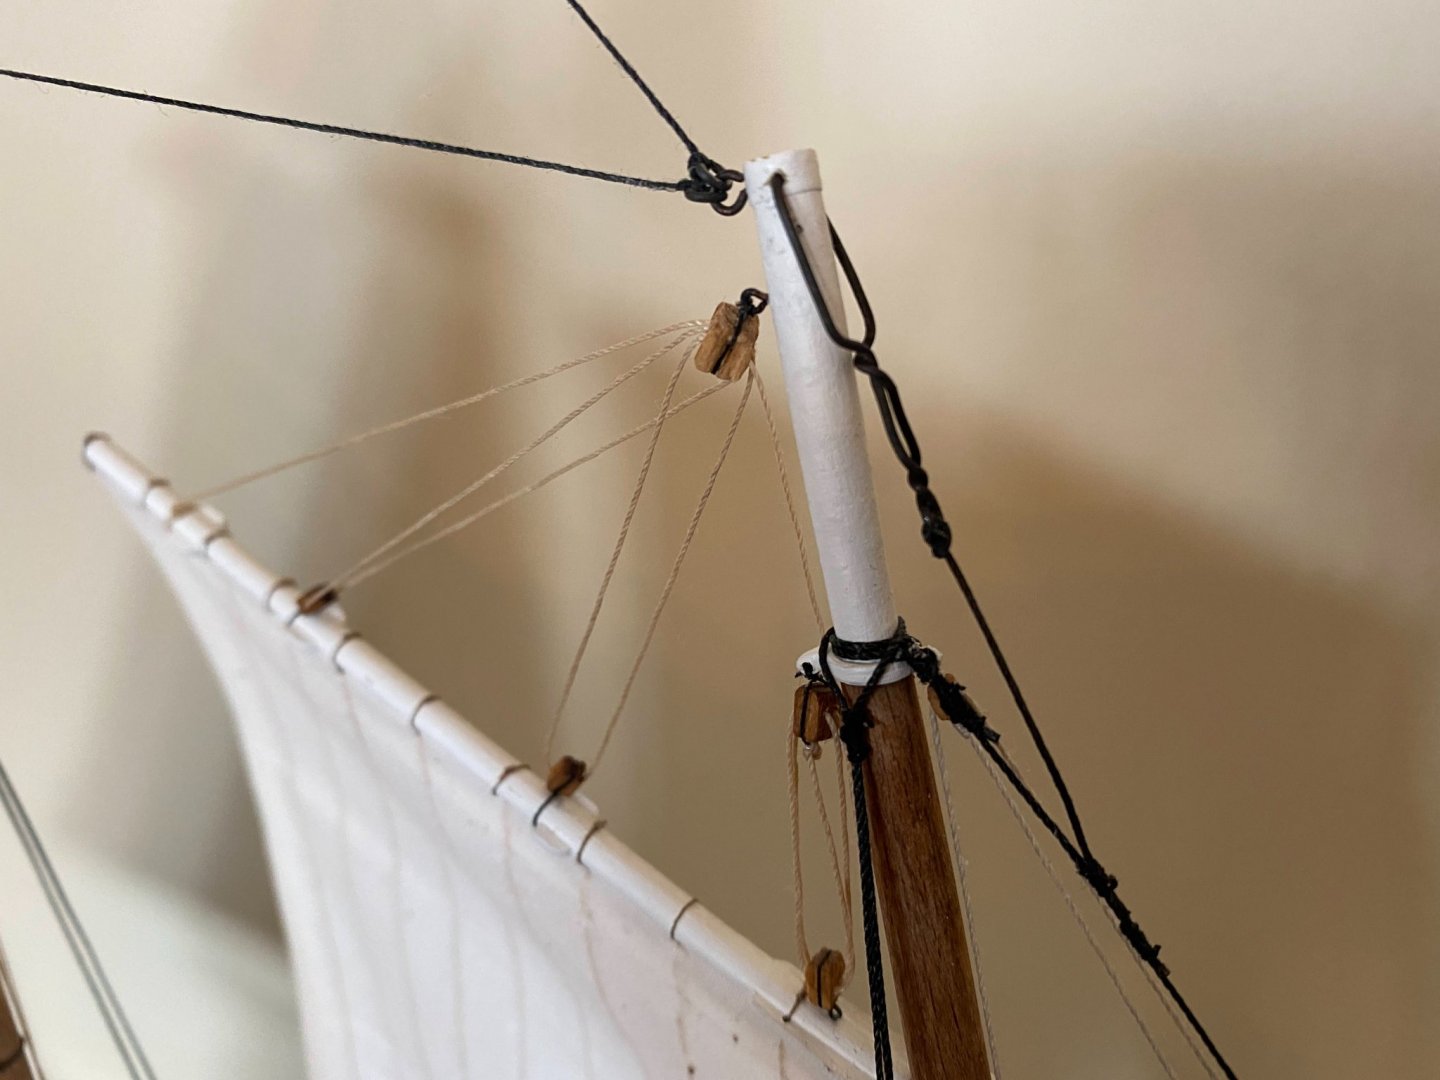 - allanyed , closehaul and GrandpaPhil
________________________________________________________________________________________ Current build:: Shackleton's Endurance -- OcCre Completed: USS Constitution cross section -- Model Shipways Peterboro Canoe -- Midwest Models Bluenose -- Artesania Latina Joshua Slocumb’s Spray -- BlueJacket J Boat Endeavor -- Amati Other Wright Flyer -- Model Airways Yacht America -- Model Shipways Brig Niagara -- Model Shipways Sopwith Camel -- Hasegawa  I have plans drawn by George Campbell for an old Model Shipways kit. 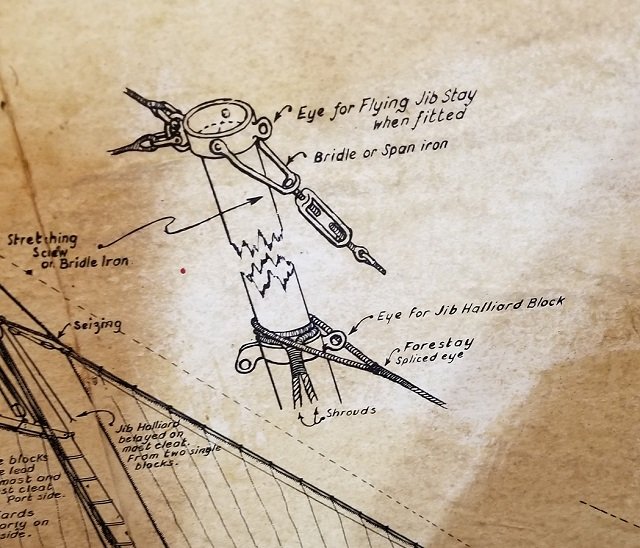 They show what Tomculb is speaking of. The two block tackle doesn't look right to me, but I'm no expert... “Indecision may or may not be my problem.” ― Jimmy Buffett Current builds: Rattlesnake (Scratch From MS Plans On Hold: HMS Resolution ( AKA Ferrett ) In the Gallery: Yacht Mar y, Gretel , French Cannon @Tomculb @Gregory Thank you for the replies. I apologize that I have not replied sooner....I failed to "follow" my own post so did not get notified of your replies. What you say makes sense and is helpful....I ended up working on sails first instead of rigging so I have not tackled these bits yet, though I am close to starting it. Just to follow up, I've completed two of these things. So far I've just been running black line through the blocks (or bullseye in one case) and seizing the line to the line attached to the block on one or both ends, as shown below. There are three more on the bowsprit rigging that I will do the same with. 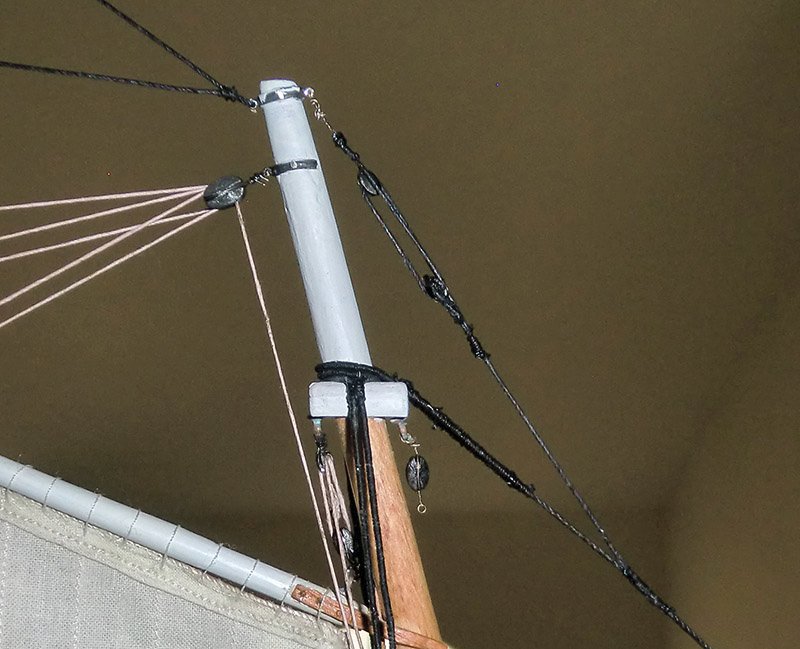 Sorry to contribute so late. Reference "The Low Black Schooner" by John Rousmaniere. In the back of the book is reprinted John Stearman's rigging plan of 10/1851. Notes on the following page indicate the foremast rigging as "7/8" iron rod (from jib stay) set up by a Turnbuckle to head of / mast" I'm not sure as to the exact way of fastening the rod to the mast and to the stay, but maybe others can help. Bruce Bollenbach  Join the conversationYou can post now and register later. If you have an account, sign in now to post with your account.  × Pasted as rich text. Paste as plain text instead Only 75 emoji are allowed. × Your link has been automatically embedded. Display as a link instead × Your previous content has been restored. Clear editor × You cannot paste images directly. Upload or insert images from URL. - Insert image from URL
- Submit Reply
Recently Browsing 0 members- No registered users viewing this page.
Modelshipworld - Advancing Ship Modeling through Research SSL SecuredYour security is important for us so this Website is SSL-Secured NRG Mailing AddressNautical Research Guild 237 South Lincoln Street Westmont IL, 60559-1917  Model Ship World ® and the MSW logo are Registered Trademarks, and belong to the Nautical Research Guild (United States Patent and Trademark Office: No. 6,929,264 & No. 6,929,274, registered Dec. 20, 2022)Helpful links. - Articles Database
- NRG Home Page
- NRG Online Store
- Important: Our Guidelines
- Terms of Use
- Buildlog Index
About the NRGIf you enjoy building ship models that are historically accurate as well as beautiful, then The Nautical Research Guild (NRG) is just right for you. The Guild is a non-profit educational organization whose mission is to “Advance Ship Modeling Through Research”. We provide support to our members in their efforts to raise the quality of their model ships. The Nautical Research Guild has published our world-renowned quarterly magazine, The Nautical Research Journal, since 1955. The pages of the Journal are full of articles by accomplished ship modelers who show you how they create those exquisite details on their models, and by maritime historians who show you the correct details to build. The Journal is available in both print and digital editions. Go to the NRG web site (www.thenrg.org) to download a complimentary digital copy of the Journal. The NRG also publishes plan sets, books and compilations of back issues of the Journal and the former Ships in Scale and Model Ship Builder magazines. Our Emblem ® Nautical Research Guild ® and the NRG logo are Registered Trademarks, and belong to the Nautical Research Guild (United States Patent and Trademark Office: No. 6,999,236 & No. 6,999,237, registered March 14, 2023)- Existing user? Sign In
- Latest Posts
- All unread content since my last vist
- Unread topics I have posted in
- Create New...
Login to your account America yacht - 1:56 RevellRussian CorrespondentReflections on life and ministry by a pastor serving Lutheran congregations in the region. 19 October 2011A wider vision of the church in siberia - synod assembly. | | I should probably apologize – the above sounds more like a press release
than a blog entry. At the same time, it is a sincere reflection of the events of the weekend. |  | | | Closing worship led by Synod President, Pastor Evgeny Philipov |  Synod assembly delegates and guests No comments:Post a Comment  THE MAGAZINERecent articles, popular topics, recent reviews, recent videos, recent threads, new products, current issue.  SEARCH FINESCALE.COMEnter keywords or a search phrase below: - FineScale Modeler
- Modeling Subjects
Revell Yacht America - Order Ascending
- Order Descending
| | on Tuesday, October 8, 2013 1:13 PM up close. And, I picked up the model for a reasonable sum on eBay. This version came with the soft sails, which I don't plan to use. First major task- the inside of the bulwarks had bad detail and overdone wood grain, so it needed to be removed. Glued the hull together, and sanded down the overdone copper plates and wood topsides. Removed all of the deck furniture. I am going to re plank the deck with BJ strip decking, stained and the edges blackened to represent caulking. I have the drawings on order, in order to get the pattern and lengths. | | | on Tuesday, October 8, 2013 1:26 PM | | | on Thursday, October 10, 2013 8:40 PM | | | on Friday, October 11, 2013 12:17 AM Steve | | | on Friday, October 11, 2013 9:00 AM | | | on Friday, October 11, 2013 9:05 AM | | | on Saturday, October 12, 2013 2:21 PM Put together a nice little stand. Measured out the sheer line from the drawings, making allowance for the thickness of the plastic sub deck and eventual wood planks. Glued in blocks to support the sub deck. Then I figured out a way to set up the mast steps, since I am not using the plastic ones that stuck into sockets in the deck. I am using the mast center lines as a basis for scaling. The model scales at about 1/64. | | | on Sunday, October 13, 2013 1:15 AM I roughly shaped a half-dozen deck beams that will give the rest of the (sub) deck the same shape. | | | on Wednesday, October 16, 2013 3:52 AM Set up the waterway planks. I will sand them down from 1/32" to 1/50". Set up the bulwark stanchions based on the frame lines which I marked out on the sub deck. | | | on Wednesday, October 16, 2013 1:28 PM | | | on Wednesday, October 16, 2013 1:47 PM | | | on Thursday, October 17, 2013 9:01 AM | | | on Tuesday, October 22, 2013 12:25 AM | | | on Tuesday, October 22, 2013 10:20 AM | | | on Tuesday, October 22, 2013 6:19 PM In this case the schooner has a 6" break in the deck between the masts, creating a quarter deck. I can't really figure out why except that without it there would be no bulwark at all in the waist. This boat would have been a nightmare to sail in the dark. A rail about a foot above the deck and that grub beam half way back. Maybe not a big deal in the Sound, but imagine halfway across the Atlantic tripping and going over. It's no wonder the deck furniture and the lower parts of the masts were painted white. | | | on Wednesday, October 23, 2013 10:25 AM | | | on Wednesday, October 23, 2013 11:30 AM The two masts are the same diameter and length. Note that it helps to leave a 1/4" extra at the end because of the inevitable sanding taper. These get collar fittings however, so the amount to remove may be a little less after I carve the shoulders for the fittings. | | | on Wednesday, October 23, 2013 10:37 PM I want to remember reading, ages and ages ago about a racing crew sailing a similar vessel across the Atlantic. I want to remember that they rigged temporary lifelines for the crossing. As mentioned above, these were austere vessels built for speed, not comfort. The area under the cockpit would have a compartment mostly to secure the ship's papers in; perhaps a bare-bones cabin for the owner. The rest of the space was open hold, with a platform or orlop over the bilges to stow the sails upon. So, for the ocean crossing, a frame of cribbing was set up under one of the hatches , upon which the iron stove was lashed. Some bins for fuel for the stove would be fit to the cribbing, too. Had to be under a hatch as there is no Charlie Noble on these vessels. Berthing was by way of hammocks from deck beams, or by flaking out on the bagged sails. That grub beam probably had some structural merit; but, as noted above, probably existed as a social limit. Only those of suitable station were allowed aft of it.
The model is shaping up a beauty, and we are the better for having seen it. | | | on Saturday, October 26, 2013 10:07 PM The drawings show a little galley with a stove pipe. I had the misfortune to be the hash slinger on a 5 day sailboat race "Rund Sjelland" in 1978, around the Island of Sjelland on which Kobenhavn lies. The only thing worse than feeding all the Knuts and Erics was tiller duty at night. You see these cross channel ferries coming, but cannot judge distance and track very well and tend to let the boat drift up the side of their path. At which point you truly lose your position until morning. Any how off to the coppering yard. | | | on Sunday, October 27, 2013 11:32 PM | | | on Monday, October 28, 2013 12:31 AM Can't wait to see more of the spars. | | | on Tuesday, October 29, 2013 2:48 AM The gold leaf guys have put on the garlands but need to come back tomorrow and brush off the excess. The idea is to get all of the hull details done before she goes in for the topside finishes. The deck is started. | | | on Tuesday, October 29, 2013 10:05 AM I tried the gold leaf thing w/ my Connie, but just could not get it to work right. Leave it overnight before brushing off the excess? | | | on Wednesday, October 30, 2013 3:05 AM to go, The hull is correct and I get to scratch build everything from the deck up. I've never built a plank-on-bulkhead ship so this is working out to be a good start towards that, I have built quite a few solid hull wood models and have the Model Shipways "Elsie" on the way. One thing; this model is really BIG! Highly recommended. OK the Lief sisters came in to the yard and reworked the scrolls. After they left, Leff Niepad and his rather stupid brother Wright showed up to plank the quarterdeck. They work silently, and I'm pleased with their progress. | | | on Wednesday, October 30, 2013 1:11 PM | | | on Wednesday, October 30, 2013 1:31 PM | | | on Monday, November 4, 2013 11:19 PM | | | on Wednesday, April 1, 2015 1:23 AM | | | on Wednesday, April 1, 2015 11:48 AM Mike | | | on Tuesday, June 9, 2015 11:23 PM | Our community is FREE to join. To participate you must either login or register for an account.  - PRODUCT REVIEWS
- READER GALLERY
  Crash of a Tupolev TU-154B-1 in Omsk: 178 killed 227th Motorised Rifle Division 227-я мотострелковая дивизия Military Unit: 31626 Activated 1978 in Omsk (Svetlyy), Omsk Oblast, as a mobilisation division. The division was unmanned, except for some pre-assigned officers, serving with the parent division ( 56th Training Motorised Rifle Division ). Organisation 1987: - 000 Motorised Rifle Regiment (Svetlyy, Omsk Oblast)
- 000 Tank Regiment (Svetlyy, Omsk Oblast)
- 000 Artillery Regiment (Svetlyy, Omsk Oblast)
- 0000 Anti-Aircraft Artillery Regiment (Svetlyy, Omsk Oblast)
- 000 independent Missile Battalion (Svetlyy, Omsk Oblast)
- 0000 independent Anti-Tank Artillery Battalion (Svetlyy, Omsk Oblast)
- 000 independent Reconnaissance Battalion (Svetlyy, Omsk Oblast)
- 000 independent Engineer-Sapper Battalion (Svetlyy, Omsk Oblast)
- 000 independent Communications Battalion (Svetlyy, Omsk Oblast)
- 000 independent Chemical Defence Company (Svetlyy, Omsk Oblast)
- 000 independent Equipment Maintenance and Recovery Battalion (Svetlyy, Omsk Oblast)
- 000 independent Medical Battalion (Svetlyy, Omsk Oblast)
- 0000 independent Material Supply Battalion (Svetlyy, Omsk Oblast)
Disbanded 1987. Storage Areas: - Svetlyy, Omsk Oblast, 1978 - 1987
Subordination: - Siberian Military District , 1978 - 1987
Divisional coordinates: - Omsk (Svetlyy) storage: 54 53 15N, 73 29 50E - co-located with the 56th Training Motorised Rifle Division
The division was maintained as a Mobilisation Division (US terms: Mobilisation Division) - manning was 0%. Equipment set present, older types, substantial equipment shortfalls. 1:56 Racing yacht AmericaTimeline for revell (h-361) yacht america, full history.  Missing info Kits are shown on the timeline when year and origin are filled in.  |


IMAGES
VIDEO
COMMENTS
Revell model kit in scale 1:56, 05416 is a rebox released in 2016 | Contents, Previews, Reviews, History + Marketplace | Racing yacht America | EAN: 4009803054162 ... Racing yacht America Yachts US Navy (1794-now) USS America. Box contents. Plastic sprue, Rope, Decalsheet (waterslide), Metal. Product timeline . Revell. 1969. 1974. 1992.
Fellow Modelers, Last year I posted an "A to Z Progress Build" of my 1/200 scale Nichimo I-19 Japanese Submarine. It was a lot of fun to do and got a good response so I have decided to do it again, this time building Revell's 1/56 scale yacht America. I do not have a lot of experience building sailing ships, so the build is pretty much ...
Revell Title: Yacht America Number: 5632 Scale: 1:56 Type: Full kit Released: 1993 New box Packaging: Rigid box (Top opener) Topic: Racing yacht America » Sailing ships (Ships) Box contents. Plastic sprue, Rope, Decalsheet (waterslide) Product timeline . Revell. 1969. 1974. 1992. 1993. 2016.
The Yacht America achieved instant and long-lasting fame by winning the prestigious 100 Sovereign Cup of the Royal Yacht Squadron on 22 August, 1851, off the Isle of Wight. ... The kit was first produced by Revell in 1969 and has been re-issued several times under various names. Originally named Yacht America, the 1974 armed re-issue was called ...
USS America. This is the 1/56 Scale Racing Yacht America Plastic Model Kit from Revell. Suitable for Ages 13 & Older. Revell of Germany # rvl05416. $42.25.
The Revell Yacht America is still a really good kit for sailing ship beginners. I painted the deck light tan, then brushed over it with brown pastel dust. Most of the pastel dust was burnished away and finally a very thin wash of the base tan color was sprayed over the area at random. All of these steps combined to give the deck a wide color ...
The reefing lines on the mainsail, Yankee Genoa, and staysail are a really nice touch and one most modelers unfamiliar with sailing vessels would overlook. I also think you were wise to use the vacformed sails as there is no way you could get the proper shape and draft in them using cloth and the tape idea looks great.
Revell 1/56 Yacht America 1851. Posted by lenroberto on Monday, January 5, 2009 9:19 AM Sort of rare 1/56 scale Revell kit- a beauty - of the yacht America from which the America's Cup races were named after her victory in 1851. A large kit- about 2 feet tall and 27 inches long- 6 inch beam. ...
Revell Yacht America photos. Posted by Goshawk on Friday, August 25, 2006 8:26 AM Here, as promised, are some photos of my finished Revell yacht America. A very pleasant build, and a great kit to get back into sailing ship model building. All comments welcome, good or bad. Tory . Reply; scottrc. Member since ...
This Revell model kit features an iconic Yacht America design, perfect for any collector or enthusiast. The kit includes all necessary parts for easy assembly and is ideal for those with limited building experience. The finished product is a beautiful and detailed replica of the original Yacht America, sure to impress any admirer. >The kit is specifically designed for those interested in ...
11.2.2016. Tags: USS-America-1782. SY America is a 19th and 20th century seagoing yacht, the keel of which was laid in 1850, and which was launched on May 3, 1851. The total length of the ship was 30.9 meters and a width of 6.96 meters. The total sail area was 492 m2. SY America is one of the most famous American seagoing yachts in the history ...
1. Location Austin, Texas. #1. Posted January 19, 2021. I am working on Bluejacket's America 1/48th scale. I am getting close to rigging and have started studying the rigging plans, such as they are. I am not a sailor by any stretch of the imagination, and am a bit unsure of a couple things I see. Most of the running rigging I can figure out ...
The full history of 5632 Revell Yacht America in scale 1:56, quickly see all reboxings and new tools. EN. scale modeling database | stash manager. News Feed Kits Paints Books Magazines Brands Shops Events Updates Language: EN. 1:56 Racing yacht America Timeline for Revell (5632) Yacht America Full history ...
America yacht - 1:56 Revell. Alphabetically Least expensive Most expensive Bestsellers. 10 items total . Yacht America 1:56 . Out of stock €43,12 excl. VAT. €52,17 Detail. Code: 173M/1. America 1:56 . Out of stock from €41,32 excl. VAT. from €50 ...
Revell 1/56 Racing Yacht USS America Plastic Model Kit - 80-5416. SKU: 4009803054162. Category: Plastic Ship Kits. The "America's Cup" race, the defining event in world Yacht Racing, is named after this vessel. It was designed to take speed sailing to a new level.
I think it was simplified "for beginning modelers," but the America was by nature a relatively simple subject in terms of hull, deck, and rigging. The bible on Revell kits, Thomas Graham's Remembering Revell Model Kits, says the kit was originally released in 1969, and describes it as being on 1/56 scale.
Circumstances: While descending to Omsk Airport, the crew encountered poor weather conditions and low visibility due to snow showers. On final, as he was unable to locate the runway, the captain abandoned the approach and initiated a go-around. Three other attempts to land were abandoned within the next minutes.
Revell Yacht 'America'. The Yacht America achieved instant and long-lasting fame by winning the prestigious 100 Sovereign Cup of the Royal Yacht Squadron on 22 August, 1851, off the Isle of Wight. Later, the trophy was renamed America´s Cup in her honour. Today, it is still one of the most prestigious sailing trophies in the world.
This past weekend I was fortunate to have the opportunity to attend the 20 th annual synod assembly of the ELCUSFE in Omsk. Just over 20 delegates from the "largest Lutheran synod in the world" 1 considered both practical and theological issues; the positive tone of the assembly was set by Bishop Otto Schaude and reinforced by a wonderful facility, excellent weather and common worship.
Revell Yacht America. Posted by GMorrison on Tuesday, October 8, 2013 1:13 PM Cup fever swept across the Bay Area this Fall, and I was bit hard. In addition to going to all of the races, I had the opportunity to see the replica of America up close. And, I picked up the model for a reasonable sum on eBay. ...
Other fatalities: 4. Total fatalities: 178. Circumstances: Following an uneventful flight from Krasnodar, the crew started the approach to Omsk Airport in a reduced visibility due to the night and rain falls. The aircraft landed at a speed of 270 km/h and about one second later, the captain noticed the presence of vehicles on the runway.
227th Motorised Rifle Division. 227-я мотострелковая дивизия. Military Unit: 31626. Activated 1978 in Omsk (Svetlyy), Omsk Oblast, as a mobilisation division. The division was unmanned, except for some pre-assigned officers, serving with the parent division (56th Training Motorised Rifle Division). Organisation 1987:
The full history of H-361 Revell Yacht America in scale 1:56, quickly see all reboxings and new tools. EN. scale modeling database | stash manager. News Feed Kits Paints Books Magazines Brands Shops Events Updates Language: EN. 1:56 Racing yacht America Timeline for Revell (H-361) Yacht America Full history ...