What is a Sailboat Jib?

Last Updated by
Daniel Wade
June 15, 2022
A sailboat jib is a triangular headsail located forward of the mast. The jib typically has less sail area than the mainsail.
Typical single-masted sailboats usually have a jib, which is located between the bow and the mast. The jib takes advantage of the forward part of the boat. The jib is not the only kind of headsail, but it is the most common.
Table of contents

Do Sailboats Need a Jib?
Many sailors often wonder if it's even worth hoisting the jib, especially on a windy day. The truth is that you typically don't need the jib to sail, though you're losing up to 50% of your sail area if you don't.
Under typical conditions, most sailors hoist the mainsail and the jib and reef them as necessary. On windy days, you may get on fine with just the mainsail. Whether or not to hoist the jib is entirely up to your judgment.
Trimming the Jib
The trim of the jib is usually controlled using two jib sheets , one on either side of the mast. This makes sense, as it would be hazardous and time-consuming to unwind a single sheet each time you turn, walk along the deck, and wrap it around the other side of the mast.
If you're sailing with the wind to your port side, you'll manipulate the jib using the starboard jib sheet. The opposite also applies when the wind is to your starboard side. Make sure to secure the correct sheet on the winch and free up the opposite sheet.
Can a Sailboat have Multiple Jib Sails?
Yes, sailboats sometimes have multiple jib sails. That said, not all headsails are jibs. Schooners often use two or three headsails. These include the jib, a smaller jib topsail, and sometimes a fore staysail.
The most common kind of American cruising sailboat is the single-mast sloop, which typically employs a single jib. That's why the vast majority of sailboats you see will only have one headsail.
What are Jib Sails Made Of?
Early jib sails were made of organic canvas-like cotton or a mix of organic fibers. Traditional jib sail material usually contains a mix of cotton, hemp, and other fibrous plant material.
Today, synthetic fabrics have largely replaced traditional canvas materials in sailmaking. Synthetic sails are lighter and stronger than their organic counterparts, and they resist water and weather better as well.
Polyester Jib Sails
Modern jib sails are made of a woven blend of polyester and other synthetic material. A material called Dacron is one of the most common sail fabrics due to its low cost, excellent UV resistance, and its tendency not to stretch. Dacron jib sails can be expected to last many years with minimal attention and few failures.
Nylon is another common sail material. Like polyester, nylon is an inexpensive and robust synthetic material that's great for sailmaking. Nylon is extremely lightweight, making it ideal for spinnakers. However, nylon stretches too easily for some applications, and it's prone to damage by some chemicals.
Kevlar Jib Sails
Kevlar is a relatively common sail material. It's considered a 'premium' fabric due to its cost and spectacular qualities. Kevlar has an excellent strength-to-weight ratio and resists stretching better than Nylon or Polyester. Due to its high cost, Kevlar sails are usually only found on racing sailboats and luxury yachts.
Parts of the Jib
The jib on a sailboat has many parts and mounting points, and it's important to understand where they are, what they do, and what they're called. The parts of the jib are similar to the mainsail, and you'll likely recognize them easily.
The foot is the horizontal section that runs across the base of the sail. It's usually a strip of reinforced sail material which keeps it from fraying. Think of the foot as the bottom of the jib.
The clew is the bottom corner of the jib, and it's located on the aft section of the foot. It usually contains a grommet. Since the jib is a triangular sail, the clew is the corner of its base 90-degree angle.
The leech is the long straight section of the jib that runs parallel with the mast. The leech runs from the clew at the foot of the sail to the very top.
Note that the orientation of the leech on the jib follows the direction of the mainsail and not the shape. In both cases, the leech is located on the aft part of the canvas.
The head of the jib is located at the very top and usually forms the smallest angle of this triangular sail. The head also contains a grommet similar to the clew.
Like the mainsail, the luff is located on the forward part of the jib. The luff is the longest section of the sail, stretching from the tip of the sail to the very bottom and forward end.
The tack is located directly forward of the clew on the opposite (forward) end of the foot. The tack, like the clew and the head, has provisions for rigging.
Traditionally, headsails like the jib are entirely unsupported by spars. However, many sailboat owners opt to install a jib boom to extend their bowsprits or improve off- wind sailing . A jib boom operates much like a traditional mainsail boom.
The jib boom mounts to the forward part of the bowsprit and pivots from its pedestal. A jib boom is useful when projecting the sail, but a spinnaker can typically be used to achieve the same result.
Some sailors caution against the use of jib booms, as they offer few benefits for windward sailing. Additionally, they take up space on the bow and pose the same hazards as a mainsail boom.
Jib vs. Genoa: What's the Difference?
The jib is often confused with the genoa: another common kind of headsail. The jib and the genoa look similar and perform the same function, but the genoa is larger.
A working jib typically makes up less than half of the total sail area, though it's sometimes around the 50% mark. The genoa, on the other hand, is usually equal to or larger than the mainsail.
The Genoa-type headsail is wider than the jib at the base. As a result, it doesn't fit between the tip of the bowsprit and the mast. Genoa sails stretch around the mast and extend far past it. This gives the genoa a distinct oversized look.
Reefing the Jib
Reefing is how you reduce the area of the sail. Reefing is necessary for windy conditions or when reducing speed. Jib reefing is a bit more complicated than mainsail reefing, as the jib doesn't always have a boom.
One way to reef the jib is to wind it around a roller furling starting with the luff. You can also reef the jib vertically using its reefing points and a few pieces of rope.
Roller Furlings
Roller furlings are an increasingly popular way to reef and stow headsails. Roller furling systems work for jibs and genoas and streamline the process significantly.
How a Roller Furling Works
A roller furling begins with a drum mounted at the base of the headstay and a swivel at the top, allowing the whole stay to rotate. The jib feeds through a groove in the headstay, which allows you to wind it up around the stay whenever necessary.
Roller furlings allow you to easily reduce sail area from the cockpit. Simply loosen the sheets and wind the furling using a line, and watch the jib shrink right in front of you. Roller furlings eliminate most haphazard trips across the deck to the bow and eliminate the need to hoist and lower the jib.
Electric Roller Furlings
Today there are numerous electrically-controlled roller furlings available. These devices are almost as easy to install as manual roller furlings, and they offer an additional level of convenience.
Electric roller furlings reduce deck clutter and decrease the labor required to sail your boat. However, electric furling systems are costlier than the majority of manual roller furling.
Related Articles
I've personally had thousands of questions about sailing and sailboats over the years. As I learn and experience sailing, and the community, I share the answers that work and make sense to me, here on Life of Sailing.
by this author
Sailboat Parts
Learn About Sailboats
Most Recent

What Does "Sailing By The Lee" Mean?
October 3, 2023

The Best Sailing Schools And Programs: Reviews & Ratings
September 26, 2023
Important Legal Info
Lifeofsailing.com is a participant in the Amazon Services LLC Associates Program, an affiliate advertising program designed to provide a means for sites to earn advertising fees by advertising and linking to Amazon. This site also participates in other affiliate programs and is compensated for referring traffic and business to these companies.
Similar Posts

Affordable Sailboats You Can Build at Home
September 13, 2023

Best Small Sailboat Ornaments
September 12, 2023

Discover the Magic of Hydrofoil Sailboats
December 11, 2023
Popular Posts

Best Liveaboard Catamaran Sailboats
December 28, 2023

Can a Novice Sail Around the World?
Elizabeth O'Malley

4 Best Electric Outboard Motors

How Long Did It Take The Vikings To Sail To England?

10 Best Sailboat Brands (And Why)
December 20, 2023

7 Best Places To Liveaboard A Sailboat
Get the best sailing content.
Top Rated Posts
Lifeofsailing.com is a participant in the Amazon Services LLC Associates Program, an affiliate advertising program designed to provide a means for sites to earn advertising fees by advertising and linking to Amazon. This site also participates in other affiliate programs and is compensated for referring traffic and business to these companies. (866) 342-SAIL
© 2024 Life of Sailing Email: [email protected] Address: 11816 Inwood Rd #3024 Dallas, TX 75244 Disclaimer Privacy Policy
No products in the cart.
Sailing Ellidah is supported by our readers. Buying through our links may earn us an affiliate commission at no extra cost to you.
A Full Guide to The Jib Sail And How To Use It
Most cruising boats today have a sail plan consisting of at least three sails: A mainsail, a headsail, and a light-wind sail.
The Jib sail (along with its sister, the Genoa) is one of the most widely used headsails on modern sailboats in combination with a larger mainsail. It is very versatile and easy to use in different configurations throughout most weather conditions.
In this article, I want to explain the Jib in detail and talk a bit about how it works and how we rig and trim it to get the most performance out of the boat. I’ll also show you each part of the sail and its materials before explaining how it differs from other headsails like the Genoa .
Finally, I’ll finish with some tips on maintaining the sail properly to make sure it last as long as possible.
Well, shall we get started?
What is a Jib sail, and what do we use it for?
The Jib is a triangular sail that does not overlap the mainsail. It is typically between 100% and 115% of the foretriangle size and is commonly seen on modern vessels with fractional rigs.
The foretriangle is the triangular area formed by the mast, deck, and forestay. Learn more terms here .
Like other headsails, the Jib is usually rigged on a furling system attached to the forestay , making it easy to operate. The Jib can also be rigged with a self-tacking system, making upwind sailing easy for you, whether you want to cruise solo or with your friends.
How the Jib works on a sailboat
The Jib provides a sail area forward of the mast, allowing the boat to be steered and balanced effectively.
The curved shape of the sail creates a pressure differential. The outer, more convex side (leeward side) has a lower pressure than the inner, concave side (windward side). This pressure differential generates lift, which translates into forward propulsion, much like how an airplane wing produces lift.
How to rig a Jib
You can rig the Jib on either a furling system or directly to the forestay. Most modern sailing boats are equipped with a furling system, which is a long sleeve that runs from the top of the mast down to the bow and attaches to a drum on the bottom and a swivel on the top.
Take a closer look at this step-by-step process on how to rig the Jib to sail onto a furling system:
- Feed the Jib’s luff into the track on the furler’s sleeve with the top of the sail first and connect the head ring on the sail to the chackle on the swivel.
- Attach the Jib halyard to the swivel and hoist the sail up.
- When the sail is hoisted almost all the way to the top, you attach the sail’s tack to a shackle on the top of the drum.
- Put the halyard on a winch and winch it tight.
- Now you have to manually roll up the sail around the forestay and tie on the two sheets to the clew of the sail.
- Lead the two sheets on each side of the vessel’s side decks through the sheet cars, turn blocks, and back to the winches.
- Now that the sail is furled away, we need to tie the furling line onto the drum. You have to figure out how the furling line attaches, as it differs from system to system.
- Once the furler line is attached to the drum, ensure that it can wrap itself up freely.
- Pull the sail back out using one of your sheets and monitor that the furling line wraps on nicely.
- Leed the furling line through the blocks and funnels, through the jammer , and leave it next to the winch.
- Furl the sail away again using the furling line and ensure that the sheets run freely as you monitor your sail getting wrapped nicely around the forestay.
- Secure the furler line jammer and tidy up your two sheets. Make sure to secure the sheets around the winches.
So, you see now why most boats use furling systems? It is easy! Many larger sailboats even have electrical furlers, removing the need for the furling line.
How to use, reef, and trim a Jib
To use the Jib, you wrap the furler line around the winch, open the jammer, and pull on either of the sheets, depending on which tack you are sailing on. You should hold on to the furler line to prevent the sail from unfurling itself uncontrollably, especially in strong winds. Trying to catch it if it starts running can injure your hands, so be careful! I’m speaking from experience here; burned hands are “No bueno.”
You can now unfurl the entire sail or a part of it. Once the full sail, or the amount you desire, is out, adjust your car position and tighten the sheet.
How to reef a jib
You do the opposite as the above to reef the sail or furl it back in.
Ease off the working sheet, but keep it on the winch. At the same time, pull in on the furler line either manually or on the winch. Remember to move the cars forward and re-tighten the sheet if you are reefing away only a part of the Jib.
How to trim a jib
Adjusting the sheet cars and sheet tension is important to obtain an optimal sail shape in the Jib. Finding this balance is what we call sail trim . I’m not going too deep into sail trim here, as it is a topic for itself, which will require a separate article,.
But here is a rule of thumb:
You want the leech and foot of the sail to form an even “U” shape on any point of sail . When sailing upwind, you usually move the car aft. When bearing off the wind, you move the car forward.
The goal is to apply even tension on both the foot and the leech. When you reef the sail, you’ll also want to move the car forward to adjust for the reduced sail area. Sailing downwind doesn’t require the same fine-tuning as upwind sailing.
Four tips for sailing upwind:
- Winch up the jib sheet until the leech stops fluttering and the foot has a nice, even “U” shape.
- You must move the sheet car forward if the foot is tight and the leech flutters.
- Move the sheet cars aft if the leech is tight and the foot flutters .
- If the wind increases and the boat starts to heel excessively, you can either ease off the sheet or adjust your course more head to wind.
You should play around and experiment with sail trim, as every boat behaves differently. Trimming sails is an art that takes time to master. Staysails, Jibs, and Genoas are trimmed the same way, but the car positions will be different due to their size and shape differences. Once you learn how to trim a Jib, you’ll be able to trim any headail and even a storm jib or a spinnaker.
Sailing with more than one Jib
Sailing with multiple jib sails can be beneficial on longer downwind passages. Most furling systems have two tracks, allowing you to have two Jibs on the same furler, making this setup easy to reef. You can do the same with Yankees and Genoas, depending on what you have available in your boat.
Some sailboats have two or more forestays, allowing them to have two individually furled Jibs. This is usually called a cutter rig. Most Cutter rigs, however, use a Staysail on the inner forestay and a Yankee sail on the outer, but this versatile rig allows you to experiment with many setups.
Exploring the different parts of the Jib
Head: The head is the top corner of the Jib. It typically has a ring in the top corner that attaches to the Jib halyard or the top swivel for furling systems.
Leech: The leech is the aft part of the rib, located between the clew and head.
Luff : A Jib’s luff is the front part between the tack and head. Jibs can be equipped with luff foam to help maintain their shape when partially reefed on a furler.
Clew : The clew is the aft lower corner of the jib where the sheets are attached.
Tack : The tack is the lower, forward corner of the Jib. The tack is connected to a furler drum on the forestay on most sailboats. Vessels using traditional hank-on headsails connect the tack to a fixed point on the bow.
Foot : The foot of the Jib is the bottom portion of the sail between the clew and the tack.
Telltales: Telltales are small ropes, bands, or flags attached to the front of the Jib’s leech to help us understand how the wind affects the sail and allow us to fine-tune the trim for optimal performance.
Commonly used materials for the Jib
The most common material used for Jib’s today is Dacron woven polyester, followed by CDX laminate due to the relatively affordable price. Continuing up the range, we find woven hybrids like Hydranet, Vectran, Radian, and other brands.
Then, we have advanced laminates with Aramids, carbon, kevlar, and more exotic materials. At the top of the spectrum, we find the latest technology in DFi membrane sails like Elvstrøms EPEX or North Sails 3Di, which comes at a premium price tag.
These days, however, modern technology has given us warp-oriented woven cloth, which is becoming a popular option due to its increased ability to keep shape over time without stretching as much as traditionally cross-cut dacron sails. ProRadial, made by Contender and Dimension Polyant, is a good example. North Sails has an excellent article that goes in-depth on sail materials.
The difference between a Jib and a Genoa
The difference between a Jib and a Genoa is that the Jib is a headsail that does not overlap the mainsail, while the larger Genoa is designed to overlap the mainsail. While the smaller Jib is excellent at pointing upwind and easier to handle, the larger Genoa excels on any points of sail with the wind behind the beam.
Genoas are usually larger than 115% of the foretriangle , with sizes ranging from 120% to 150%. They are often used on yachts with masthead rigs and smaller mainsails but are also common on fractional rigs.
How to Maintain and Care for Your Jib Sail
Good maintenance and care of your Jib will ensure optimal performance and minimize wear and tear. Check out these tips on how to maintain and protect your Jib:
- Rinse the Jib with fresh water regularly and leave it up to dry before packing it away. Proper drying will prevent moisture and mildew.
- Give the sail a service once a year. Check for any damaged seams and repair them if necessary. If there are any chafing marks, reinforce the sail with patches on chafe points and add shafe guards to the equipment it rubs against.
- Protect the sail from UV rays by keeping it packed away when not in use. A furling Jib can be protected by adding a UV strip to the foot and leech.
I also wrote an article on how to make sails last longer .
Final Words
We have talked a lot about the Jib’s features and how it works in this article. I recommend you to head out and set sail to get some experience and play around with your sails. If you don’t have a boat, chat around in your nearest marina; someone will for sure bring you along for a sail. I know I would.
Remember to experiment with sail trim and practice tacking and maneuvering the vessel with the sail on both the port and starboard sides.
If you still have questions, check out the frequently asked questions section below or drop a comment in the comment field. I’ll be more than happy to answer any of your questions!
PS: Explore more sails in my easy guide to different types of sails here .
FAQ – The Jib Sail Explained
When to use a jib sail.
The Jib is an excellent sail for most conditions, especially when cruising at any angle towards the wind. The Jib has a benefit over the Genoa in strong winds as it is easier to handle, and its smaller size makes it more effective than a reefed Genoa when sailing to windward.
Can you sail with just the Jib?
It is possible to sail with just the Jib alone, and it works exceptionally well downwind on deep angles where the mainsail usually would have blocked off the wind.
Can you sail upwind with just the jib?
It is possible to sail upwind with just the Jib, but most sailboat owners prefer to balance their boats by flying their mainsail combined with theiJib when sailing to windward.
What is the difference between a Genoa and a Jib?
The Genoa is different from a Jib sail as it is larger and overlaps the mainsail, whereas the Jib is smaller and does not overlap the mainsail.
Sharing is caring!
Skipper, Electrician and ROV Pilot
Robin is the founder and owner of Sailing Ellidah and has been living on his sailboat since 2019. He is currently on a journey to sail around the world and is passionate about writing his story and helpful content to inspire others who share his interest in sailing.
Leave a Reply Cancel reply
Your email address will not be published. Required fields are marked *
How To Use a Jib on a Sailboat (Here’s What You Need To Know)

If you’re a sailor looking to maximize your control of your sailboat, learning how to use a jib is essential.
A jib is a triangular sail mounted at the bow of the boat and is a key component in controlling the speed and direction of your boat.
This article will provide an overview of what a jib is and how to use it, including understanding the forestay, adjusting the jib sheet, positioning the jib, trimming the jib, and practicing with a jib.
Plus, we’ll provide a few tips to ensure you get the most out of your jib.
Read on to discover everything you need to know to use a jib on a sailboat.
Table of Contents
Short Answer
A jib is a triangular sail that is set on a stay in front of the mast of a sailboat.
To use a jib, the sheet attached to the clew of the sail must be pulled in to bring the sail around so that the wind fills it.
The sheet should be adjusted to keep the sail trimmed properly while sailing.
The jib can also be used to help turn the boat, by easing the sheet and allowing the sail to swing out to the windward side.
What is a Jib?
A jib is an essential component of a sailboat, as it provides the boat with increased control and maneuverability on the water.
A jib is a triangular sail that is mounted on the front of the boat, also known as the bow.
It is attached to the forestay, a metal cable that runs from the bow of the boat to the mast.
The jib is used to create lift, allowing the sailboat to move more quickly and efficiently through the water.
The jib works in conjunction with the main sail, providing additional power and control when sailing.
It can be adjusted to the wind direction and the desired angle of the sailboat, which can help to increase the speed of the boat and improve its performance in different wind conditions.
Additionally, the jib can also be used to help the boat turn and maneuver in tight spaces, such as when entering a harbor or marina.
In order to use a jib on a sailboat, the jib must first be raised and secured to the forestay.
This is usually done by attaching it to the luff groove, which is a groove along the edge of the sail that slides onto the forestay.
Once the jib is secure, the jib sheet is used to control the jibs angle and direction of travel.
The jib should be adjusted according to the wind direction and the desired angle of the sailboat.
Finally, the jib trim is adjusted, which will keep the jib in the optimal position for smooth sailing.
With practice, sailors can become proficient in using a jib to their advantage.
Understanding the Forestay

When it comes to using a jib on a sailboat, understanding the importance of the forestay is essential.
The forestay is the metal cable that runs from the bow of the boat to the mast.
It plays an integral role in the efficiency and maneuverability of the boat, as it is the connection point for the jib sail.
Without the forestay, the jib cannot be raised and secured, which limits the boats performance.
Knowing how to properly adjust and maintain the forestay is key to using a jib correctly and efficiently.
When raising the jib, the forestay should be taut to hold the jib in place.
It is essential to make sure that the forestay is not too loose, as it could cause the jib to flutter and lose its shape.
Additionally, the forestay should not be too tight, as it will increase the strain on the jib and could cause damage.
The tension of the forestay should be adjusted to achieve the optimal balance between stability and sail shape.
In addition to ensuring the proper tension of the forestay, it is important to pay attention to the alignment of the forestay with the mast.
If the forestay is misaligned with the mast, it can disrupt the wind flow and cause the jib to flutter.
This fluttering can be prevented by ensuring the forestay is properly aligned.
By understanding the role of the forestay and how to adjust it correctly, sailors can use a jib to their advantage and improve their sailing performance.
With practice, sailors can become proficient in using a jib and the forestay to achieve the desired angle and direction of travel.
Adjusting the Jib Sheet
Adjusting the jib sheet is a key part of using a jib on a sailboat.
The jib sheet is a rope or line that is attached to the clew of the jib and runs to the cockpit or winch, allowing the sail to be adjusted to the appropriate position and angle.
It is important to ensure that the jib sheet is securely attached to the clew of the jib before sailing.
Additionally, the jib sheet should be adjusted to the correct tension depending on the wind conditions.
If the jib sheet is too loose, the jib will flog and be ineffective.
If the jib sheet is too tight, the sail will be over-trimmed and the boat will be slower.
To find the optimal jib sheet tension, try different tensions and angles and make sure to pay attention to how the boat responds to the changes.
With practice, you will be able to determine the best tension for the jib sheet.
Positioning the Jib

Positioning the jib on a sailboat is an important step for any sailor looking to make the most of their sailing experience.
While the jib is an essential component of a sailboat, it is also essential to understand how to properly use it.
In order to use a jib, the jib must first be raised and secured to the forestay, which is the metal cable that runs from the bow of the boat to the mast.
The jib sheet is then used to control the jibs angle and direction of travel.
It is important to pay attention to the wind direction and adjust the jib accordingly.
The jib should be adjusted to be perpendicular to the wind direction, and this angle should be kept consistent during the sail.
This helps to ensure that the sailboat will move in the desired direction, and that the jib will provide optimal lift.
Sailors should also adjust the jib trim, which is the tension on the jib sheet.
The jib trim should be adjusted according to the wind conditions to keep the jib in the optimal position for smooth sailing.
Too much tension on the jib sheet can cause the jib to backwind, which can slow down the boat and make it difficult to maneuver.
Too little tension can cause the jib to luff, which can reduce the lift provided by the sail.
Finally, with practice, sailors can become proficient in using a jib to their advantage.
Utilizing the jib to its fullest potential can help to optimize speed and control, and make the sailing experience even more enjoyable.
Trimming the Jib
Trimming the jib is a crucial part of using a jib on a sailboat.
This is the step that will ensure the jib is in the optimal position for the best sailing experience.
The jib trim should be adjusted according to the wind direction and the desired angle of the boat.
When the wind is coming from a certain direction, the jib will need to be adjusted accordingly.
If the wind is coming from the starboard side, the jib should be adjusted to the right.
If the wind is coming from the port side, the jib should be adjusted to the left.
In addition to adjusting the jib to the wind direction, the jib trim should also be adjusted to the desired angle of the boat.
This will help to maximize the performance of the boat and ensure that the jib is in the best position for sailing.
The jib trim should be adjusted so that the angle of the jib is roughly the same as the angle of the boat.
This will ensure that the jib is properly positioned and will help to maximize the performance of the boat.
Finally, the jib trim should be adjusted periodically to ensure that the jib is in the best position for sailing.
This can be done by observing the jib and adjusting the trim as necessary.
By trimming the jib correctly, sailors can improve their sailing experience and make the boat faster and easier to navigate.
Practicing with a Jib

Using a jib on a sailboat requires practice and skill to become proficient.
While learning the basics of how to use a jib is important, it is also necessary to gain an understanding of the wind and how it affects the sailboat.
By learning the basics of how a jib works and how to adjust it, sailors will be able to use the wind to their advantage.
The jib should be raised and secured to the forestay, which is the metal cable that runs from the bow of the boat to the mast.
Next, the jib sheet is used to control the jibs angle and direction of travel.
This is done by adjusting the tension on the sheet, which will affect the angle of the sail and the direction of the boat.
The jib trim is then adjusted to keep the jib in the optimal position for smooth sailing.
To practice using a jib on a sailboat, it is important to start slowly and focus on learning the basics.
Begin by familiarizing yourself with the wind and understanding how the direction of the wind affects the sailboat.
Once you understand the basics, you can experiment with different angles and settings to see how the jib affects the boats speed and direction.
As you become more comfortable and experienced with using a jib, you can begin to practice more advanced maneuvers, such as tacking, jibing, and reefing.
These maneuvers can be used to control the speed and direction of the sailboat, and can make the sailing experience more enjoyable.
Sailing with a jib can help to make the boat faster and easier to navigate, and can enhance the sailing experience.
By understanding the basics of using a jib and practicing regularly, sailors can become comfortable and confident in their ability to use a jib to their advantage.
Tips for Using a Jib
Using a jib on a sailboat is a great way to increase control and maneuverability while sailing.
A jib is essentially an additional sail that can be attached to the forestay, a metal cable running from the bow of the boat to the mast.
It is important to know the basics of how to use a jib in order to maximize the sailing experience.
Here are some tips to help you get started.
First, it is important to ensure that the jib is properly raised and secured to the forestay.
This can be done by attaching the jib’s clew, or the corner of the sail, to the forestay using a wire or cable.
It is also important to make sure that the jib is taut and free of wrinkles or creases.
Once the jib is in place, the jib sheet can be used to control the jib’s angle and direction of travel.
This is done by adjusting the jib sheet, which is a rope connected to the corner of the jib, in order to change the tension of the sail.
It is important to adjust the jib sheet according to the wind direction and the desired angle of the sailboat.
This will ensure that the jib is in the optimal position to take advantage of the wind.
Finally, the jib trim should be adjusted.
This is done by using the jib sheet and the jib halyard, which is a rope that runs from the top of the jib to the deck.
By adjusting the tension of the jib halyard, the angle of the jib can be changed to keep it in the best position for sailing.
Using a jib correctly can help to improve the sailing experience and make the boat faster and easier to navigate.
By following the tips outlined above, sailors can get a better understanding of how to use a jib on a sailboat and maximize their sailing experience.
Final Thoughts
Using a jib on a sailboat can make sailing smoother, faster, and more enjoyable.
With a solid understanding of the components and the proper technique, anyone can become a pro at using a jib.
It just takes a little practice, patience, and understanding of the wind direction.
With the right know-how, you’ll be sailing like an expert in no time!
James Frami
At the age of 15, he and four other friends from his neighborhood constructed their first boat. He has been sailing for almost 30 years and has a wealth of knowledge that he wants to share with others.
Recent Posts
When Was Banana Boat Song Released? (HISTORICAL INSIGHTS)
The "Banana Boat Song" was released in 1956 by Harry Belafonte. This calypso-style song, also known as "Day-O," became a huge hit and remains popular to this day for its catchy tune and upbeat...
How to Make Banana Boat Smoothie King? (DELICIOUS RECIPE REVEALED)
To make a Banana Boat Smoothie King smoothie at home, start by gathering the ingredients: a ripe banana, peanut butter, chocolate protein powder, almond milk, and ice. Blend the banana, a scoop of...
Better Sailing

Jib Vs Genoa: What is the Difference?
Most modern sailboats don’t need big overlapping headsails to ensure performance when sailing upwind. In the old days, sailboats were really heavy, their keels were long, and the sail area was the most crucial part that made the boat moving. However, nowadays light masts and rigging are available and facilitate many things while sailing. For example, if you increase the mast’s height and apply a high-aspect sail plan with a jib that overlaps no more than 105%, well this is quite an efficient rigging. So, are you are thinking of going offshore and wondering what sails are the best for your sailboat? Do you want to clarify the difference between a jib and a genoa? Then, follow me and keep reading!
Description of a Genoa
The main characteristics of a genoa are its shape and size. Genoas go past the mast, are triangular, and tend to overlap the mainsail, to some extent. It’s also one of the many headsails that can be set on a Bermudian rig. The numbers 130,150 etc refer to a percentage that has to do about the relationship of the length of the foot of the genoa and from the forestay to the front of the mast. As a result of this operation, i.e. the Luff Perpendicular divided by J (the distance), you get the overlap percentage of the sail.
Keep in mind that the larger the number you get the larger the sail would be. In general, in order to measure genoas, we often use the length of their Luff Perpendicular. In order to construct the LP, you can draw a line from the sail’s clew to the luff, and carefully intersect the luff at the right angle.
Description of a Jib
The Jib is also a triangular sail that increases sail area and improves handling. Therefore, it increases the sailboat’s speed. Basically, the mainsail controls the stern of the ship whereas the headsail, which sits forward the mast, is most of the time a jib. One of the main functions of the Jib is that it funnels the airflow along the front of the mainsail. This improves the airflow. Moreover, the jib gives control over the bow of the boat, thus making it easier to maneuver the boat. There are different sizes for a jib with the smallest being a storm jib.
In case the boat has a furler, then the size of the genoa or jib can be adjusted according to the wind’s strength, direction, and speed. Usually, jibs are 100% to 115% LP and are used in areas with strong winds. Also, a jib won’t be longer than 115% LP of the fore-triangle dimensions. Lastly, to ensure better performance in high wind speed the smaller area of the jib the better.

>>Also Read: Names of Sails on a Sailboat
Genoa VS Jibs – What Is The Difference Between Them?
Generally, Jibs and Genoas are triangular sails that are attached to a stay in front of the mast. Jibs and genoas are employed in tandem with the mainsail in order to stabilize the sailboat. They usually run from the head of the foremast to the bowsprit. A genoa is like a jib but is larger and reaches past the mast. But, as aforementioned, when the jib overlaps the mast we refer to it as a genoa. Also, a genoa overlaps the mainsail to some degree. Both sails are measured by their Luff Perpendicular percentage, i.e. the area within the fore-triangle that they use. Sometimes, there are large genoas that cover the majority of the mainsail. This mainly happens in light wind conditions where the most sail area is used to increase performance.
And again, when the headsail doesn’t overlap the mast is considered a jib. On the other hand, an overlapping sail is a genoa. Generally, smaller jibs are more lightweight, less expensive, and easy to handle. Jibs might also have a better lifespan as their leeches aren’t dragged across the mast, shrouds, and spreaders. So, all these characteristics make the jibs easier to trim and change. Furthermore, as they weigh less they will heel and pitch less. Lastly, keep in mind that there are different sailcloths weights, and materials that can be used on jibs and genoas. The sail design of each sail is always based on the type of sailboat and the sailing conditions will determine the sailcloth’s weight.
Having Multiple or Less Sails on your Sailboat
In case your sailboat has a larger genoa then you ought to think about getting a smaller headsail. For example, a sail with an LP of around 115% or maybe less. You can use the smaller sail when the wind is getting stronger and keep your genoa in storage. It’s essential to store, protect, and generally take care of your sails a few times per year. So, it’s recommended to often change your sails once in a while. Remember that for every boat has its own sail plan. For example, a boat might need one, two sails, three, etc that will enhance its performance. Each one used for different weather conditions and for different sailing plans.
The rule of thumb says that the fewer the sails less the drag will be. Meaning that you can sail higher to the wind with a single sail rather than having multiple sails of the same aspect ratio and total area. Furthermore, for the same total sail area and same geometrical shape, having multiple sails means that they’ll be less tall. In other words, they’ll catch slower wind closer to the ground. However, for the same total sail area, multiple sails will provide less heeling. This means that you can have lighter structures that support them.
Sail Area and Furling
In the old times, boats used to have long and shallow keels therefore it was crucial to fly a significant amount of sail in order to produce horsepower. But, when a vessel has a light material construction, light masts, and rigging then the height of the mast can be taller without having an effect on the righting moment. So, an overlapping jib, around 115%, results in more efficiency and less dependence on the additional overlap. But, when furling away sail shape from a large genoa you might reduce the sail’s shape efficiency. This is because when using a genoa for strong winds, it’s going to gradually cause an uneven stretch to the Dacron.
Remember that not all sails suit for all kinds of boats. Some boat owners might recommend a specific sail for a specific vessel. But the most important factors that determine what sails suit your boat are the location in which you sail, the type of the vessel, and the captain’s experience. For example, a sail made for Oceanis 331 in Florida will be completely different than a sail made for the same boat that sails in the Meditteranean.
But, what is the best sail size for cruising boats? A 130 or 135% headsail is great because this sail shape is flat thus can be reefed efficiently. However, a 130% headsail doesn’t have a good sheeting angle but is great for offshore sailing. On the other hand, non-overlapping headsails have a narrow sheeting angle so they’re not appropriate for offshore sailing.
In general, light-air sails are large sails and need adequate camber depth to work in light winds. So, when rolling them up and use them reefed you can’t take in enough of the camber to make the sail work windward. And that’s why there are several roller-furling headsails that include lengths of rope or a strip of dense foam that runs along the luff of the sail from the head to the tack.
Apart from that, any sailboat traveling offshore is going to need a small 130% headsail in order to withstand harsh weather conditions. It’s always better to use more than one headsail when voyaging overseas. Last but not least, don’t forget to take into consideration the trade-offs when sailing upwind.
Improve your Sailboat’s Performance
As aforementioned, remember that the most crucial factors that determine the right sail size for your sailboat are the type of your vessel and the kind of passage you’re planning. There are certain things that you can do to improve your sails’ performance, no matter the kind of headsail you have. The first one refers to adding a means of adjusting the sheeting position when reefing and unreefing the headsail. For instance, you can add a block-and-tackle system that can pull the genoa lead forward when the sail is reefed. And when unreefed you can ease it aft. Generally, when moving a lead forward or aft, this changes the angle at which the sheet pulls down on the clew. And when pulling the clew down it trims the top of the jib, but when moving it aft it opens the top of the jib.
The Bottom Line
Modern technology and sail engineering have improved the development of sailcloths, sails’ versatility, and design tools to enhance their performance. Nowadays, you can choose between different types of sails according to the type of your sailboat, location, and experience. So, what’s the difference between a jib and a genoa? In order to clarify the main difference between a jib and genoa you should bear this in mind: When the foot of the headsail is longer than the distance from the forestay to the mast then we refer to a Genoa. Otherwise, the headsail is called a Jib. Basically, a genoa is a large jib that reaches past the mast and overlaps the mainsail. I hope that by reading this article you made clear the difference between a jib and a genoa and how you can enhance your sails’ performance. Wish you a lot of adventurous voyages to come!

Peter is the editor of Better Sailing. He has sailed for countless hours and has maintained his own boats and sailboats for years. After years of trial and error, he decided to start this website to share the knowledge.
Related Posts

Lagoon Catamaran Review: Are Lagoon Catamarans Good?

Best Inboard Boat Engine Brands

Are O’Day Sailboats Good? A Closer Look at a Classic Brand

Why Do Sailboats Lean?
- Buyer's Guide
- Destinations
- Maintenance
- Sailing Info
Hit enter to search or ESC to close.

Learn How To Jibe a Sailboat – Essential Techniques & Tips
Alex Morgan
Jibing, also known as gybing, is a fundamental skill in sailing that every sailor must learn. It involves changing the direction of a sailboat by bringing the stern of the boat through the wind. Proper jibing technique is essential for a safe and smooth maneuver, ensuring the boat maintains control and speed throughout the process.
Understanding the basics of jibing is crucial before attempting the maneuver. This includes comprehending how the wind affects the sails and how to adjust them for a successful jibe. Jibing incorrectly can lead to accidents, damage to the boat, or even capsize.
In this article, we will provide a step-by-step guide on how to jibe a sailboat, covering everything from preparation and communication to the proper handling of the sails and steering. We will also highlight common mistakes to avoid during the maneuver, such as failing to communicate or mishandling the mainsail.
To help improve your jibing skills, we will share some useful tips and techniques for a successful jibe, including maintaining control and speed during the maneuver. With practice and the right approach, you can become proficient in jibing and enjoy the exhilaration of navigating your sailboat with ease.
Stay tuned for the following sections, where we will dive deeper into the details of jibing a sailboat and provide valuable insights to enhance your sailing experience.
Key takeaway:
- Proper jibing technique is crucial: Understanding the basics of jibing and executing it correctly is essential for safe and efficient sailboat handling.
- Step-by-step guide for successful jibing: Following a systematic approach that includes preparation, communication, sail trimming, and balancing the boat is key to executing a smooth jibe.
- Avoid common mistakes: Failing to communicate, allowing the jib to backwind, mishandling the mainsail, and oversteering or understeering are common mistakes to be avoided during the jibing process.
What is Jibing?
Jibing , a crucial maneuver in the world of sailboats, is an art that requires precision and skill. In this section, we’ll unravel the essence of jibing by diving into the basics. Get ready to grasp the fundamental concepts and techniques behind this maneuver, and discover how it can enhance your sailing experience. So buckle up and prepare to explore the intricacies of jibing like never before!
Understanding the Basics of Jibing
Understanding the basics of jibing is important for sailboat enthusiasts. Here is a step-by-step guide to help you grasp the fundamentals:
1. Prepare yourself and the boat for the jibing maneuver. Ensure you have enough space and the necessary equipment.
2. Communicate with your crew members or passengers about the upcoming jibing maneuver. Clear and concise instructions are vital for a successful jibe .
3. Ease the jib sheet gradually, allowing the sail to luff and depower. This step ensures a smooth transition during the jibe .
4. Shift the mainsail by releasing the mainsheet while pulling in the new leeward sheet. This action helps the sail move smoothly to the opposite side.
5. Steer and change course smoothly to initiate the jibe . Maintain control of the boat and be aware of the wind direction and potential obstacles.
6. Trim the jib by pulling in the new leeward sheet to fill the sail with wind on the new course.
7. Stabilize and balance the boat after completing the jibe . Adjust the sails and the boat’s position as needed to maintain control and optimize speed.
Understanding these steps will enhance your jibing skills and contribute to a safe sailing experience. Practice and experience are important in mastering the art of jibing . Always prioritize safety and communicate effectively with your crew for a successful jibe .
The Importance of Proper Jibing Technique
Proper jibing technique is of utmost importance for sailboat maneuvering. It is crucial for ensuring smooth transitions when changing direction. The significance lies in control , accident prevention , and speed optimization . To effectively execute a successful jibe, follow these steps:
1. Prepare the crew: Communication is key to ensure that everyone is ready and fully aware of their responsibilities for the maneuver.
2. Trim the sails: Adjust the settings to optimize power and maintain balance for optimal performance.
3. Steer gradually: Turn the boat slowly and smoothly, allowing the sails to naturally transition to the opposite side.
4. Coordinate the crew: Work together in a synchronized manner to smoothly move the sails across the boat, avoiding any obstructions or tangling.
5. Complete the turn: Once the jibe is done, steady the boat’s course and make any necessary adjustments to maintain control.
Practicing and refining proper jibing technique can significantly enhance sailing proficiency and ensure safety on the water.
Fact: A well-executed jibe has the potential to improve a sailboat’s speed by approximately 10-15% due to better wind exposure on the new tack.
Why is it Important to Jibe Correctly?
Jibing a sailboat correctly is important for the safety of the crew and boat control. By jibing correctly , you prevent accidents, protect sails and rigging, maintain control, preserve boat speed, and improve performance .
Jibing incorrectly can cause accidents like forceful gybing or losing control of the boat, leading to sail and rigging damage. Correct jibing reduces strain on sails and rigging, preventing tears or breakages. Proper jibing allows smooth direction changes, avoiding sudden movements that disrupt balance.
Furthermore, correct jibing maintains momentum and prevents unnecessary loss of speed. Ultimately, proper jibing enhances overall efficiency and navigation success. So, why is it important to jibe correctly ? Because it ensures the safety of the crew, prevents accidents, preserves the condition of sails and rigging, maintains control, preserves boat speed, and enhances performance.
Step-by-Step Guide on How to Jibe a Sailboat
Get ready to set sail with our step-by-step guide on how to jibe a sailboat! We’ll walk you through the process, starting with the crucial preparations and communication. Then, we’ll show you how to smoothly ease the jib sheet and shift the mainsail . As we change course, we’ll also cover steering techniques and the importance of trimming the jib . Don’t forget the final steps of stabilizing the boat and finding that perfect balance. Get ready to master the art of jibing and take your sailing skills to new heights!
Step 1: Preparation
The first step in jibing a sailboat is Preparation . Proper preparation is necessary for a smooth and successful maneuver. Here are the steps to follow:
– Check the wind direction : Assess the wind direction to determine the appropriate course of action and ensure safety.
– Secure loose items : Properly secure all loose items on the boat, including equipment, personal belongings, and anything that could cause damage or injury during the jibing process.
– Inform the crew : Communicate with the crew members and inform them about the upcoming maneuver. Everyone should be aware of their roles and responsibilities during the jibe.
– Prepare the sails : Get the jib and mainsail ready for the jibe by adjusting the tension in the sheets and the angle of the sails.
– Check the surroundings : Look around the boat to make sure there are no obstacles or other vessels nearby that could pose a risk during the jibe.
– Position the helm : Turn the helm in the direction of the intended jibe for a smooth turn and to maintain control of the boat.
– Communicate with the crew : Before starting the jibe, talk to the crew members to ensure they are ready and understand the plan. Clear communication is essential for a successful jibe.
By following these steps, you can prepare yourself properly for a jibe and improve the chances of a safe and controlled maneuver.
Step 2: Communication
Step 2: Communication is crucial for jibing a sailboat and ensuring safety and coordination. Follow these steps:
1. Establish clear communication lines between the helmsman and crew members.
2. The helmsman should give clear and concise instructions using simple commands.
3. Before starting the jibing maneuver, the helmsman should inform the crew members about the upcoming maneuver and its direction.
4. Ensure all crew members acknowledge and understand the helmsman’s instructions.
5. Maintain continuous communication throughout the jibing process to update the crew members about any changes or adjustments.
Effective communication during jibing helps prevent accidents, minimizes confusion, and ensures smooth execution of the maneuver by the entire team.
Step 3: Easing the Jib Sheet
To properly ease the jib sheet during a sailboat jibe, follow these steps:
1. Prepare for the jibe by ensuring all crew members are aware and in their positions.
2. Communicate with the crew about the upcoming jibe for safety and coordination.
3. Slowly and smoothly ease the jib sheet by gradually releasing tension, allowing the sail to luff slightly. The amount you ease the sheet depends on wind conditions and the degree of the jibe. This step is crucial in maintaining control and stability during the maneuver.
4. Monitor the position of the jib as you ease the sheet. It should gently backwind during the jibe to stabilize the boat and facilitate the turn.
5. Steer the boat smoothly during the turn, making sure the jib does not cross the boat too quickly.
6. After completing the jibe , trim the jib sheet in the new position to regain power and control.
7. Maintain stability and balance by adjusting other controls such as the mainsail and the centerboard or keel.
To ensure successful jibes and skillful handling of the sailboat:
– Practice these techniques regularly.
– Maintain clear communication with the crew.
– Adapt to the specific wind and water conditions while sailing.
Step 4: Shifting the Mainsail
- Shift the mainsail by releasing it from its current position and preparing to move it to the opposite side of the boat.
- Ensure that the crew is aware of the maneuver and ready to handle the mainsail.
- Gradually ease out the mainsheet as the wind fills on the opposite side.
- Guide the mainsail smoothly across the boat using your body weight and strength. Avoid letting it swing uncontrollably to prevent accidents or sail damage.
- Maintain control by gradually trimming the mainsheet on the new side as the mainsail crosses over.
- Ensure that the mainsail is properly trimmed and adjusted to the new wind angle for balance and optimal performance.
- Monitor the sail shape and make any necessary adjustments to optimize its position.
To successfully shift the mainsail during a jibe , effective communication , controlled handling of the mainsheet, and gradual adjustments for stability are crucial. Mistakes in this step can result in loss of control or sail damage, so it is essential to practice and develop the necessary skills for a smooth mainsail shift during jibing.
Step 5: Steering and Changing Course
Steering and changing course is crucial for jibing a sailboat, requiring coordination and precision.
1. Shift the mainsail and smoothly steer the boat towards the new course by turning the tiller or wheel.
2. Avoid sudden or jerky movements to prevent destabilizing the boat or losing power in the sails.
3. Monitor the wind direction and adjust steering to maintain proper angle and sail trim for a smooth transition.
4. Be aware of other boats or obstacles nearby and make necessary course adjustments to avoid collision.
5. Control the boat’s speed during the course change by adjusting sail trim and steering to prevent excessive acceleration or deceleration.
6. Communicate any necessary adjustments to the crew, especially those responsible for trimming the sails or handling other tasks.
7. Once the course change is complete, ensure the boat is balanced and stable, checking sail trim, weight distribution, and making any necessary corrections.
Proper steering and changing course during jibing will maintain control and ensure a safe and efficient maneuver.
Step 6: Trimming the Jib
To properly trim the jib , follow these instructions:
Step 1: Position yourself on the windward side of the boat, near the jib sheet .
Step 2: Loosen the jib sheet slightly to allow the jib to luff in the wind.
Step 3: Slowly trim or pull in the jib sheet to bring the jib back to a full position, ensuring a smooth, wrinkle-free sail.
Step 4: Pay attention to the telltales on the jib, which are small pieces of fabric or yarn attached to the sail. They should flow smoothly, indicating proper trim.
Step 5: Adjust the jib sheet tension as necessary to maintain the correct sail shape and control the power in the jib.
Step 6: Continuously monitor the jib’s performance and make small adjustments to optimize speed and efficiency.
Step 7: Coordinate with the helmsperson to ensure proper communication between jib trim and boat steering.
Properly trimming the jib is essential for control, speed, and minimizing heeling while sailing. It helps balance forces, maximize power, and prevent excessive leaning. By following these steps, you can ensure optimal performance during a sailboat jibe.
Step 7: Stabilizing and Balancing the Boat
To stabilize and balance the boat during a jibe, follow these steps:
Step 1: Gradually release the jib sheet as you complete the jibe to allow the sail to swing smoothly to the new side.
Step 2: Maintain control of the boat and prevent oversteering or understeering by keeping a firm grip on the tiller or steering wheel.
Step 3: Adjust the angle of the mainsail to the new wind direction by pulling in or letting out the mainsheet.
Step 4: Ensure proper trim of both the jib and mainsail to maintain balance. The sails should be neither too loose nor too tight.
Step 5: Monitor the boat’s tilt or heel. If it leans too much to one side, adjust the sails or shift weight to restore balance.
Step 6: Make small steering adjustments to keep a stable course, avoiding overcorrection or sudden movements.
Step 7: Continuously monitor the boat’s stability and balance during the jibe, making any necessary adjustments to ensure smooth sailing.
By following these steps, you can safely and enjoyably stabilize and balance the boat during a jibe.
Common Mistakes to Avoid When Jibing
When it comes to jibing a sailboat, there are some common mistakes you’ll want to steer clear of. From miscommunication to mishandling the mainsail, these blunders can throw off your course and impact your sailing experience. In this section, we’ll explore four key areas where errors often occur: failing to communicate effectively, allowing the jib to backwind, mishandling the mainsail, and oversteering or understeering. Get ready to navigate these challenges and set sail smoothly towards successful jibing!
1. Failing to Communicate
Failing to communicate can be a crucial mistake when it comes to jibing a sailboat. Proper communication is essential to ensure a smooth and safe maneuver.
To avoid this mistake, it is important to follow these guidelines:
Provide clear instructions: Before jibing, communicate your intentions and provide specific instructions to your crew.
Coordinate timing: Make sure to coordinate with your crew so that everyone is ready to shift their weight and adjust the sails at the right moment.
Stay alert: Keep the lines of communication open and stay aware of any potential obstacles or changes in wind conditions.
Use clear signals: In addition to verbal communication, utilize hand signals or established cues to convey important information.
Remember, effective communication is key for a safe jibing maneuver, fosters teamwork among the crew, and enhances the overall sailing experience.
2. Allowing the Jib to Backwind
To avoid the common mistake of allowing the jib to backwind while jibing a sailboat, follow these steps:
- Prepare for the jibe by ensuring everyone on the boat is aware and ready.
- Communicate clearly with your crew, using hand signals or verbal commands to indicate the upcoming maneuver.
- Ease the jib sheet gradually to prevent catching wind on the wrong side. Release the jib sheet as you steer the boat through the jibe.
- Smoothly shift the mainsail and ensure it is properly controlled and adjusted for the new direction.
- Steer the boat through the jibe , maintaining control and a steady course.
- Trim the jib after completing the jibe to ensure it is properly set and catching wind on the correct side.
- Balance and stabilize the boat by adjusting the sails and controlling the helm to optimize performance.
To prevent backwinding the jib , release the jib sheet gradually and maintain control throughout the maneuver. By following these steps, you can improve your jibing technique and avoid backwinding the jib.
Remember to practice these steps regularly to enhance your jibing skills, maintain control, and speed while sailing. Implementing these techniques will help you navigate smoothly and effectively on the water.
3. Mishandling the Mainsail
Mishandling the Mainsail:
To avoid mishandling the mainsail during a jibe , it is important to follow a few key steps. First, release tension on the mainsheet gradually before starting the jibe. This will help to ease the mainsail and prepare it for the maneuver. Next, carefully cross the boom to the other side of the boat while steering. This should be done with caution to avoid any damage or mishaps. Once on the other side, use the mainsheet to trim the sail and maintain proper shape and control. This will ensure that the mainsail is functioning correctly throughout the jibe. Timing is crucial when performing a jibe. It is important to choose a stable time with enough wind to smoothly complete the maneuver.
To improve your skills in sailboat handling and avoid mishandling the mainsail, consider the following suggestions. First, take sailing lessons or courses to learn proper techniques. This will provide you with a solid foundation of knowledge and skills. Next, practice jibing in different conditions to understand how the mainsail responds. This will help you anticipate any challenges or adjustments that may need to be made. Communication with your crew or sailing partners is also important for smooth coordination. Make sure to communicate your intentions and work together to execute the jibe effectively. Understanding wind conditions and their impact on the mainsail is crucial. Pay attention to the wind direction and strength, and make adjustments to the mainsail as needed. Be vigilant and observant while handling the mainsail. Continuously monitor its performance and make any necessary adjustments or corrections.
By following these steps and suggestions, you can avoid mishandling the mainsail during a jibe and sail safely and effectively.
4. Oversteering or Understeering
When jibing a sailboat, it is important to ensure that you do not oversteer or understeer in order to maintain control and balance. To prevent these mistakes, here are some helpful tips:
1. Maintain a steady helm: To prevent oversteering, avoid making excessive steering inputs during the jibe. Keep the tiller or wheel steady to maintain control.
2. Ease the mainsail gradually: When shifting the mainsail during the jibe, make sure to release it gradually. Avoid releasing it too quickly, as this can cause the boat to jerk or lose balance.
3. Coordinate with crew members: Communication is key during a jibe. Coordinate with your crew members to ensure everyone is prepared and knows what to expect. This will help avoid sudden movements that can lead to oversteering or understeering.
4. Anticipate the turn: Before initiating the jibe, anticipate the boat’s turn and plan your actions accordingly. This will help you avoid making abrupt steering adjustments during the maneuver.
5. Practice proper weight distribution: Maintaining a balanced weight distribution on the boat is crucial. Shift your weight smoothly and evenly to prevent the boat from leaning excessively.
6. Monitor the sails: Keep a close eye on the jib and mainsail throughout the jibe. Adjust the trim as necessary to maintain proper sail shape and prevent oversteering or understeering.
By following these tips, you can avoid the common mistake of oversteering or understeering while jibing a sailboat, ensuring a smoother and more controlled maneuver.
Tips and Techniques for Successful Jibing
Jibing , a crucial maneuver in sailboating, requires skill, control, and finesse. In this section, we’ll dive into the tips and techniques that can enhance your jibing abilities. From improving your jibing skills to mastering techniques for maintaining control and speed, each sub-section will provide valuable insights to help you navigate the waters with confidence and precision . So, get ready to set your sails and embark on a journey to become a master of the jibe !
Tips for Improving Jibing Skills
Here are some useful tips for improving jibing skills:
- Practice sail trim: To maintain control and prevent luffing or overloading, ensure proper trimming of the jib and mainsail before jibing.
- Anticipate wind changes: Effectively plan and execute smooth jibes by paying attention to shifts in wind direction and strength.
- Maintain boat speed: Smooth transitions during jibing require sufficient boat speed. Avoid slowing down too much to stay in control.
- Focus on body position: Proper body position is crucial for successful jibing. Keep balanced and centered in the boat, ready to adjust quickly as the boat changes direction.
Remember, the key to becoming confident and proficient in executing successful jibes is practice and refining your technique.
Fun Fact: Jibing is a maneuver used to change the direction of a sailboat when sailing downwind, involving crossing the stern of the boat through the wind from the opposite side.
Techniques to Maintain Control and Speed
To successfully maintain control and speed while jibing a sailboat, you can follow the following techniques:
1. Preparation is key: It is important to anticipate wind shifts and currents in order to choose the best possible moment for the maneuver.
2. Effective communication: Make sure to inform your crew members about the upcoming jibe, and ensure that everyone is ready to perform their respective tasks.
3. Gradually ease the tension on the jib sheet: By releasing tension gradually, you allow the sail to move smoothly and effortlessly.
4. Swiftly shift the mainsail: Move the mainsail to the opposite side of the boat to maintain balance during the maneuver.
5. Skillfully steer and change course: Use the tiller or steering wheel to smoothly transition the boat without losing speed or control.
6. Trim the jib: Once the turn is complete, bring the jib sail back into the appropriate position for optimal performance.
7. Prioritize stability and balance: Make necessary adjustments to ensure that the boat remains stable and well-balanced throughout the jibing process.
Remember, practice makes perfect! Regular practice will help you improve your jibing skills and allow you to experience more efficient and enjoyable sailing.
Some Facts About How To Jibe A Sailboat:
- ✅ To jibe, follow these three steps: start from a broad reach, release the preventer and turn downwind, wait for the jib to jibe itself, then pull the mainsail amidships and ease it out on the new tack.
- ✅ Tips for jibing safely include trimming the jib sheet once it crosses, using a slow turn, keeping control of the mainsail, easing the main quickly, watching the course to prevent rounding up, and not being shy about jibing.
- ✅ If the jib jibes unexpectedly, immediately head up to prevent an uncontrolled jibe and secure the boom with a preventer.
- ✅ There are two methods to jibe a Gennaker: snuffing the spinnaker and re-lead the sheet, or jibing while still flying by tensioning the windward sheet and releasing the working sheet.
- ✅ Jibing a Gennaker while still flying requires trimming the sail before jibing the boat to prevent the spinnaker from blowing through or wrapping around the forestay.
Frequently Asked Questions
How to jibe a sailboat in normal position.
To jibe a sailboat in normal position, follow these three steps:
- Start from a broad reach.
- Release the preventer and turn downwind.
- Wait for the jib to jibe itself, then pull the mainsail amidships and ease it out on the new tack.
What are some tips for jibing a sailboat in the breeziest conditions?
When jibing a sailboat in the breeziest conditions, consider these tips:
- Trim the jib sheet once it crosses.
- Use a slow turn to maintain control.
- Keep control of the mainsail.
- Ease the main quickly.
- Watch the course to prevent rounding up.
- Don’t be shy about jibing.
What should I do if the jib jibes unexpectedly?
If the jib jibes unexpectedly, immediately head up to prevent an uncontrolled jibe and secure the boom with a preventer.
How do I jibe a Gennaker in a sailboat?
There are two methods to jibe a Gennaker:
- Snuff the spinnaker and re-lead the sheet.
- Jibe while still flying by tensioning the windward sheet and releasing the working sheet.
What are the steps to jibe a Gennaker while still flying?
To jibe a Gennaker while still flying, follow these steps:
- Trim the sail before jibing the boat to prevent the spinnaker from blowing through or wrapping around the forestay.
- Jibe the boat while maintaining tension on the windward sheet.
- Release the working sheet gradually.
What are the steps to jibe a spinnaker in a sailboat?
To jibe a spinnaker in a sailboat, you can use the easiest technique:
- Snuff the sail.
- Drop the pole to the deck.
- Pull the snuffed spinnaker around the bow with the sheets.
- Jibe the main.
- Reset the pole.
- Redeploy the spinnaker.
About the author

Leave a Reply Cancel reply
Your email address will not be published. Required fields are marked *
Save my name, email, and website in this browser for the next time I comment.
Latest posts

The history of sailing – from ancient times to modern adventures
History of Sailing Sailing is a time-honored tradition that has evolved over millennia, from its humble beginnings as a means of transportation to a beloved modern-day recreational activity. The history of sailing is a fascinating journey that spans cultures and centuries, rich in innovation and adventure. In this article, we’ll explore the remarkable evolution of…

Sailing Solo: Adventures and Challenges of Single-Handed Sailing
Solo Sailing Sailing has always been a pursuit of freedom, adventure, and self-discovery. While sailing with a crew is a fantastic experience, there’s a unique allure to sailing solo – just you, the wind, and the open sea. Single-handed sailing, as it’s often called, is a journey of self-reliance, resilience, and the ultimate test of…

Sustainable Sailing: Eco-Friendly Practices on the boat
Eco Friendly Sailing Sailing is an exhilarating and timeless way to explore the beauty of the open water, but it’s important to remember that our oceans and environment need our protection. Sustainable sailing, which involves eco-friendly practices and mindful decision-making, allows sailors to enjoy their adventures while minimizing their impact on the environment. In this…
Parts Of a Sail Explained (Illustrated Beginners Guide)
Are you curious about sail mechanics and how they engage the wind? In this illustrated guide, we'll explain the various sail components and how they work together to propel a sailboat. From the head to the foot, the tack to the clew, we'll break down each part and give you a solid foundation to build on as you learn to trim sails and navigate the open sea.
A sail, which is a large piece of fabric that is attached to a long pole called the mast, uses the wind to pull a sailboat across the water. It has various parts, such as the head, tack, clew, luff, leech, foot, mainsail, jib, and batten. These components determine the shape and efficiency of the sail.
Let's break down all these terms and descriptions to understand how each component interacts with each other. So, whether you're a seasoned sailor or a beginner, you'll have a better grasp of sail trim and optimal performance on the water.
- The primary parts of a mainsail include the head, tack, clew, luff, leech, and foot.
- Some critical elements of the jib include the sheet, genoa, and headstay.
- Asymmetrical spinnakers are designed for off-wind sailing and have a more rounded shape, while symmetrical spinnakers are used for downwind sailing and have a more traditional, triangular shape.
- The most common fabrics used for making sails are traditional fabrics like cotton and flax, and modern fabrics such as polyester and nylon, Dacron, Mylar, and laminates.
- Be sure to learn how to properly trim, reef, clean, flake, and store your sails for durability and optimal performance.

On this page:
Parts of a sail and their functions, mainsail components, jib components of a sailboat, components of spinnakers, sail controls and settings, sail care and maintenance, sail materials and construction.
In this guide, we'll focus on the three main types of sails : Mainsail, Jib, and Spinnaker.
Mainsail is the primary sail on your boat
The mainsail is the largest sail on a sailboat and is typically attached to the mast and boom. It is found aft (rear) of the mast. It's attached to the boat through a track or sail slide, which allows it to move up and down.
Jib is a triangular sail placed in front of the boat
The jib is a smaller sail that is attached to the bow of the boat and works in conjunction with the mainsail to control the direction and speed of the boat. It helps to improve the boat's handling and increase speed, working in tandem with the mainsail.
In some cases, larger jibs called genoas are used to capture more wind, thus increasing the boat's speed.
Spinnaker is designed for sailing downwind
The spinnaker is a large, colorful, and lightweight balloon-shaped sail designed for sailing downwind. It captures the wind from the rear, pushing the boat forward with added speed and stability.
In this section, you'll find a comprehensive explanation of the primary components of a sail and their functions:
Head is the uppermost corner of a sail
The head of the sail refers to the uppermost corner where it connects to the top of the mast. Knowing the location of the head is essential, as it helps you identify the top of the sail and allows you to properly hoist and secure it in place.
Tack is the lower front corner of a sail
The tack is where the lower front corner connects to the base of the mast, or the boom. This important point helps you determine the sail's orientation and affects its overall shape and efficiency. By adjusting the tension at the tack, you can control your sail's performance and handling in various wind conditions.
Clew is the lower rear corner of a saisl
The clew is where the sheets attach to control the sail's angle to the wind. Adjusting the tension on the sheets can change the sail's shape and ultimately influence the boat's speed and direction. Becoming familiar with the clew will help improve your sailing skills and ensure smooth maneuvers on the water.
Luff is the front edge of the sail
The luff is the forward edge of the sail that runs along the mast. It's crucial to maintaining a tight and efficient sail shape. When sailing upwind, pay close attention to the luff, as it can provide valuable information about your sail's trim. A properly trimmed sail will have a smooth luff, allowing the boat to move efficiently against the wind.
Leech is the rear edge of the sail
The leech is opposite the luff. It plays a critical role in controlling the overall shape and efficiency of your sail. Watch the leech carefully while sailing, as excessive tension or looseness can negatively affect your sail's performance. Adjusting your sail's trim or using a device called a "boom vang" can help control the shape and tension of the leech.
Foot is the bottom edge of the sail
The foot is running between the tack and the clew. It helps control the shape and power of the sail by adjusting the tension along the boom. Ensure the foot is properly trimmed, as this can impact your boat's performance and speed. A well-adjusted foot helps your sail maintain its proper shape and operate at optimal efficiency while out on the water.
In this section, we'll look at some critical elements of the jib: the sheet, genoa, and headstay.
Sheet is the line used to control the position and trim of the sail
The jib sheet is the line used to control the jib's angle in relation to the wind. You adjust the sheet to get the best possible sail trim, which greatly affects your boat's performance. The jib sheet typically runs from the jib's clew (the lower rear corner of the sail) through a block on the boat's deck, and back to the cockpit, where you can easily control it.
When adjusting the jib sheet, you want to find the perfect balance between letting the sail out too far, causing it to luff (flutter), and pulling it in too tightly, which can cause heeling or poor sail shape. Make small adjustments and observe how your boat responds to find the sweet spot.
Genoa is a larger jib used to capture more wind
A genoa is a larger version of a standard jib. It overlaps the mainsail, extending further aft, and provides a greater sail area for improved upwind performance. Genoas are categorized by the percentage of overlap with the mainsail. For example, a 130% genoa means that the sail's area is 30% larger than the area of a jib that would end at the mast.
Genoas are useful in light wind conditions, as their larger surface area helps your boat move faster. However, they can become difficult to manage in strong winds. You might need to reef (reduce the size) or swap to a smaller jib to maintain control.
Headstay provides a support structure for the jib
The headstay is a crucial part of your boat's standing rigging system. It is the cable or rod that connects the top of the mast (the masthead) to the bow of the boat. The headstay helps maintain the mast's stability and provides a support structure for the jib.
The tension in your headstay plays a significant role in the jib's sail shape. Proper headstay tension will create a smooth, even curve, allowing your jib to perform optimally. If the headstay is too tight, the sail may be too flat, reducing its power, whereas a loose headstay can result in a sagging, inefficient sail shape.
A spinnaker is a sail designed specifically for sailing off the wind , on courses between a reach and downwind. They are made of lightweight fabric, often brightly colored, and help maximize your sailing speed and performance.
Asymmetrical spinnakers are designed for off-wind sailing
Asymmetrical spinnakers are usually found on modern cruising and racing boats. They're designed for a broader range of wind angles and have a more forgiving shape, making them easier for you to handle. Key components of an asymmetrical spinnaker include:
- Tack : This is the front, lower corner where the sail connects to the boat. A tack line is used to adjust the sail's position relative to the bow.
- Head : The top corner of the sail, where it connects to the halyard to be hoisted up the mast.
- Clew : The aft corner of the sail, connected to the sheet, allowing you to control the angle of the sail to catch the wind effectively.
You can find a step-by-step guide on how to rig and hoist an asymmetrical spinnaker here .
Symmetrical spinnakers are used for downwind sailing
Symmetrical spinnakers are more traditional and usually found on racing boats, where downwind performance is critical. These sails are shaped like a large parachute and are split into two identical halves. Key components of a symmetrical spinnaker include:
- Head : Similar to the asymmetrical spinnaker, the head is the top corner connected to the halyard.
- Clews : Unlike an asymmetrical spinnaker, a symmetrical spinnaker has two clews. Both are connected to sheets and guys, which help control the sail's shape and movement.
- Spinnaker Pole : This is a horizontal pole that extends from the mast and is used to project the windward clew outwards and hold the sail open.
Handling a symmetrical spinnaker can be more challenging, as it requires precise teamwork and coordination. If you're new to sailing with this type of sail, don't hesitate to seek guidance from experienced sailors to improve your technique.
In this section, we'll explore sail controls and settings, which are essential for beginners to understand for efficient sailing. We'll discuss trimming, and reefing, as sub-sections.
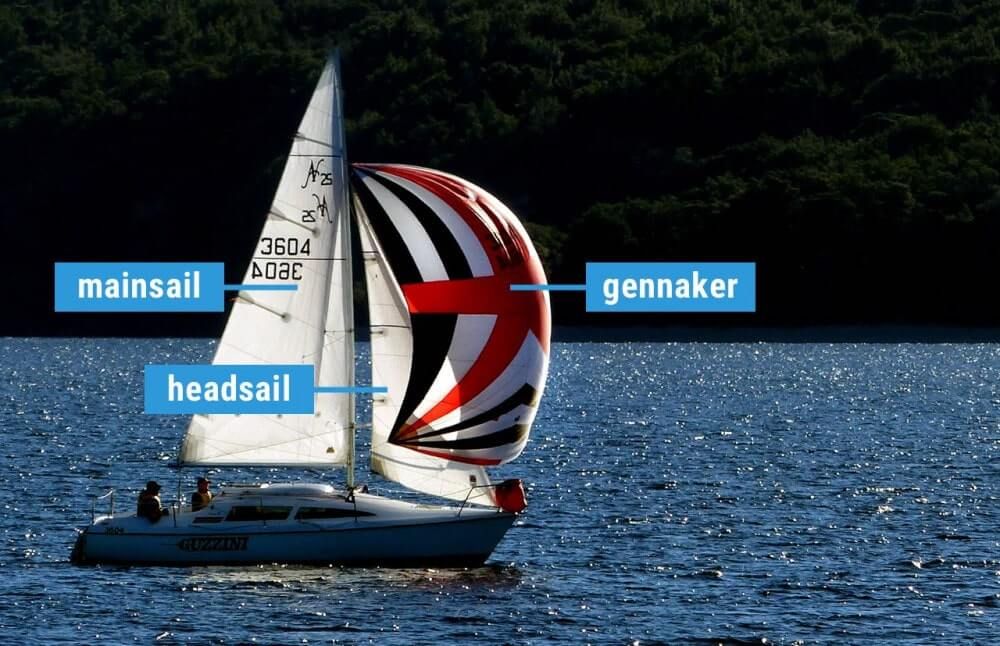
Trimming your sails for speed and stability
Trimming is the process of adjusting your sails to optimize them for the current wind conditions and desired direction. Proper sail trim is crucial for maximizing your boat's speed and stability. Here are some basic tips for sail trimming:
- Pay attention to the telltales, which are small ribbons or yarn attached to the sails. They help you understand the airflow over your sails and indicate whether they're properly trimmed.
- Use the sheets, which are lines attached to the clew of your sails, to adjust the angle of your sails relative to the wind.
- In light winds, ease the sails slightly to create a more rounded shape for better lift. In stronger winds, flatten the sails to reduce drag and prevent excessive heeling.
Reefing your sails for control and balance
Reefing is the process of reducing the sail area to help maintain control and balance in stronger wind conditions. It's an essential skill to learn for your safety and the longevity of your sails. Follow these steps to reef your sails:
- Head into the wind to reduce pressure on the sails.
- Lower the halyard (the line that raises the sail) until the sail reaches the desired reefing point.
- Attach the sail's reefing cringle (reinforced eyelet) to the reefing hook or tack line.
- Tighten the new, lower clew (bottom corner) of the sail to the boom with the reef line.
- Raise the halyard back up to tension the reduced sail.
Take proper care of your sailboat to ensure that it remains in top condition. In this section, we will discuss the key aspects of sail care and maintenance, focusing on cleaning and storage.

Steps to clean your sails
Keeping your sail clean is crucial for its longevity and performance. Follow these simple steps to maintain a spotless sail:
- Rinse with fresh water after each use, paying extra attention to areas affected by saltwater, debris, and bird droppings.
- Use a soft-bristled brush and a mild detergent to gently scrub away dirt and stains. Avoid harsh chemicals or abrasive materials, as they may damage the fabric.
- Rinse again thoroughly, ensuring all soap is washed away.
- Spread your sail out to air-dry, avoiding direct sunlight, which may harm the fabric's UV protection.
Ways to store your sails
Sail storage is equally important for preserving the lifespan of your sail. Here are some tips for proper sail storage:
- Fold or roll your sail : Avoid stuffing or crumpling your sail; instead, gently fold or roll it to minimize creases and wear on the fabric.
- Protect from UV rays : UV exposure can significantly reduce the life of your sail. Store it in a cool, shaded area or use a UV-resistant sail cover when not in use.
- Ventilation : Ensure your sail is stored in a well-ventilated area to prevent mildew and stale odors.
- Lay flat or hang : If space allows, store your sail laid out flat or hanging vertically to reduce the risk of creasing and fabric damage.
Flaking your sails when not in use
Flaking is the process of neatly folding your sails when they're not in use, either on the boom or deck. This helps protect your sails from damage and prolongs their lifespan. Here's how to flake your sails:
- Lower the sail slowly, using the halyard while keeping some tension on it.
- As the sail comes down, gather and fold the sail material in an accordion-like pattern on top of the boom or deck.
- Secure the flaked sail with sail ties or a sail cover to prevent it from coming undone.
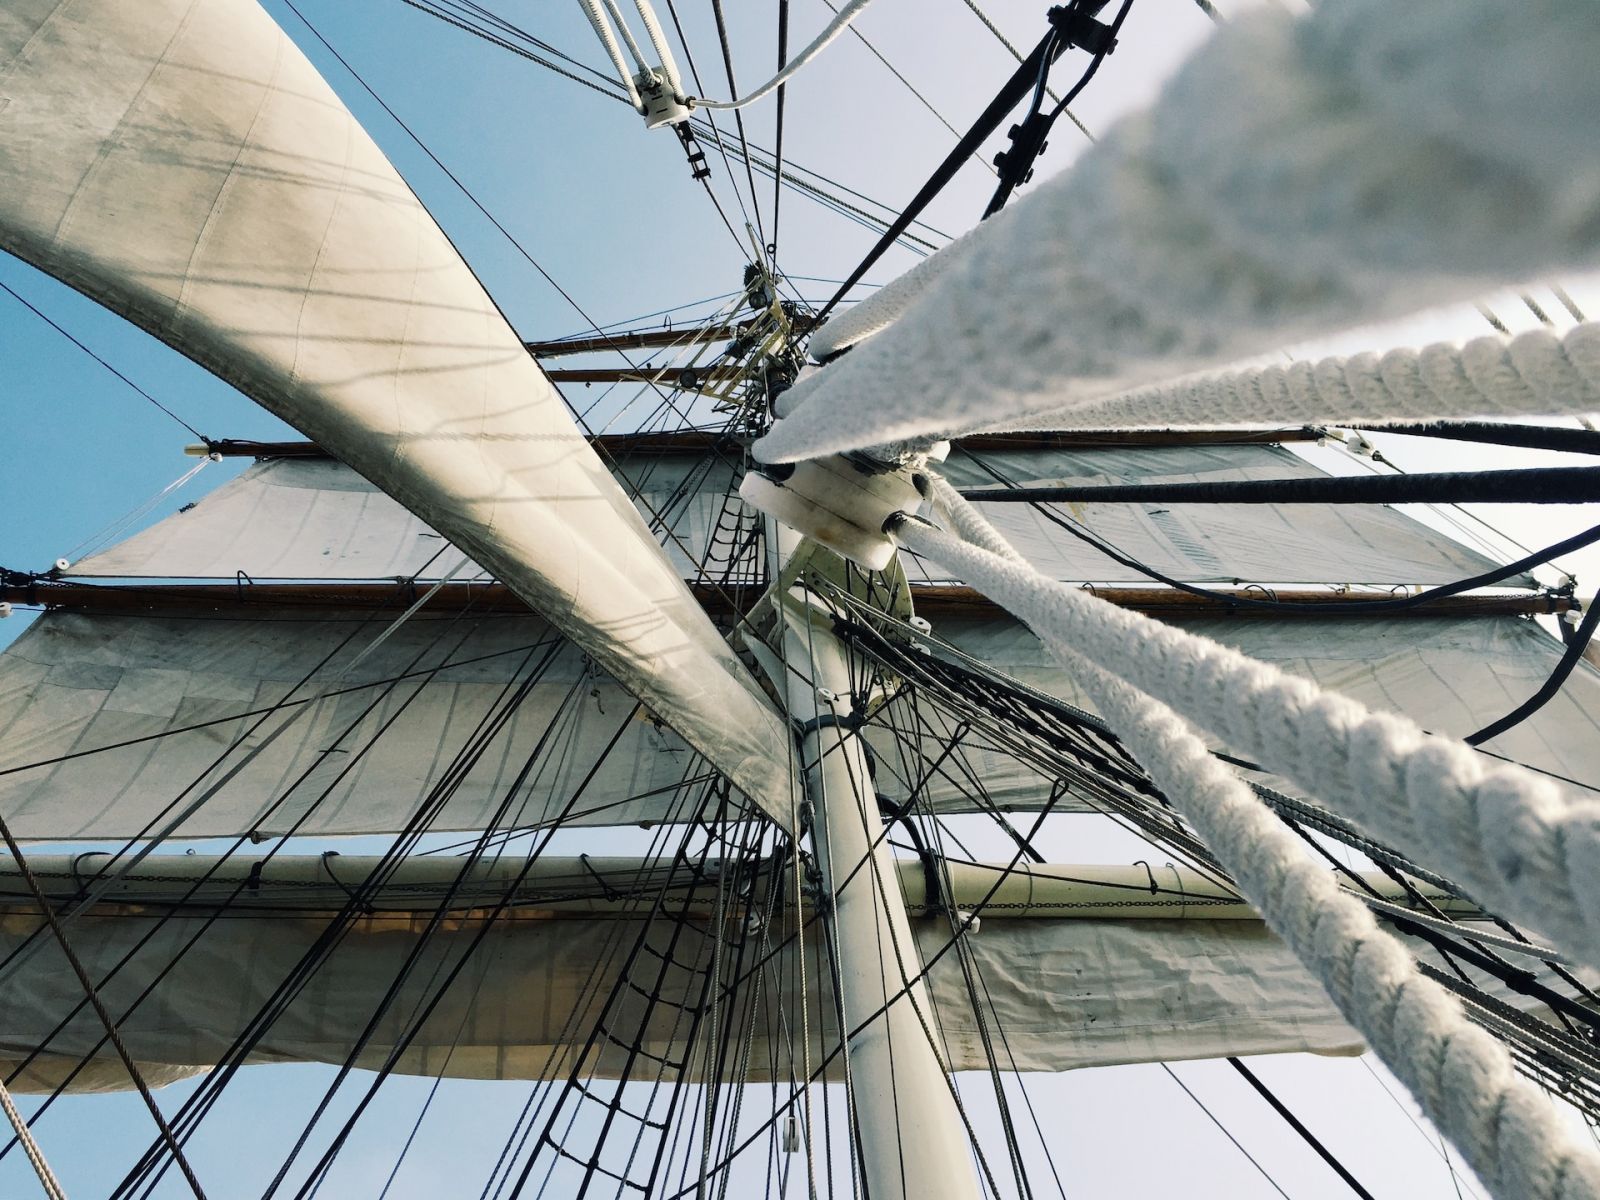
Traditional fabrics used to make sails
In the early days of sailing, natural materials like cotton and flax were used to make sails. These fabrics were durable, breathable, and held up well in various weather conditions. However, they would eventually wear out and lose their shape due to the constant exposure to UV rays and seawater.
While traditional fabrics like cotton and flax were once commonly used for sailmaking, they have largely been replaced by synthetic materials like polyester and nylon due to their superior strength, durability, and resistance to mildew and rot. However, some sailors and sailmakers still use cotton and other natural fibers for certain applications, such as traditional sailmaking or historical recreations.
Modern fabrics used to make sails
Modern sail materials, such as Dacron, Mylar, and laminates, are more resilient and longer-lasting than traditional fabrics. These materials are lightweight, strong, and resistant to UV rays and water damage.
Dacron : Dacron is a popular material for sails because of its durability, UV resistance, and ease of maintenance. It's a type of polyester fabric that is often used for making cruising sails. Dacron offers excellent shape retention and resistance to stretch, making it ideal for both beginners and experienced sailors.
Laminate materials : Laminate sails are made by bonding multiple layers of materials like Mylar, polyester, and Kevlar. These sails offer better shape and performance compared to their fabric counterparts, making them popular among racers. However, they tend to be more delicate and may not be suitable for long-term cruising.
Mylar films : Mylar films are used in laminate sails for their excellent strength-to-weight ratio and shape retention. These films are often sandwiched between other materials, such as polyester or Kevlar, to enhance the sail's resistance to stretch and load handling. However, Mylar sails can be susceptible to delamination and abrasion, requiring extra care and regular inspection.
Sail stitching for shape and durability
Sail stitching is an essential aspect of sail construction, helping to maintain the sail's shape and durability. Various stitching techniques can be used, such as zigzag, straight, and triple-step sewing. The choice of stitching type depends on the sail's purpose and expected loads. In addition, using UV-resistant thread ensures that the stitching lasts longer under harsh sun exposure.
Leave a comment
You may also like, how do sails actually work: full beginners guide.
The sails are your boat's primary driving force. Your boat is designed to sail , and with good wind it will be faster and more comfortable than using the engine. …

Sail Names: Explained for Beginners (With 15 Examples)

How To Trim Sails: The Ultimate Guide (with Cheat Sheet)

How To Reef Your Sails (Mainsail, Jib, Furling, Loose)

How Much Do New Sails Cost?
Own your first boat within a year on any budget.
A sailboat doesn't have to be expensive if you know what you're doing. If you want to learn how to make your sailing dream reality within a year, leave your email and I'll send you free updates . I don't like spam - I will only send helpful content.
Ready to Own Your First Boat?
Just tell us the best email address to send your tips to:
- Anchoring & Mooring
- Boat Anatomy
- Boat Culture
- Boat Equipment
- Boat Safety
- Sailing Techniques
Understanding the Jib Sail
Sailing is an art form that requires understanding the science of aerodynamics and mastering the techniques for trimming and tuning sails. A jib sail is fundamental to any sailboat’s rigging, allowing for more power and better control on the open water.
To help sailors venture out into the deep blue sea, this article explores jib sails, including different types, components, and uses. We’ve also included some tips to get the best performance out of your jib sail. Let’s dive into the world of jib sails and see what they offer!
Key Takeaways
- A jib sail is a triangular-shaped sail located at the front of the mast, providing optimal performance depending on wind conditions.
- Jib sails generate lift when wind hits the curved surface and creates a pressure difference on either side.
- Types of jib sails include working jib, blade jib, storm jib, and drifter.
- The mainsail provides forward motion while the jib sail generates lift for sailing upwind.
- While sailing in winds less than 15 knots, jib sails should be employed; in heavier winds, reef or reduce its size and adjust the shape to prevent overpowering the boat.
- Sail tuning is key for successful sailing - adjusting halyard tension, sheet tension, lead position, traveler position and mast rake impacts performance and safety.
- The jib sail is essential to racing due to its power control and tactical advantage in gaining speed and maneuverability.
What is a jib sail?
A jib sail is a triangular sail located at the front of the mast, attached to the forestay. It’s a headsail, meaning it sits forward of the mainsail – often used in unison with the latter for optimal performance.
These sails come in various sizes, shapes, and materials, designed to provide optimal performance depending on sailing conditions.
How does the jib sail work?
Jib sails work by harnessing the aerodynamic energy of the wind to propel a sailboat forward. As the wind hits the sail, it creates lift which pushes the boat in the right direction.
The shape of the jib sail is essential for its success; it can be adjusted according to varying levels of wind intensity, allowing for flatter sails in high winds and fuller sails in light breezes.
In addition, jibs can help stabilize a boat when navigating rough waters or facing stronger winds by reefing or reducing their size and pushing the center of effort downwards. They can also be used independently from mainsails when heading downwind or sailing in low winds.
What is the difference between a jib sail and other types of sails?
The jib sail is distinct from other sails in several ways. Primarily, it is located forward of the mast, while the main sail sits behind the mast and is attached to the forestay.
Regarding size and shape, jib sails are typically smaller than others and have a triangular layout. This design aims to generate lift while allowing for sailing upwind. In comparison, mainsails tend to be larger with a rectangular shape that generates power and speed in all wind conditions.
Then there are genoa sails , similar to jibs but larger and fuller in shape. These reduce drag when sailing in light winds due to their surface area. Lastly, spinnaker sails – used when sailing downwind – differ significantly from the two former types of sail as they feature a parachute-like shape and size that captures more wind than the jib or genoa sail, generating maximum power and speed under such conditions.
Other types of jib sails that are commonly used include the working jib, which is a small sail used in moderate wind conditions; the blade jib, which is a smaller sail designed to be stable in strong winds; the storm jib, which is a heavy-duty sail intended to provide stability in extreme weather; and lastly, the drifter, which is a lightweight sail with the large surface area used to capture maximum lift when sailing in light winds.
Using the jib sail on a sailboat
Knowing when to use the jib sail is critical for successful sailing. Typically, it should be employed when sailing upwind in winds of less than 15 knots.
Its usage in heavier wind depends on the boat design and the sailor’s experience. At 20 knots or higher, the mainsail may need to be reefed or reduced, and the jib sail adjusted to a flatter shape with less drag to prevent overpowering the boat.
In extreme weather, such as during a storm, the jib sail may need to be replaced with a storm jib or removed altogether.
When hoisting the jib sail, it must be adequately secured to the forestay, and the halyard tensioned accordingly. The sheet must also be appropriately adjusted to control its angle relative to the wind and maximize performance.
The mainsail provides forward motion while the jib sail generates lift that helps move against wind direction; together, they propel forward movement.
By tweaking factors like sheet tension, lead position, halyard tension, and traveler position, depending on wind speed and boat speed, optimal performance and safety can be achieved with the correct utilization of the jib sail.
Jib sail aerodynamics
The jib sail uses the same aerodynamic principles as an airplane’s wing. When the wind hits the curved surface of the sail, a pressure differential is created between the curved side and flat side, generating lift that propels the sailboat forward.
The location of the jib sail on the boat is important for its aerodynamic performance – attached to the forestay in front of the mast, it captures wind’s energy ahead of the mainsail. The position of the jib sail also adds stability to the boat in strong winds or choppy seas .
Jib sail tuning tips
Jib sail tuning is a crucial part of sailing, as it can maximize speed, balance, and safety. Here are some tips on tuning the jib sail:
- Start with the basics – ensure the sailboat is appropriately balanced and the sails are trimmed correctly. The mainsail, traveler, and sheet tension will all affect the jib sail performance.
- Adjust sheet tension – this affects the jib sail’s shape and power; in lighter winds, use a looser sheet to keep a fuller shape, and in heavier winds, tighten for reduced surface area.
- Adjust jib lead position – this controls the angle of the foot of the sail, closer to the centerline for lighter wind conditions and outboard for heavier winds.
- Adjust halyard tension – controlling shape and tension of the sail, loosen in light wind conditions, and tighten in stronger winds to reduce surface area and prevent overpowering the boat.
- Monitor sail shape regularly – ensure proper trimming by monitoring shape while sailing.
- Adjust jib cars – blocks or sliders controlling position along the track affect shape and power; adjust based on wind speed for optimal performance.
Jib sail shape and performance
Understanding sail shape and performance is critical to maximizing a sailboat’s speed, balance, and safety. Shape of the sail is determined by tension, angle of attack, and curvature – here are some factors to consider when assessing sail performance:
- Sail Trim – properly trimming the mainsail and jib sail will ensure proper shape and lift for optimal performance.
- Wind Conditions – adjust sails based on wind speed and direction for generating lift and forward momentum while sailing.
- Angle of Attack – the angle between the sail’s surface and wind direction must be adjusted to generate lift and prevent stalling.
- Curvature – adjusting the curvature of the sails based on wind conditions can help achieve the ideal shape.
- Tension – adjusting tension based on wind conditions aids in maintaining the ideal shape for generating lift.
- Sail Material – different materials have different stretch/weight characteristics, affecting sails’ shape/performance.
How to adjust the jib sail shape
Control mechanisms exist to adjust the shape and performance of a jib sail, including:
- Halyard tension – should be loosened in light wind conditions to keep a fuller sail shape and tightened in heavy wind conditions, reducing the sail’s surface area.
- Sheet tension – should be adjusted to be looser in light winds and tightened in heavy winds, reducing the sail’s surface area.
- Jib lead position – located at the block or ring that controls the angle of the jib sail’s foot, it should be positioned closer to the centerline in light winds and farther outboard in heavy winds, flattening the sail shape and reducing its surface area.
- Jib cars – these blocks or sliders control the jib sail’s position along its track; their position should be adjusted based on wind conditions
- Backstay tension – tightening can flatten the jib sail and reduce its surface area, whereas loosening it can create a fuller sail shape.
- Mast rake – raking aft will increase sail surface area and create a fuller shape, whereas raking forward will reduce sail surface area and flatten its shape.
Importance of the jib sail in yacht racing
The jib sail is a crucial component of sailboat racing, playing a significant role in the sailboat’s performance and speed. Here are some reasons why the jib sail is vital in racing sailboats:
- Speed – its shape and position can increase the sailboat’s speed, providing a tactical advantage over other boats in a race.
- Maneuverability – adjusting the jib sail during tacks and gybes can help the sailboat turn more efficiently and maintain speed through turns.
- Power control – controlling its shape and position can impact the power provided, preventing overpowering the sailboat and maintaining safe sailing conditions.
- Tactical advantage – proper adjustment based on wind conditions and other boats’ positions can help gain a tactical advantage and maintain the lead in races.
- Overall performance – a well-performing jib sail increases the sailor’s speed, maneuverability, and tactical advantage, leading to a successful competitive experience.
The jib sail is a critical element of sailing, and understanding how to use it is vital. Using the proper techniques and tuning the jib sail correctly can significantly impact a sailboat’s performance, whether cruising or racing.
By following the tips and guidelines outlined here, one can better understand the jib sail and enhance their sailing experience. Safety should always be prioritized, so never hesitate to ask for advice from experienced sailors when in doubt.
The Importance of a Kedge Anchor
What are no wake zones and why should i care, related posts, whisker pole sailing rig: techniques and tips, reefing a sail: a comprehensive guide, sail trim: speed, stability, and performance, leave a reply cancel reply.
Your email address will not be published. Required fields are marked *
- Cookie Policy
- Privacy Statement
© 2023 TIGERLILY GROUP LTD, 27 Old Gloucester Street, London, WC1N 3AX, UK. Registered Company in England & Wales. Company No. 14743614
Welcome Back!
Login to your account below
Remember Me
Retrieve your password
Please enter your username or email address to reset your password.
Add New Playlist
- Select Visibility - Public Private

A Guide to the Different Parts of a Sailboat

Table of Contents
Last Updated on November 29, 2023 by Boatsetter Team
When you use Boatsetter, you have the opportunity to choose from a myriad of different sailboat rentals from all over the United States and beyond . A sailboat is a perfect way to relax on the water, either on a solo adventure or on an excursion with friends and family.
When you rent a sailboat with Boatsetter, you will have the option to book a captained sailboat to enjoy your day out on the water or book bareboat to hone your sailing skills. Either way, you may be interested in the intricacies of a sailboat and its different parts. If this sounds like you, you have come to the right place. In this article, we go in-depth about the different parts of a sailboat so that you can be more knowledgeable about whatever boat you may choose and come away from reading this feeling more confident about the whole sailing experience.
A basic sailboat is composed of at least 12 parts: the hull , the keel , the rudder , the mast, the mainsail, the boom, the kicking strap (boom vang), the topping lift, the jib, the spinnaker, the genoa, the backstay, and the forestay. Read all the way through for the definition of each sailboat part and to know how they work.
Explore sailboats for rent near you or wherever you want to go

In short, the hull is the watertight body of the ship or boat. There are different types of hulls that a sailboat may have, and these different hulls will often affect the speed and stability of the boat.
Displacement Hulls
Most sailboats have displacement hulls , like round bottom hulls, which move through the water by pushing water aside and are designed to cut through the water with very little propulsion. The reason these are called displacement hulls is that if you lower the boat into the water, some of the water moves out of the way to adjust for the boat, and if you could weigh the displayed water, you would find that it equals the weight of the boat, and that weight is the boat’s displacement. One thing to know about displacement hulls is that boats with these hulls are usually limited to slower speeds.
Planing Hull
Another type of hull is a planing hull. These hulls are designed to rise and glide on top of the water when enough power is supplied. When there is not enough power behind the boat, these boats often act as displacement hulls, such as when a boat is at rest. However, they climb to the surface of the water as they begin to move faster. Unlike the round bottom displacement hulls, these planing hulls will often have flat or v-shaped bottoms. These are very common with motor-driven water vessels, such as pontoon boats, but they can also be found on smaller sailboats which allow them to glide quickly over the water.
Finally, sailboats can differ depending on the number of hulls that they have. There are three options: monohulls (one hull), catamarans (two hulls), and trimarans (three hulls).
Monohulls , which have only a single hull, will usually be the typical round bottom displacement hull or occasionally the flat bottomed or v-shaped planning hull. Catamarans have two hulls with a deck or a trampoline in between, with the extra hulls providing increased stability. Finally, trimarans have three hulls — a main hull in the middle and two side hulls used for stability. These trimarans have gained popularity because of their excellent stability and ability to go at high speeds.
When evaluating a sailboat , it is important to pay attention to the type of hull that the boat has because the type of hull a sailboat has can drastically change the sailing experience, especially when it comes to stability and speed.

All sailboats have a keel, a flat blade sticking down into the water from the sailboat’s hull bottom. It has several functions: it provides counterbalance, life, controls sideways movement, holds the boat’s ballast , and helps prevent the boat from capsizing. When a boat leans from one side to the other, the keel and its ballast counteract the movement and prevent the boat from completely tipping over.
As with hulls, there are a number of different types of keels, though the two most common types of keels on recreational sailboats are the full keel or the fin keel. A full keel is larger than a fin keel and is much more stable. The full keel is generally half or more of the length of the sailboat. However, it is much slower than the fin keel. A fin keel, which is smaller than the full keel, offers less water resistance and therefore affords higher speeds.
A more recent feature on sailboats is the “winged keel,” which is short and shallow but carries a lot of weight in two “wings” that run sideways from the keel’s main part. Another more recent invention in sailing is the concept of the canting keels, which are designed to move the weight at the bottom of the sailboat to the upwind side. This invention allows the boat to carry more sails.
The Rudder

A rudder is the primary control surface used to steer a sailboat. A rudder is a vertical blade that is either attached to the flat surface of the boat’s stern (the back of the boat) or under the boat. The rudder works by deflecting water flow. When the person steering the boat turns the rudder, the water strikes it with increased force on one side and decreased force on the other, turning the boat in the direction of lower pressure.
On most smaller sailboats, the helmsman — the person steering the boat — uses a “ tiller ” to turn the rudder. The “tiller” is a stick made of wood or some type of metal attached to the top of the rudder. However, larger boats will generally use a wheel to steer the rudder since it provides greater leverage for turning the rudder, necessary for larger boats’ weight and water resistance.

The mast of a sailboat is a tall vertical pole that supports the sails. Larger ships often have multiple masts. The different types of masts are as follows:
(1) The Foremast — This is the first mast near the bow (front) of the boat, and it is the mast that is before the mainmast.
(2) The Mainmast — This is the tallest mast, usually located near the ship’s center.
(3) The Mizzen mast — This is the third mast closest to the stern (back), immediately in the back of the mainmast. It is always shorter than the mainmast and is typically shorter than the foremast.
The Main Sail

The mainsail is the principal sail on a sailboat, and it is set on the backside of the mainmast. It is the main source that propels the boat windward.

A boom is a spar (a pole made of wood or some other type of lightweight metal) along the bottom of a fore-and-aft rigged sail, which greatly improves the control of the angle and the shape of the sail, making it an indispensable tool for the navigation of the boat by controlling the sailes. The boom’s primary action is to keep the foot (bottom) of the sail flatter when the sail angle is away from the centerline of the sailboat.
The Kicking Strap (Boom Vang)
The boom vang is the line or piston system on a sailboat used to exert a downward force on the boom, enabling one to control the sail’s shape. The vang typically runs from the base of the mast to a point about a third of the way out the boom. It holds the boom down, enabling it to flatten the mainsail.
The Topping Lift
The topping lift is a line that is a part of the rigging on a sailboat, which applies an upward force on a spar (a pole) or a boom. Topping lifts are also used to hold a boom up when it’s sail is lowered. This line runs from the free end of the boom forward to the top of the mast. The line may run over a block at the top of the mast and down the deck to allow it to be adjusted.

A jib is a triangular staysail set ahead of the foremost mast of a sailboat. Its tack is fixed to the bowsprit, the bow, or the deck between the bowsprit and the foremost mast. Jibs and spinnakers are the two main types of headsails on modern boats.
The Spinnaker

A spinnaker is a type of sail designed specifically for sailing off the wind from a reaching downwind course. The spinnaker fills up with wind and balloons out in front of the sailboat when it is deployed. This maneuver is called “flying.” The spinnaker is constructed of very lightweight material, such a nylon fabric and on many sailing vessels, it is very brightly colored.
Another name for the spinnaker is the “chute” because it often resembles a parachute, both in the material it is constructed from and its appearance when it is full of wind.
People often use the term genoa and jib as if they were the same thing, but there is a marked difference between these two types of sails. A job is no larger than a foretriangle, the triangular area formed by the mast, the deck or bowsprit, and the forestay. On the other hand, a genoa is larger than the jib, with part of the sail going past the mast and overlapping the mainsail. These two sails, however, serve very similar purposes.
The Backstay

The backstay is a standing rigging that runs from the mast to the transom (the vertical section at the back of the boat), counteracting the forestay and the jib. The backstay is an important sail trip, control and directly affects the mainsail’s shape and the headsail.
There are two general categories of backstays:
1) A permanent backstay is attached to the top of the mast and may or may not be readily adjustable.
2) A running backstay is attached about two-thirds up the mast and sometimes at multiple locations along the mast. Most modern sailboats will have a permanent backstay, and some will have permanent backstays combined with a running backstay.
The Forestay

A forestay is a piece of standing rigging that keeps the mast from falling backward. It is attached at the very top of the mast, or at certain points near the top of the mast, with the other end of the forestay being attached to the bow (the front of the boat). Often a sail, such as a jib or a genoa, is attached to the forestay.
A forestay might be made from stainless steel wire, stainless steel rod or carbon rod, or galvanized wire or natural fibers.
Parts of a sail
Sails are vital for sailboats, made up of complex parts that improve performance and maneuverability. In this section, we’ll take a closer look at the different parts of that make up the sails.
Luff – The luff is a vertical sail part that maintains its shape and generates lift by interacting with the wind. It attaches securely with a bolt rope or luff tape for easy hoisting.
Leech – The leech controls air flow and reduces turbulence. Battens or leech lines are used to maintain shape and prevent fluttering.
Foot – The foot of a sail connects the luff and leech at the bottom edge. It helps define the sail’s shape and area. The outhaul is used to adjust its tension and shape.
Head – The sail’s head is where the luff and leech meet. It has a reinforced section for attaching the halyard to raise the sail.
Battens -The b attens are placed horizontally in sail pockets to maintain shape and optimize performance in varying wind conditions. They provide structural support from luff to leech.
Telltales – Sailors use telltales to adjust sail trim and ensure optimal performance.
Clew – The clew is important for shaping the sail and connecting the sheet, which regulates the angle and tension, producing energy. It’s located at the lower back corner of the sail.
Sailing is a favorite pastime for millions of Americans across the country. For some, there is nothing better than gliding across the water propelled by nothing more than the natural force of the wind alone. For both experienced and non-experienced sailors alike, Boatsetter is the perfect place to get your ideal sailboat rental from the mouthwatering Florida keys to the crystal blue waters of the Caribbean .
Smaller sailing boats are perfect for a single day out on the water, either by yourself or with friends and family. In comparison, larger sailing boats and sailing yachts can allow you days of luxury on longer excursions full of adventure and luxury.
Whatever your sailing dreams are, it is always good to know, for both the experienced sailor and the novice, all about the sailboat’s different parts. In this article, we learned all about the boat’s hull, the keel, the rudder, the mast, the mainsail, the boom, the kicking strap (boom vang), the topping lift, the jib, the spinnaker, the genoa, the backstay, and the forestay, which make up the basic parts of any sailboat you might find yourself on.
About us
Boatsetter is the go-to app for boat rentals and on-water experiences. Whatever the adventure, we’ve got a boat for that—Set sail , start the party , go yachting , make your trophy catch , and hone your watersports skills! Download the Boatsetter app ( App Store | Google Play ). Make sure to follow @boatsetter on Instagram, and tag us in all your boat day pictures for the chance to be featured.
Rent. List. Share—Only at Boatsetter
Boatsetter empowers people to explore with confidence by showing them a world of possibility on the water. Rent a boat, list your boat, or become a Boatsetter captain today.
Browse by experience

Explore articles

Catamaran Cruising is Different than Sailing a Sailboat— But Why?

Boat Buying Guide: Buying a New or Used Boat?

Top 10 Spots to Boat this Labor Day Weekend

How to Use Add-ons to Help with Trip Planning
- Find A School
- Certifications
- North U Sail Trim
- Inside Sailing with Peter Isler
- Docking Made Easy
- Study Quizzes
- Bite-sized Lessons
- Fun Quizzes
- Sailing Challenge

Parts of a Sailboat – The Sails
By: Zeke Quezada, ASA Learn To Sail , Sailboats
It’s safe to say a sailboat is only as good as its sails when you consider that capturing the wind’s energy is the premise behind what sailors do to propel their boats in a forward direction. A good captain will trim those said sails to be as efficient as possible and the proper heading will help with overall performance, but the sail is the driving force of the boat.
Naturally, we should know the difference between the various sails and how they work.
These are the sails that you would find on a generic keelboat rigged as a sloop. It is, in fact, the common of sail plans and thus serves us well for this explanation of sails and their duties on a sailboat.
The Mainsail : It has its forward edge attached to the mast
The Headsail : This is a generic term that refers to any sail that sits forward of the mast. The most common is the Jib. When a jib is so large that it overlaps the mast it is called a genoa.
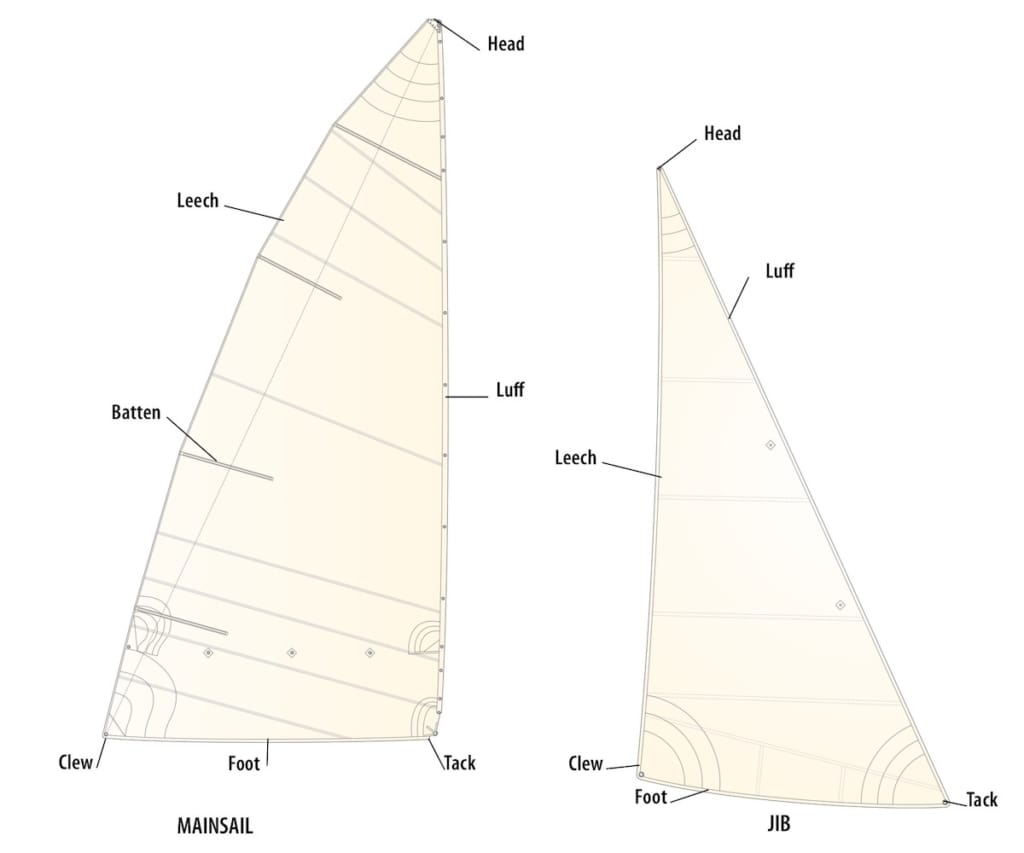
Parts of a Sail
- Luff -A sail’s forward edge. The luff of the mainsail is usually hoisted up and attached to the mast. The luff of the jib is attached to the forestay.
- Leech – The sail’s back edge.
- Foot – The bottom edge of the sail
- Tack – Between the luff and the foot is the tack. The tack is attached to the boat or a spar.
- Head – The corner at the top of the sail between the luff and the leech.
- Clew – The third triangle of a sail between the leech and the foot.
- Batten – Solid slats or rods to help maintain the desired airfoil shape.
Learning to Sail
- ASA 101: What You’ll Learn ASA 101 is your introduction to Basic Keelboat Sailboat and is your key to a lifetime of sailing.
- How To Sail Sailing a boat is part art and part skill but few activities offer such a variety of pleasures as sailing. Something special occurs when you cast off the lines and leave your cares at the dock.
- 7 Tips For The Beginning Sailor There are the obvious things you need when you go sailing, sunscreen, a hat, a windbreaker, non-skid shoes, and wind. However, what do you really need to be ready to head out on the water?
- How To Learn To Sail You won’t have to buy a boat or learn a new language or buy a new wardrobe to get a taste for sailing. You can dictate how much you want to experience.
- Learning To Sail Is Just The Beginning Sailing means different things to different people. At ASA we understand that learning to sail is just the beginning of a relationship with a lifestyle that is infectious. Where will sailing take you? We have a few ideas but how you view sailing is the most important.
- What Is Your Role on a Boat? What type of sailor are you and what role do you take on the boat? Your ASA sailing education will prepare you to be a skipper on a sailing vessel and with that comes the responsibility of keeping your crew safe and ensuring the safety of the vessel you are sailing.
Related Posts:

- Learn To Sail
- Mobile Apps
- Online Courses
- Upcoming Courses
- Sailor Resources
- ASA Log Book
- Bite Sized Lessons
- Knots Made Easy
- Catamaran Challenge
- Sailing Vacations
- Sailing Cruises
- Charter Resources
- International Proficiency Certificate
- Find A Charter
- All Articles
- Sailing Tips
- Sailing Terms
- Destinations
- Environmental
- Initiatives
- Instructor Resources
- Become An Instructor
- Become An ASA School
- Member / Instructor Login
- Affiliate Login
Everything You Need To Know About Sailboat Jibs
If you’re considering entering the world of sailing or are a beginner at having your own boat, then there are several terms you will need to know and understand to get the most out of your new pastime.
One of these terms that you may have heard, especially concerning sailboats, is a jib. But what is a jib?
A jib is a type of sail that is found on sailboats (see also ‘ Two-Mast Sailboat Types ‘) and understanding what they are and what they do is very important. That’s why we’ve taken the time to write this article to tell you everything you need to know about sailboat jibs.
Let’s get started!
What Is A Sailboat Jib?
A sailboat job is a headsail that is found on sailboats. It’s a triangular sail that is found forward of your mast. It’s typically not as large and has less of a sail area than your mainsail but it is still important to sailing.
Most sailboats that have a single mast will usually have a jib and you’ll find this between the bow and the mast. Jibs are fixed on a stay, which can be a wire, rod (see also ‘ Rod (Unit Of Measurement) Length Compared To Fishing Rod ‘), or rope, and they run forward from the mast to the deck or bowsprit.
A jib is just one of many different types of headsails.
Do Sailboats Need A Jib?
You might be asking yourself that as your sailboat has a mainsail, does it even need a jib? This is a common question asked by many sailors, especially on windy days when the mainsail can get a good force behind it.
The answer is that you probably don’t need the jib to sail and your sailboat will be able to sail without it. However, if you don’t hoist the jib, you will reduce the amount of your sail area by up to 50 percent.
We would recommend that you hoist the jib if you feel you need to. If it’s a windy day and you have the wind at your back, then the mainsail may be all you need and you can leave the jib.
On typical days that have average amounts of wind, most sailors will choose to hoist both the mainsail and the jib and will reef them whenever it is deemed necessary.
We consider this to be the best option and as you become more experienced with sailing, you will find deciding when and where to hoist the jib will become an easier decision to make.
Trimming The Jib
Before we look at trimming the jib, let’s take a little time to define what we mean.
What Is Trimming In Sailing?
When we talk about trimming a jib, or any other sail, we are referring to the process by which sails are controlled.
Sails have lines known as “sheets” attached to them, and when we adjust the tension of these lines to move the sail, this is known as trimming.
How To Trim A Jib
The jib on a sailboat is usually controlled by using two jib sheets that are positioned on either side of the mast. Using two separate sheets makes moving and manipulating the jib easier as you can adjust it from either side.
If there was only one sheet, you would need to constantly reposition the sheet to the appropriate side.
When the wind is to your port side, you will manipulate your jib by adjusting the tension of the starboard side sheet and vice versa. When you adjust the starboard jib sheet, remember to secure it on the winch and free the port side jib sheet to get the best movement.
Is It Possible For A Sailboat To Have Multiple Jib Sails?
Yes, it’s perfectly possible for a sailboat to have more than one jib sail. However, remember that not all headsails are jibs, so some sailboats might have a jib and other types of headsails as well.
Although multiple jibs aren’t unheard of, it’s more likely that an American sailboat will only have one. The most popular cruising sailboat in the States is the single-mast sloop and these typically only have one jib.
Next time you’re at a harbor or on the waves and have the opportunity to see other sailboats, it’s more likely that the sailboats around you will only have one jib.
What Material Are Jib Sails Made From?

Historically, jib sails were made of organic materials that had a canvas feel to them, such as cotton.
Traditionally, they’ve been made from materials such as cotton, hemp, and other plant material that have similar properties. A mix of these materials was usually made to get the best mix of strength and durability.
In modern times, synthetic fibers and fabrics have become more common and have largely replaced the more traditional canvas materials.
This is largely because synthetic fibers have several advantages over their organic counterparts. They’re often lighter and stronger, for example, as well as being more durable and able to resist water.
Let’s look at some of the most popular materials used for jib sails.
This is one of the most common materials used for sails. Most modern jib sails are made from polyester that is woven into a blend with other synthetic materials.
The most common type of polyester used in sails is Dacron and this is because it has many inherent properties that make it perfect for sailing.
Dacron doesn’t stretch, has excellent UV resistance, and is also cheap to manufacture, making it a low-cost option.
Dacron sails have become popular because they will last for several years without the need for much maintenance, they’re reliable, and they’re cost-effective.
This is another synthetic material that is commonly used for sails. It shares many characteristics with polyester as it is also inexpensive and durable.
It’s more lightweight than polyester and is ideal for sailboats such as spinnakers that work best with lighter sails.
Nylon isn’t perfect, however, and it can be too stretchy for some sail applications. It also reacts to and can be damaged by certain chemicals, so some people prefer to avoid nylon sails.
Kevlar is an extremely strong and heat-resistant synthetic fiber that has a wide application of uses beyond sailing. Its tightly woven structure means that it is commonly used for personal armor, as well as firefighter uniforms and motorcycle safety clothing.
When comparing the strength-to-weight ratio of Kevlar and steel, Kevlar is five times stronger. It resists stretching and won’t be damaged by even the worst conditions.
All of this makes Kevlar a very expensive material compared to polyester and nylon. For many sailboats, this cost is prohibitive and Kevlar sails are usually only used on expensive ships such as luxury yachts and racing sailboats.
What Are The Parts Of A Jib?

Now that we know more about what a jib is, what it’s used for, and what it’s made from, let’s look at a jib in closer detail.
Jibs have many different parts and mounting points, so if you’re going to sail with one it’s important that you know what they all are and what their purposes are.
Thankfully, many of these parts and terms are similar to what you’ll find on a mainsail so you may already know most of them.
This is the horizontal section that you will see running across the base of the sail. You can usually identify it quite easily because it normally has a reinforced strip of material to prevent it from fraying or becoming damaged.
It’s an easy term to remember because the foot is at the bottom, just as it is with many other items and living things.
You will find the clew at the bottom of the jib. It’s at the aft (back) section of the sail’s foot and is also easy to identify. Most clews will have a metal grommet at the clew.
If you imagine a jib sail in your mind, you should have the image of a triangle that has a straight side and bottom that meet at a right angle. The clew is at this 90-degree angle.
If we keep the image of our triangular jib in our minds, the leech is the long straight section that is placed parallel to the mast. It begins at the clew, found at the 90-degree angle at the bottom, and runs to the very top of the sail.
The orientation of the leech on the jib always follows the direction of the mainsail. The leech is always on the aft part of the sail.
As the foot of the jib is at the bottom, it only follows that the head is at the top. The head of a jib sail is the very top of the triangle and is also usually the smallest of the three angles. This is also easy to identify as, like the clew, it will have a grommet.
We learned that the leech is the part of the jib that is parallel to the mast (see also our article on sailboat masts ) and is the aft part of the sail. In contrast, the luff is the forward part of the sail and is also the longest edge.
It’s the slanted edge that runs from the head of the sail down to the forward end.
The clew is at the corner of the jib where the foot and leech meet. The tack is found directly forward of this and is the opposite corner of the foot, where the foot and luff meet.
The tack, clew, and head, all have provisions so that the jib can be rigged.
Usually, headsails like jibs are hoisted and rigged without being supported by wood, metal, or carbon poles. Known as spars, these poles are fixed and used to support the mainsail but many sailboats don’t use them for jibs.
Instead, sailboat owners decide to use jib booms to support their jib. These can be used to extend bowsprits or improve off-wind sailing. They’re similar to mainsail booms and work in very similar ways.
A jib boom is mounted to the forward part of a bowsprit and pivots from the pedestal. It can be used when projecting the sail but there are other methods for this too, such as using a spinnaker instead.
Not every sailor is a fan of jib booms, however. Some find that they don’t offer many benefits when it comes to windward sailing and choose to avoid them.
They can also take up additional room on the bow and come with the same hazards as a mainsail boom. Whether you choose to use a jib boom or not will be a matter of personal preference.
Final Thoughts
Jibs are a type of headsail that is often seen on sailboats. We hope this guide to jibs has answered all of your questions. Happy sailing!
Related Posts:

- AROUND THE SAILING WORLD
- BOAT OF THE YEAR
- Email Newsletters
- America’s Cup
- St. Petersburg
- Caribbean Championship
- Boating Safety
How to Use Jib Telltales
- By Jonathan Mckee
- Updated: September 28, 2021

Telltales are the most ubiquitous and simplest piece of equipment found on any sailboat, and even in this age of powerful race electronics , nothing is more reliable or true than these trusty yarns—or fabric strips—that serve as our guide to good sail trim. They’re an effective teaching tool for beginning racers, especially those on the headsails, so let’s focus on the basics of our jib telltales.
There are two fundamental uses of telltales: We can use them as guides to steer by, as the lower luff telltales indicate how the oncoming wind is interacting with the front of the jib, or we can use them to help us trim the jib more effectively, using the telltales at the upper luff of the sail, and especially the leech telltales.
It’s true that sailboat races can be won through fast sail trim and precision steering, and using the telltales effectively can help you do both. They let us see how the wind is interacting with the jib, which is the info we need to trim the sail right and to steer the boat to windward most efficiently.
Let’s start with some advice on placement. New sails come with telltales, and these are usually well-placed and an appropriate material. But I will often adjust the location slightly and sometimes add a few more to help fill in the picture of how the wind is flowing across both sides of the sail. Wool telltales that might come with a new sail tend to get snagged on the sail stitching, so applying a light coat of McLube on the sail can help prevent that from happening.
Luff telltales need to be a contrasting color, and it is good to have a different color on both sides of the sail. For most jib materials, using green for the starboard side and red for the port side works well. On black or darker-colored headsails, white telltales work best.
I like to have the port and starboard telltales offset slightly, with the starboard side about 1 inch higher than the port. I also like to use a row of three to five short telltales for the steering telltales because they provide a little more information about where the flow is attached to the front of the jib. For the other luff telltales, a single set per location is adequate. They should be placed 10 to 20 percent back from the luff.
For luff telltales, I prefer to use light-gauge wool for more sensitivity.
Leech telltales tell us how the wind is exiting the jib. In particular, they are key indicators of leech stall, when the jib is trimmed too tightly for the wind to travel around it. The leech telltales might need to be a heavier material because they take a beating when tacking. Put them 15 to 30 percent down from the head. Bright red is a good color that contrasts with the sky.
Now for the fun part—using your telltales to go faster. First, let’s discuss using them to set up the jib for the conditions. Essentially, the luff telltales show us the sail’s twist, and the leech telltales show us how tightly it is trimmed.
In underpowered conditions, we are usually trying to have the upper and lower luff telltales break evenly, indicating that the wind is hitting the whole luff at an even angle for max efficiency. Use jib-lead adjustments and jib-sheet changes to achieve this.
In overpowered conditions, we need to twist the jib to reduce heeling moment, so the inside upper telltales will not be flowing. This is OK. However, the leech telltales should never be stalled for more than a short time. Keep them flowing at least 80 percent of the time, even when underpowered. If they stall, you need to ease the jib sheet or move the lead aft to open the upper leech and re-create flow.
Once the jib is set up correctly, we use the steering telltales to keep the jib (boat) at the right angle to the wind. As a basic guide, we want both windward and leeward telltales flowing straight aft in lighter wind, or when there are waves. In stronger wind, and especially flat water, we can sometimes be inside the windward telltale, but never stall the leeward side for more than a second or two.
There are some subtleties in reading the telltales. “Full flow” is when both windward and leeward yarns are flowing straight back. This will provide maximum efficiency when underpowered. “Telltales dancing” means the yarn is flickering or streaming up slightly. Having the windward steering telltales dancing can be good, especially when overpowered. “Telltales stalled” is when the telltale is streaming the wrong way, a definite no-no for the leeward telltales.
- More: How-To , print fall 2021 , sail trim
- More How To

A Guide to Tactical Risk Management

The Wisdom of Augie Diaz

Why S-Turns, Roll Jibes and Roll Tacks Are Fast

The Path to Consistent Boatspeed

Luna Rossa’s New AC75 Marks Its Silver Age

Emirates Team New Zealand Splashes Defense Yacht

Wanderers of the Wayfarer Dinghy

Alinghi Red Bull Racing First to Reveal Its AC75
- Digital Edition
- Customer Service
- Privacy Policy
- Cruising World
- Sailing World
- Salt Water Sportsman
- Sport Fishing
- Wakeboarding

What Is The Jib Sail On A Sailboat?
The jib sail is the triangular-shaped sail that flies forward of the sailboat mast . Jibs can come in all different shapes and sizes, making them fit for a variety of purposes, so they’re important sails to have on a sailboat.
This article will help educate sailors on understanding the purpose and benefits of having a jib sail. We’ll also go over some tips for keeping it in great condition so your sails are always ready for a voyage.
If you’re looking to understand more about the intricacies of your boat then read on to find out all about your jib sail.
Armed with this knowledge, you’ll be prepared for any offshore adventure!

Table Of Contents
What is the jib sail, why is a jib called a jib, do you need a jib to sail, can you sail with jib only, how do you trim a jib sail, different parts of a jib sail, how do you reef a jib, can a sailboat have multiple jib sails, jib sail materials.

The jib sail is a very important part of the sailing experience. It is a triangular stay-sail set at the front of the boat, typically held up by furling, which allows for easy retracting and maintenance.
The jib sail generally takes most of its power from the wind instead of relying on direct force from the mainsail.
With this design, it can be adjusted quickly to suit different wind conditions or speeds for optimal performance.
While some may consider it to be a difficult piece of equipment due to its many variations, when used correctly the jib sail can often give more maneuverability and speed than traditional sails.
Overall, it is an integral tool for sailing enthusiasts who appreciate its power and adaptability.

The sailboat component known as a jib has an interesting name with an interesting backstory.
Many centuries ago, sailors would use these jibs to sail around and explore the world. Those same jibs were referred to by the nickname ‘jibboom’. This stuck with generations of sailors and eventually, they began referring to the component simply and solely as the ‘jib’.
Today, a jib is commonly used on sailboats and is a key component in their design. Cruisers rely upon it for navigation purposes, while racers use it to achieve greater speeds when going upwind.
Modern technologies have allowed us to improve upon this centuries-old contraption, but its basic name – the jib – remains unchanged in popularity.
When it comes to sailing, many people wonder whether or not a jib is necessary for their experience. In short, the answer to this question depends on what type of sailing one intends to do and their level of experience with the activity.
For newcomers to the activity, it is advisable to have a jib since it will provide increased stability. This stability can be helpful in ensuring that the boat does not capsize and that complete control is maintained at all times.
A jib is a smaller foresail than a genoa, so might be preferable on a smaller boat. It is easier to handle than a larger genoa sail.
Of course, it is also possible to sail on a main sail alone. It will be harder to balance the boat, making steering harder work and a main sail isn’t always the most appropriate sail for different wind angles, but it is absolutely possible to sail without a jib or genoa.
Ultimately, the decision between needing a jib or not boils down to personal preference as well as skill level when it comes to sailing. It’s even possible to use a sailboat without sails !

Sailing with jib only is possible, although it isn’t usually the preferred way of sailing if you have a mainsail. I have to admit that Adam and I love sailing on our jib alone in the right conditions.
With some proper and well-thought-out balancing techniques, some experienced sailors argue that a vessel’s performance can be improved with jib alone. For example, sometimes the main can block the wind when sailing close to downwind, and flying the jib alone helps you pick up more speed.
Ultimately what’s important to remember here is that it can be done but that it requires good technique and a strong knowledge of how different sails work together with one another and the vessel itself in order to get optimum performance out of any yacht.

Trimming a jib sail is an essential skill for any sailing enthusiast. Knowing how to make the necessary adjustments can make a huge difference between an enjoyable day out and a frustrating one.
It’s important to understand that each boat will be slightly different, so it’s worth taking the time to familiarize yourself with your vessel before attempting to trim your sail.
Before you head out, double-check all of the halyard tension, clew and yard position, runner tension, Cunningham positions, and outhaul settings for maximum efficiency.
Once you’re out on the water and ready to get started, use your mainsail as a reference point and adjust your jib accordingly. To achieve this, start by bringing in the clew until it’s approximately parallel with your boom, then ease off on any necessary halyards while dropping the tack until you reach optimum performance.
Gauging this accurately requires practice and an understanding of wind conditions. With a little patience and practice, you’ll soon know exactly how to trim a jib sail.

Understanding the different parts of a jib will help you to understand how it works and how to get the best possible performance from it when sailing.
- Luff -This is the sail’s forward edge. The luff of the jib is attached to the forestay.
- Leech – The sail’s back edge.
- Foot – The bottom edge of the sail
- Tack – The tack is between the luff and the foot of the sail and is attached to the boat with a line that can be adjusted.
- Head – The corner at the top of the sail between the luff and the leech.
- Clew – The clew is the part of the sail attached to the fuller.
Reefing a jib is a skill practiced by sailors everywhere. It involves carefully trimming the sail of the jib, making sure you show just the right amount of sail area to ensure maximum power and speed.
Having the ability to reef your jib is also a major safety factor when out at sea. The saying goes that if you’re questioning whether or not to put a reef in, you should have already done it. If you’re wondering whether to shake a reef out, have a cup of tea.
Most boats these days have their jib sails on a furler, meaning you can simply tension the furling line to reef the sail. Then, sheets are adjusted to alter sail shape, maximizing its ability to accelerate in different wind speeds and directions.
Often you will find that reefing the sails in high winds will actually give you more speed, as it will lessen your heel angle and give additional waterline length. The more experienced you get, the easier it becomes to know the sweet spot.

As jib is the name given to any foresail that doesn’t overlap the mast it is possible to have multiple jibs on board.
The most common type of sailboat to fly two jibs at once is called a cutter rigged boat. They have two stay sails which could both be jibs. It is more common to have a larger genoa on the outer stay and a smaller jib inside to give you greater flexibility in different conditions.
You could also carry a storm jib which is usually small and made from a heavier material and is attached to one of the stays in rough weather.
These essential sails are usually made from materials that are designed to be lightweight yet durable, depending on their use.
One of the most popular materials for jib sails is polyester, usually a type of laminated Dacron cloth. This gives a good performance but with the durability that most cruisers desire. Additionally, they can be designed with multiple layers to add extra durability.
Race sailors might choose to have jib sails made from something like Kevlar, a really light weight material that won’t stretch (but will rip more easily). You won’t find them often on cruising boats due to the high cost and lower durability of this material.
Conclusion: What Is The Jib On A Sailboat?
In conclusion, a jib sail on a sailboat is a triangular sail set between the mast and the bow. It helps the boat to move through the water and provides additional power when sailing upwind. It can be used alone as an excellent downwind sail too.
Beyond providing much-needed assistance with sailing, this setup also adds some great aesthetics to any boat!
Whether you’re interested in buying one for yourself or just out exploring boats on the water, be sure to look out for what type of jib sail is being used!
You might also be interested in these posts.
- How much do new sails cost?
- How long do new sails last?
- Best lithium marine batteries
Similar Posts

Sailboat Provisioning: How To Provision For A Sailing Trip

The 6 Best Drones For Sailing 2024

Buying A Sailboat To Sail The World In

Reefing A Sail: The Ultimate Guide

The Best Anchors For Sand 2024

The Best Fishing Tackle Box For Your Sailboat

The $tingy Sailor
Diy trailerable sailboat restoration and improvement without throwing your budget overboard.

How to Rig a Self-Tacking Jib for Free!
You may not have seen or even heard of a self-tacking jib before. They’re usually only found on luxury sailboats. But that’s exactly what one is, a headsail that sheets itself when you tack. You don’t have to cast off the working sheet and haul in the lazy sheet on every tack. In fact, after you set it up, you don’t have to touch the sheet again while sailing. You just push the helm to lee, come about as you normally would, and the jib passes through the fore triangle by itself and stops on the new lee side at the same sheeting angle as it was before the tack. I set one up for free and you can too.
Before I continue, a bit of legal housekeeping. This post contains affiliate links. That means I receive a small commission if you make a purchase using those links. Those commissions help to pay the costs associated with running this site so that it stays free for everyone to enjoy. For a complete explanation of why I’m telling you this and how you can support this blog without paying more, please read my full disclosure .
Self-tacking headsails are becoming more and more popular on high-end cruising yachts as designers strive to remove as much effort from sailing as possible with headsail furlers, in-mast mainsail furling, electric winches, autopilots, and more. Seems it won’t be long before sailboats are fly-by-wire like airplanes and driverless cars. How lazy will we get?

But there are practical benefits to a self-tacking jib if you:
- Are single-handed or short-handed on crew.
- Are short tacking through a narrow passageway.
- Have a broken jib car or winch that makes normal tacking impossible or dangerous.
- Or your crew are seriously chilling (lazy) and you’d rather not have to mind the headsail.
A selfie (tacker) you can really use
The basic principle of a self-tacking jib is simple; a means for the clew of the jib to remain sheeted throughout its arc of travel from one side of the sailboat to the other during tacks. Commercial self-tacking systems accomplish this with an arc-shaped track mounted to the foredeck. The jib clew is attached to the track by a single sheet to a car that glides freely on the track like a traveler. The sheet leads to the cockpit where the skipper can adjust the jib shape by trimming the sheet. Such systems can cost many hundreds of dollars to retrofit to a conventional yacht.
The picture below shows the system with a thick red line that I will describe and it cost me nothing new to set up.

Instead of a track fixed to the deck, this system uses a block temporarily fixed to the jib clew. It reuses one of the headsail sheets you already have to form a bridle on the foredeck for the block to ride on. The other headsail sheet is not used.
The only other parts you need are two turning blocks. They can be snatch blocks that you keep on hand for miscellaneous jobs, your spinnaker sheet blocks if they’re portable, or they can be permanent blocks that you install just for this purpose (in that case, your system won’t be free). Heck, even two carabiners will work. If you only have one block or carabiner, reave the sheet directly through the clew grommet in step 2 below instead and attach your block or carabiner to the side deck where it can lead the sheet. The clew will have a little more friction but not enough to keep it from working.
When I want to set up the jib for self-tacking, I just move my existing spinnaker sheet blocks forward from the aft coamings to midship. I won’t be flying the spinnaker at the same time so they won’t be in use anyway. I like these 40mm web attachment style blocks from Nautos . They’re high quality, inexpensive, and work great. Instead of lashing them with webbing, I use 5/32″ dyneema loops or soft shackles.

For easy, versatile, and economical ways to attach these blocks to almost anything like you see in the pictures here, check out the continuous loops of dyneema that I describe in How to Rig a Cruising Spinnaker in 4 Stingy Stages and DIY Soft Shackles for Quick and Easy Headsail Changes .
This self-tacking setup works best with a small headsail. I set up my 110% jib this way and it works okay. A larger headsail would not work. A 90% jib, storm sail, or trysail would work even better. That’s because, in order for the jib to set as flat as possible, the foot of the sail should be no longer than the distance from the sail’s tack to the jib sheet bridle.
Do it your self-tacker
To rig a self-tacking jib:
1. Tie one end of the sheet to a point on the deck approximately abeam of the mast and as far outboard as possible. On a C-22, a forward stanchion base is a good place. If you have a toerail, you have lots of choices and can adjust the bridle position for the best sail shape. The picture below (taken from the foredeck looking aft) shows the middle of my single sheet tied to the starboard forward stanchion base. The lazy half of the sheet is leading aft. The working half of the sheet leads out of the picture frame to the right. I keep a soft shackle tied to an alpine butterfly knot in the middle of my headsail sheet where I attach the clews of my headsails. I describe this more in DIY Soft Shackles for Quick and Easy Headsail Changes . That soft shackle is tied to the stanchion base here.

2. Lead the working end of the sheet to the foredeck and reave it through one of the turning blocks that you have attached to the jib clew. The picture below shows one of my spinnaker sheet blocks tied to the jib clew with a simple girth hitch. The continuous loop makes it easy to tie and remove in seconds.

3. Continue leading the sheet across the foredeck to the opposite point on the toerail or stanchion base and reave the sheet through the second turning block (or carabiner) that you attach there. The picture below (taken from the foredeck looking aft) shows the block tied to the port forward stanchion base.

4. Continue leading the sheet aft and through the jib car block as usual. Wrap the sheet a couple of turns around the winch and cleat it off as usual, leaving a couple feet of slack at the jib clew.
That’s all there is to it. Now you just need to trim the sheet out on the water.
Get your self-tacker into shape
To trim the self-tacking sheet:
- While pointed straight into the wind, raise the jib as you normally would. If you normally use one, the self-tacker works best without a pendant to raise the tack off the deck. You want the sail to open up as much as possible and to do that it needs to be as low as possible.
- Bear off the wind slowly until the jib fills.
- Trim the self-tacking sheet to get the best shape possible. Ease the sheet out and the clew will rise, the sail will twist, begin to luff, and spill air. Pull the sheet in and the clew will pull toward the deck, hook the sail toward the mast, and form a full, baggy shape. Experiment with your particular setup until you find the optimal shape that you can get when rigged this way for your wind conditions.
You probably won’t be able to get a nice, flat, foil shape, especially with a working jib but it will still work. I’ve made 4.5 knots with this setup in 10-15 mph winds and that was with a reefed mainsail and dragging a wad of weeds the size of a basketball wrapped around my keel cable. Temporarily suppress the rule in your mind that says you have to trim the headsail flat when sailing upwind. You can pull the rule back out when you revert to a conventional headsail setup.
When it comes time to tack, just announce “helm’s a-lee!” and come about. The clew block will roll across on the bridle that you have tied across the deck and the jib will set on the other side by itself.
When not to be self-centered
There are a few caveats that come with this technique:
- It works best in medium airs due to the compromised sail shape. Light airs are too weak to develop much forward power with this shape. The sail also isn’t flat enough for safe sailing in heavy airs. But if an unexpected gust comes up, you can blow the jib by casting the sheet off at the winch like you normally would.
- It doesn’t work well downwind because the sail is held too close to the center of the boat where it falls in the mainsail shadow. So use this setup upwind only or in very short downwind runs.
- You won’t be able to point very high into the wind, also due to the sail shape. Consequently, you won’t make much upwind progress if that’s your course. It’s best used when you’re casually daysailing or turning laps between two points 180° opposed. It works great for that.
- You can’t heave-to when set up this way because you can’t backwind the jib. It will just cross the foredeck and you’ll wind up tacking. To heave to, you have to reset your sheets to a conventional setup.
I think this is an interesting technique that’s useful in specific conditions. Racers and other sail trim experts may scoff and call it a dumb trick. Let them, but give it a try sometime and consider it another tool in your bag of sailing skills. You shouldn’t need to buy anything (or very little) to set it up and you’ve got nothing to lose by trying but a little of your time. I bet that if you set it up right, you’ll be pleased with how much more relaxing it can make sailing. Especially if you don’t have a particular destination in mind and you don’t care how fast you get there. Isn’t that some of the best of times to be had when sailing?
Would you like to be notified when I publish more posts like this? Enter your email address below to subscribe to this blog and receive notifications of new posts by email. You will also receive occasional newsletters with exclusive info and deals only for subscribers and the password to the Downloads page. It’s free and you can unsubscribe at any time but almost nobody does!
Subscribe to Blog via Email
Enter your email address to subscribe to this blog and receive notifications of new posts by email.
Email Address:
Share this:
21 thoughts on “ how to rig a self-tacking jib for free ”.
Looks good – looking forward to trying it out. Thanks Mr. $tingy!
I may have missed something, but I don’t see how the self tacking headsail can be adjusted to allow for heave to. To me, that’s one of the most important maneuvers a sailor need to have under his/her belt.
You’re right, Bill. I forgot to mention that as one of the caveats. You can’t backwind the jib when setup this way without first going forward and moving the normal clew knot back to the clew.
Just got round to reading this – what a great idea! Will try this next time I take Tamariu out – thank you $tingy, another winner!
I’ve recently sold off the last of my salt-water navy in favor (at age 81) of returning to lake sailing where the hint of menace that added spice to my coastal adventures for fifty years is blissfully absent. After restoring a derelict Rhodes 19 and launching her last summer, I quickly realized that instead of tacking every hour or two or three as on Penobscot Bay, I was coming about every five or ten minutes. Time for a self-tacking jib, but I am unwilling to spring a few grand for a Hoyt or whatever, I’ve been looking high and low for an easy solution for this matter. Bingo! Today I discovered The $tingy Sailor and this great article. I’ll be putting this great plan into action next week, and every time I call out “hard a-lee” this coming summer long, I’ll thank you that all it means for the crew is “hold onto your drink while I come about”. Ahhh…
Sail on, Eliot!
Nice trick, nice explanation, good warning of caveats. A riggig to try in my sailboat. Thanks!
Maybe a silly question, but I have a roller furler, not a hank on headsail. Is it still possible to use this set up with a furler? I imagine that you would just slack the sheet as you furl the sail. I don’t think the the clew block would be an issue. Any thoughts?
It shouldn’t be a problem. Give it a try!
Well, I rigged up this self tacking jib on my boat and love it!! It’s so much easier having guests aboard without them all constantly moving around to grind the winches and pull lines. I have it set up on a furler which makes the job even easier. The sail luff stops just before the mast, so it’s perfect. I am loving the ease of it! Thank you so much for this great idea!
I will try it on my 1977 Hunter 27 with 85% hank on jib. Thank you.
Thanks – Extremely interesting, and very clear!
From the introducing picture you can already see that this doesn’t work. In the picture the jib maybe uses 30% of its efficiency on a beat to windward. A real self tacking system gets 100 % out of the sail size. Needs a track and a sail that is designed low enough at the clew. A keelboat can be tacked slowly, so you have time to pull the jib sheet tight before the jib fills in the tack. We rarely use the winch handle on a J/80 while racing (international level) in up to 30 knots.
And yet, this system DOES work. I didn’t claim that it would work as well as a “real” self-tacking system and I state the limitations in the article. But for the average recreational sailor (not J/80 racers) that doesn’t need and can’t afford an engineered system, it works well enough to be an option in some situations.
Greetings , thanks for a very interesting article. I’m brand new at sailing just spent a year restoring a 17ft Proctor Pirate , hoping to launch next month so I’m looking all over the net for articles on sailing. I must add this one I am going to try for sure . Looking forward to more sailing info. Thanks for this =) Phill
Just out of curiosity, was the C-22 you were referring to a Catalina 22? We have one also, and I’m hoping a self-tacking jib will make my wife more amenable to cruising along the Southern California coast with our 110 percent jib. Also, was there a link for the soft shackle?
Yep, C-22 is shorthand for Catalina 22. You can read my post about soft shackles at DIY Soft Shackles for Quick and Easy Headsail Changes
Hi, Flying Scot (T) sailor writing. Just came accrost your article about the self Tacking Jib for free! Like’d it very much! Very clear and good directions. Do you think rig will work on my Flying Scot(t) ? Thanks. Flying Scot(t) from Syracuse NY.
Hi, Scott Because the mast of the Flying Scot is so far forward, it would only work with a headsail that doesn’t overlap the mast.
On a furling headsail, can this be rigged at the dock and the headsail rolled up until it’s time to unfurl? Hard for me to visualize how that would look.
Yes, works just the same but instead of having knots at the clew, you have a block.
Leave a comment Cancel reply
This site uses Akismet to reduce spam. Learn how your comment data is processed .

- Already have a WordPress.com account? Log in now.
- Subscribe Subscribed
- Copy shortlink
- Report this content
- View post in Reader
- Manage subscriptions
- Collapse this bar
How to Rig Your Small Sailboat and Prepare to Sail
In this lesson, you will learn how to rig a small sailboat to prepare for sailing. For reference purposes, a Hunter 140 daysailer was used for this learn-to sail tutorial. Before you begin, you can familiarize yourself with the different parts of a sailboat.
Install (or Check) the Rudder
Typically the rudder of a small sailboat like this one is removed after sailing to prevent wear and tear while the boat remains in the water. You need to reinstall it before sailing, or if it is already in place, check that that it is firmly attached (with optional safety lanyard securing it to the boat).
On most small boats, the top of the leading edge of the rudder has attached pins (called pintles) that are inserted downward into round rings (called gudgeons) attached to the stern. This is rather like the familiar “Insert tab A into slot B.” While the exact configuration may vary among different boat models, it’s usually obvious how the rudder mounts to the stern when you hold the rudder beside the stern.
The rudder may or may not already have a tiller mounted on it. The next page shows how to attach the tiller on this boat.
Attach (or Check) the Tiller
The tiller is a long, thin steering “arm” mounted to the rudder. If the tiller is already attached to the top of the rudder on your boat, check that it is secure.
On this Hunter 140, the tiller arm is inserted in a slot at the top of the rudder, as shown here. A pin is then inserted from above to lock it in position. The pin should be tied to the boat with a lanyard (short light line) to prevent being dropped.
Note that this tiller also includes a tiller extension, which allows the sailor to still control the tiller even when sitting far out to the side or forward.
With the rudder and tiller in place, we’ll now move on to the sails.
Attach the Jib Halyard
Because sunlight and weather age and weaken sailcloth, the sails should always be removed after sailing (or covered or bagged on a larger boat). Before you get started, you have to put them back on (called “bending on” the sails).
The halyards are used to raise both the jib and mainsail. At the sail’s end of a halyard is a shackle that attaches the grommet at the head of the sail to the halyard.
First, spread out the sail and identify each of its corners. The “head” is the top of the sail, where the triangle is the most narrow. Attach the jib halyard shackle to this corner, making sure the shackle is closed and secure.
Then follow the front edge of the sail (called the “luff”) down to the next corner. The luff of the jib of a small sailboat can be identified by the hanks every foot or so that attach this edge to the forestay. The bottom corner of the luff is called the sail’s “tack.” Attach the grommet in the tack to the fitting at the bottom of the forestay -- usually with a shackle or pin. Next, we’ll hank on the sail.
Hank the Jib on the Forestay
Hanking on the jib is a simple process, but it can feel unwieldy if the wind is blowing the sail in your face.
First, find the other end of the jib halyard (on the port, or left, side of the mast as you face the bow of the boat) and keep a good grip on it with one hand. You will be slowly pulling it in to raise the sail as you hank it on.
Beginning with the hank nearest the head of the jib, open it to clip the hank onto the forestay. It will be obvious how to open the hanks, which are usually spring-loaded to close automatically when released.
Then raise the sail a little by pulling on the halyard. Making sure there isn’t any twist in the sail, attach the second hank. Raise the sail a little more and move on to the third hank. Keep working your way down the luff, raising the sail a little at a time to make sure it isn’t twisted and the hanks are all in order.
When all the hanks are attached, lower the jib back down to the deck while you route the jib sheets in the next step.
Run the Jibsheets
The jib sail is positioned while sailing by using the jibsheets. The jib sheets are two lines that come back to the cockpit, one on each side of the boat, from the aft lower corner of the sail (the “clew”).
In most small sailboats, the jib sheets are left tied to the sail’s clew and stay with the sail. On your boat, however, the jibsheets may remain on the boat and need to be tied or shackled to the clew at this stage. Unless there is a shackle on the sheets, use a bowline to tie each to the clew.
Then run each sheet back past the mast to the cockpit. Depending on the specific boat and the size of the jib, the sheets may run inside or outside the shrouds -- the tensile lines that run from the deck to the mast, holding in place. On the Hunter 140 shown here, which uses a relatively small jib, the jibsheets pass from the sail’s clew inside the shrouds to a cam cleat, on each side, as shown here. The starboard (right side as you face the bow)) jibsheet cleat (with the red top) is mounted on the deck just to the starboard of this sailor’s right knee. This cleat secures the jibsheet in the desired position while sailing.
With the jib now rigged, let's move on to the mainsail.
Attach Mainsail to Halyard
Now we’ll attach the mainsail halyard shackle to the head of the mainsail, a process very similar to attaching the jib halyard. First spread the mainsail out to identify its three corners as you did with the jib. The head of the sail, again, is the most narrow angle of the triangle.
On many small sailboats, the main halyard does double duty as a topping lift -- the line that holds up the aft end of the boom when it is not being held up by the sail. As shown here, when the halyard is removed from the boom, the boom drops down into the cockpit.
Here, this sailor is shackling the halyard to the head of the mainsail. Then he can go on to secure the sail’s tack in the next step.
Secure the Mainsail’s Tack
The forward lower corner of the mainsail, like that of the jib, is called the tack. The grommet of the tack is installed at the bow end, usually by a removable pin inserted through the grommet and secured on the boom.
Now the luff (leading edge) of the mainsail is secured at both the head and the tack.
The next step is to secure the clew (aft lower corner) and foot (bottom edge) of the sail to the boom.
Secure the Mainsail Clew to the Outhaul
The clew (aft lower corner) of the mainsail is secured to the aft end of the boom, usually using a line called the outhaul that can be adjusted to tension the foot of the sail.
The sail’s foot (the bottom edge) itself may or may not be secured directly to the boom. On some boats, a rope sewn into the foot (called the boltrope) slides into a groove in the boom. The clew enters the groove first, forward by the mast, and is pulled back in the groove until the whole sail’s foot is held to the boom in this groove.
The boat shown here uses a “loose-footed” mainsail. This means the sail is not inserted into the boom groove. But the clew is held at the end of the boom in the same way by the outhaul. Thus both ends of the sail’s foot are firmly attached to the sail and drawn tight -- making the sail work the same as if the whole foot was also in the groove.
A loose-footed mainsail allows for more sail shaping, but the sail cannot be flattened quite as much.
With the clew secured and outhaul tightened, the mainsail luff can now be secured to the mast and the sail raised to go sailing.
Insert the Mainsail Slugs in the Mast
The mainsail’s luff (forward edge) is attached to the mast, as the jib’s luff is to the forestay – but with a different mechanism.
On the aft side of the mast is a groove for the mainsail. Some sails have a boltrope on the luff that slides upward in this groove, while others have sail “slugs” mounted every foot or so on the luff. The sail slugs, as you can see in this photo just forward of the sailor’s right hand, are small plastic slides inserted into the mast groove where it widens out into a sort of gate.
Again, first inspect the whole sail to make sure it’s not twisted anywhere. Hold the main halyard in one hand during this process – you will be gradually raising the mainsail as you insert the slugs into the mast groove.
Begin with the sail slug at the head. Insert it into the groove, pull the halyard to raise the sail a little, and then insert the next slug.
Before completing this process, be sure you’re ready to go sailing soon after the mainsail is up.
Continue Raising the Mainsail
Continue raising the mainsail with the halyard as you insert one slug after another into the groove.
Note that this sail already has its battens in place. A batten is a long, thin, flexible strip of wood or fiberglass that helps the sail keep its proper shape. They are positioned in pockets sewn into the sail in a generally horizontal direction. In this photo, you can see a batten near the top of the blue section of the mainsail over the sailor’s head.
If the battens were removed from the sail, you would insert them back into their pockets either before beginning to rig the boat or now, as you raise the mainsail in stages.
Cleat the Main Halyard
When the mainsail is all the way up, pull hard on the halyard to tension the luff. Then tie the halyard to the cleat on the mast, using a cleat hitch.
Notice that the mainsail when fully raised holds the boom up.
Now you’re almost ready to go sailing. This is a good time to lower the centerboard down into the water if you haven’t done so already. Note that not all small sailboats have centerboards. Others have keels that are fixed in place. Both serve similar purposes: to prevent the boat from skating sideways in the wind and to stabilize the boat. Larger keels also help lift the boat to windward
Now you should raise the jib. Simply pull down on the jib halyard and cleat it on the other side of the mast.
Start Moving
With both sails raised, you’re ready to start sailing . One of the first steps to getting underway will be to tighten the mainsheet and one jibsheet to adjust the sails so you can get moving forward.
You may also need to turn the boat so that the wind fills the sails from one side. A boat on a mooring, such as shown here, will naturally be blown back such that the bow faces directly into the wind – the one direction you can’t sail! Being stalled facing the wind is called being "in irons."
To turn the boat out of irons, simply push the boom out to one side. This pushes the back of the mainsail into the wind (called "backing" the sail) -- and the wind pushing against the sail will start the boat rotating. Just be sure you’re ready to take off!
Learn the Parts of a Sailboat and How to Communicate Them
Buying a Sailboat: Sloop vs. Ketch
Learn How to Sail a Small Sailboat
The 10 Best Inflatable Stand-Up Paddleboards of 2024, Tested and Reviewed
The Various Types of Sailboats and Rigs
Review of the O'Day Mariner 19 Sailboat
West Wight Potter 19 Sailboat Review
Owner's Review of the MacGregor 26 Sailboat Models
The 9 Best Beach Chairs of 2024, Tested and Reviewed
The Best Staycation in Every State
The 11 Best Two-Person Tents of 2024, Tested and Reviewed
Beaches in Long Beach, CA
12 Best Things to Do in Juneau During an Alaska Cruise
One Week in Scotland: The Perfect Itinerary
A Beginner's Guide to Sailing a Sailboat
Honolulu, Waikiki, and Oahu Gay Guide and Photo Gallery
IMAGES
VIDEO
COMMENTS
A sailboat jib is a triangular headsail located forward of the mast. The jib typically has less sail area than the mainsail. Typical single-masted sailboats usually have a jib, which is located between the bow and the mast. The jib takes advantage of the forward part of the boat. The jib is not the only kind of headsail, but it is the most common.
Look up jib in Wiktionary, the free dictionary. A jib is a triangular sail that sets ahead of the foremast of a sailing vessel. Its forward corner ( tack) is fixed to the bowsprit, to the bows, or to the deck between the bowsprit and the foremost mast. Jibs and spinnakers are the two main types of headsails on a modern boat.
The Jib is a triangular sail that does not overlap the mainsail. It is typically between 100% and 115% of the foretriangle size and is commonly seen on modern vessels with fractional rigs. The foretriangle is the triangular area formed by the mast, deck, and forestay. Learn more terms here.
A sailboat jib is an essential part of any sailing vessel's rig. A jib is a triangular sail that is set at the front of the boat, usually between the mast and the bow. It is the second most important sail on a sailboat and is typically used to help the boat turn and maneuver more efficiently.
Short Answer. A jib is a triangular sail that is set on a stay in front of the mast of a sailboat. To use a jib, the sheet attached to the clew of the sail must be pulled in to bring the sail around so that the wind fills it. The sheet should be adjusted to keep the sail trimmed properly while sailing.
What is a Yankee sail? A Yankee sail is a jib with a high-cut clew of about 3' above the boom. A higher-clewed jib is good for reaching and is better in high waves, preventing the waves crash into the jibs foot. Yankee jibs are mostly used on traditional sailboats. How much does a sail weigh? Sails weigh anywhere between 4.5-155 lbs (2-70 kg).
Description of a Jib. The Jib is also a triangular sail that increases sail area and improves handling. Therefore, it increases the sailboat's speed. Basically, the mainsail controls the stern of the ship whereas the headsail, which sits forward the mast, is most of the time a jib. One of the main functions of the Jib is that it funnels the ...
5. Steer and change course smoothly to initiate the jibe. Maintain control of the boat and be aware of the wind direction and potential obstacles. 6. Trim the jib by pulling in the new leeward sheet to fill the sail with wind on the new course. 7. Stabilize and balance the boat after completing the jibe.
A sail, which is a large piece of fabric that is attached to a long pole called the mast, uses the wind to pull a sailboat across the water. It has various parts, such as the head, tack, clew, luff, leech, foot, mainsail, jib, and batten. These components determine the shape and efficiency of the sail.
Learn how to safely and correctly jibe a sailboat with expert boating tips in this free video clip on sailing.Expert: Kelli Gant, Steve Damm, Ed PolkenhornBi...
A jib sail is a triangular-shaped sail located at the front of the mast, providing optimal performance depending on wind conditions. Jib sails generate lift when wind hits the curved surface and creates a pressure difference on either side. Types of jib sails include working jib, blade jib, storm jib, and drifter. ...
A basic sailboat is composed of at least 12 parts: the hull, the keel, the rudder, the mast, the mainsail, the boom, the kicking strap (boom vang), the topping lift, the jib, the spinnaker, the genoa, the backstay, and the forestay. Read all the way through for the definition of each sailboat part and to know how they work.
The Headsail: This is a generic term that refers to any sail that sits forward of the mast. The most common is the Jib. When a jib is so large that it overlaps the mast it is called a genoa. Parts of a Sail. Luff -A sail's forward edge. The luff of the mainsail is usually hoisted up and attached to the mast.
The jib on a sailboat is usually controlled by using two jib sheets that are positioned on either side of the mast. Using two separate sheets makes moving and manipulating the jib easier as you can adjust it from either side. If there was only one sheet, you would need to constantly reposition the sheet to the appropriate side.
Keep them flowing at least 80 percent of the time, even when underpowered. If they stall, you need to ease the jib sheet or move the lead aft to open the upper leech and re-create flow. Once the ...
Existing Head Sail - Measure your existing Jib or Genoa sail's general dimensions. Luff (leading edge of your sail), Leech (trailing edge of your sail) and the Foot of your sail. These measurements will be used to compare the measurements that you take from your rig to ensure that everything is working out well.
The jib sail is the triangular-shaped sail that flies forward of the sailboat mast. Jibs can come in all different shapes and sizes, making them fit for a variety of purposes, so they're important sails to have on a sailboat. This article will help educate sailors on understanding the purpose and benefits of having a jib sail.
Part 2 focuses on how the jib and mainsail work together to drive the boat forward. Learn how the sails affect the air all around the boat, including upwind ...
Bear off the wind slowly until the jib fills. Trim the self-tacking sheet to get the best shape possible. Ease the sheet out and the clew will rise, the sail will twist, begin to luff, and spill air. Pull the sheet in and the clew will pull toward the deck, hook the sail toward the mast, and form a full, baggy shape.
The jib sail is positioned while sailing by using the jibsheets. The jib sheets are two lines that come back to the cockpit, one on each side of the boat, from the aft lower corner of the sail (the "clew"). In most small sailboats, the jib sheets are left tied to the sail's clew and stay with the sail. On your boat, however, the jibsheets ...
This includes your sheets, the halyard and also the fibers that make up your sail. As a result, as soon as there is stretch there is some distortion to the shape of the sail no matter what your sheet material. Ultimately, the idea is to complement the fabric and engineering of the sail by choosing the appropriate line for the halyard and sheets.
Just make sure the jib halyard pulls slightly away from the forestay. Otherwise, if the pull is parallel, it's possible to get the halyard wrapped around the stay, which could stop the sail from furling. "Halyard wraps are the #1 reason systems have to be replaced in the offseason," Seldén's Scott Williman warns.