Chebacco Sailboats – Designed by Phil Bolger
Chebacco news 74 – dennis gamble’s photos.
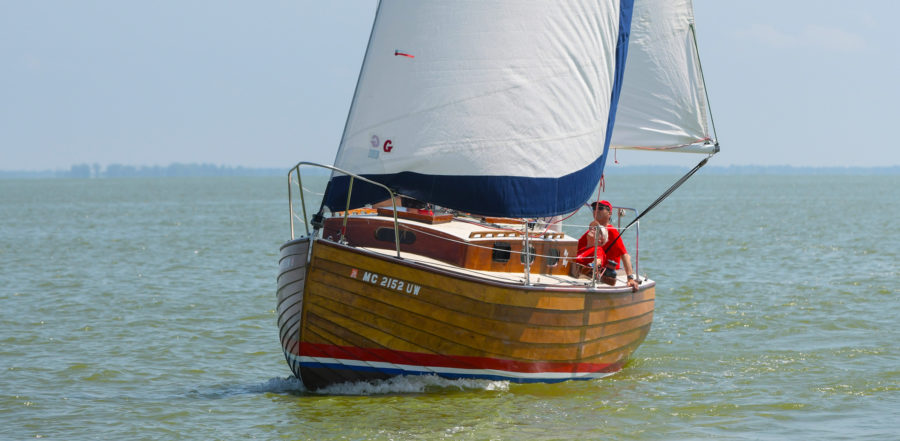
I launched my Chebacco “Moonshine” for the first time last year. Here are some pictures from last year’s sailing for the website if interested.
I sail mostly in Wisconsin, with Lake Dubay being my home lake.
-Dennis Gamble
Thanks Dennis

An Appeal For Support
By mid 2022 I will have been hosting this site for Chebacco owners for 8 Years. There have been lots of interesting posts but I rely on the community out there to send me photos and stories to include. It is a challenging world out there at the moment – but I am sure you are still thinking and working and sailing Chebacco’s, so keep the information coming. Email me at <my given name>@chebacco.com
Also, I am up for some web hosting costs this August ’22 (about US$100 per year x another 8 years), this amazing site is too big for a free host. Thanks to everyone who has made a donation in the past – but if you haven’t or you wish to make another donation I would appreciate your help. There is a donate button on the front page at the bottom.
29th March 2022
Chebacco News 73 – Ton Visser’s photos
25th September 2021: here some fotos ,last weekend sailing around Texel (holland)
Chebacco News 51
News, questions, and boats for sale..
| Lots of good contributions this issue. Been awhile since the last one, been busy, very busy. Franticaly putting in a shop and making room in house for what a friend of mine calls my re-wife. No burning questions pending, and no boats for sale that I know of. Enjoy the issue, and happy holidays Chebacco Richard |
Chebacco’s for sale:
Some Pictures – David Nedder
I have plenty of coaches.
Due to our drought conditions, the lake level is about 12″ below normal. The anchor holder looks a bit off, but when I let go of the anchor rode,down it goes down immediately. The anchor can remain installed while trailering.
Normally the boat floats off of the trailer at this launch site.
Now ready to swing around to the pier.
Pier Side.jpg
My iron wind is somewhat recalcitrant.
The Pewaukee Lack Yacht was holding a regatta that day. Mid August my brother and I took our families out to Pewaukee Lake for a cruise. The winds were moderate 5-10 MPH with an occasional gust to 12. Since my wife is not an enthusiastic sailor, I keep the pucker factor as low as possible. In moderate wind I can seat my guests so that the only ballast I shift is myself. This makes for an enjoyable cruise.
Pewaukee lake is about 5-6 miles long and about 1.5 miles at its widest. It has small islands and the winds tend to swirl and take a somewhat circular path. I can set the main and mizzen for neutral helm and “Mary-Beth, too” will sail in a large arc for about 30-40 minutes before changing tack.
Attached are some pictures taken of the “Mary Beth too” sailing.
<palign=”left”>It was light air on Pewaukee Lake at the end of August. The photographer is Lloyd Schultz of Madison, WI. He can take beautiful pictures on an overcast day.
Happy New Year.
Photos – Bill Jones
Hello Richard,
Here are a few photos for the next edition of the Chebacco News. The Carol Leigh was started in September 2003 and launched June 2005. I have not had her out much due to weather and schedule conflicts, but the little time on the water we have had has been quite enjoyable. Some quick GPS readings indicated a maximum speed of 7 knots once the wind kicked up a little.
There are lots of construction photos and notes at www.people.vcu.edu/~wmjones
Construction is of ½ inch marine fir ply and mainly douglas fir dimensional lumber. The hatch covers and CB trunk brightwork is white oak.
Preparing to pull out of the fine facilities at the Grey’s Point Campground in Topping, Va.
Here we are approaching the mouth of the Rappahannock River as it enters the Chesapeake Bay. We chose this point for the naming ceremony as it was too busy at the dock. Visible in the foreground is one of the wooden blocks I made for the Carol Leigh.
A nice shot of the fleet admiral relaxing on her namesake flagship.
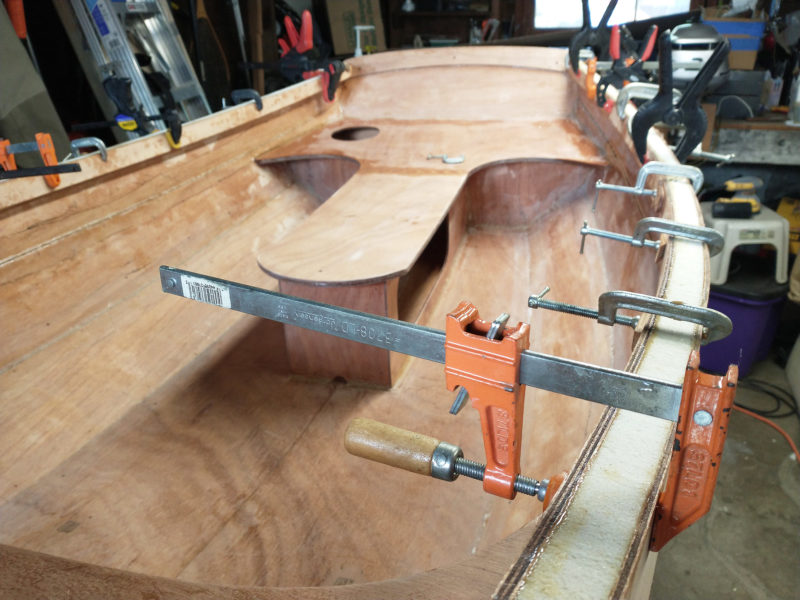
Lapstrake Raised Deck Build update – Ben Ho
Almost 18 months after I ordered the Chebacco plan from PCB, and one year after I cut the first piece of marine plywood, my lapstrake hull is finally finished and turned over. The hull was completed in June, and then sanding, fairing, epoxying, painting…took the whole summer. The unusual tropical heat we had this summer in Ontario didn’t help. Here are some pictures.
Hull is done, waterline struck with a laser pointer, working on the bottom finish with epoxy mixed with graphite and green pigment. As it turned out, the black from the graphite pretty well overrides the green, so the resulting color is very-dark green. It took a few tries before I got the hang of rolling on epoxy with a smooth finish.
Here’s what the hull looks like after 5 coats of epoxy, 2 coats of primer, and 2 coats of Interlux paint. I use System Three for epoxy and primer. The primer is wonderful stuff – it hides small imperfection well and sands easily. The sheer strake is left unpainted.
The big moment! The turn-over crew is preparing to get the hull out from the garage. The widest part is about 1” wider than the garage, so the whole setup needs to be tilted first.
The hull is built on a strong-back with casters, so it rolls around easily.
With six guys it was surprisingly easy to lift it up by 90 degrees. The safety rope prevents it from accidentally rolled all the way. The frame and temporary molds are still solidly attached to the hull to provide rigidity.
Roll-over complete, the hull is sitting on nice soft grass. Now the frame is taken off….
And the hull lifted up and put back on the frame, right side up!
And pushed back into the garage.
And ready for the interior work. Now the fun begins!!
Super Sail – Charles Gottfried
While there is no question that Bolger’s Chebaccos are among the finest sailing, most beautiful and most versatile boats in the (known) world, that’s not to say improvements can’t be made. I was recently persuaded to enter my boat in the Shipyard Raid, a staged race from Gabriola Island, BC, to Pt. Townsend, WA., and decided that I’d attempt to optimize a few things to squeeze that last bit of speed out of Full Gallop , my sheet ply chebacco. The first thing that came to mind was: More Sail!
Figure 1 – Full Gallop at Sucia Island
An optional jib is shown on the plans, approximately 25 square feet in area, and recommended to be set flying from the stemhead. Since I had a perfectly lovely 2’ bowsprit fitted, primarily to carry an anchor, I decided that the standard jib would probably not set right, being carried too far forward. Additionally, others have reported that their jibs didn’t seem to enhance performance very much, if at all, and were a pain to set up. Some head scratching followed…
I didn’t have precise angles or sizes figured, but I did have the dimensions of the standard jib. Through calculations of center of resistance, center of effort, prismatic coefficient, and righting moment, along with making magic signs and uttering the sacred incantations, I expertly re-sized the stock jib sailplan.
Actually, I guessed.
I kept the leech and luff the same length, and increased the foot dimension, from 4’ to 8’. This increased the size of the sail to about 50 square feet, and helped move the center of effort (CE) for the sail back, to counter the effect of the bowsprit moving it forward. My intent was to keep the CE about the same, and since the sprit moved the CE forward 2’, the increase in the foot, to 8’ should move it back to about the same place, more or less. I hoped.
I spoke with the good folks at Sailrite, the sail kit manufacturers, with whom I have done business before. They’re experts on sails, kits, materials, and making things work well. Jeff Grant advised me that the standard jib arrangement on the standard boat probably didn’t work well because the ‘slot’ between the sail luff and the mast was so small that it probably channeled little wind to the mainsail, and may have even hindered the effectiveness. He further pointed out that, flown from the bowsprit, that problem would lessen, at least somewhat. The further forward from the mast the jib would set, the better for efficiency. It made sense.
Chebaccos’ front deck is tiny, especially if its pitching and rolling in a seaway. Since I didn’t want to have to try to stretch out to the end of the bowsprit to attach the sail to a forestay, I decided to set the sail ‘flying’. This involves incorporating the wire stay into the sail luff, instead of fastening it between the masthead and bowsprit. This wire-reinforced sail is then attached to halyards that hoist not only the top of the sail, but can pull in the tack as well, from a block on the end of the bowsprit. This let me lead halyards back to the cockpit, attach the sail tack and head, and haul it out to set on the sprit. Both top and bottom halyards can be tightened, and the sail is drawn as tight as possible. The sheets are rigged in the conventional manner, thru blocks lashed to eyes on the coachroof, and then to cleats. Now, with a little practice, I can set and strike the sail while standing in the opened hatchway, safe from spray and a potential swim from the foredeck.
Performance
I initially set the sail on a June afternoon with 8 mph sustained winds, with some gusts. It set perfectly the first time, and after messing about with temporary blocks to carry the sheets, I headed across the lake. It had been a while since my last sail, but I immediately felt the improvement in speed. Shortly, I was joined by a lazer sailor, who admired the boat, and, sailing next to me, coached me in fine-tuning the sail. The tweaks made some improvements, and were easily accommodated with the moveable blocks I’d put together (they were on loops of line that could be attached to coachroof or beam-mounted cleats). Eventually, I found that I could outsail the lazer on some points of sail, which surprised both of us “Hey, I’ve raced at the Lazer Nationals, and this is a fast boat. And you’re pulling away!”.
In hindsight, the sail could be made even larger, by as much as an additional 12”-16” on both the leech and luff. The 8’ foot seems about right, tho. I’m not certain how wise that much additional sail would be, except in very light winds. In the end, I’m pleased with the sail as it is, and even without the extra area, the improvements are noticeable. I can’t speak highly enough about the Sailrite folks – the kit was great, done quickly, and at just over $200, the price was right. Now, I’m just waiting to hear how good it looks from behind, as told to me by the other Shipyard raiders.
Sucia 2005, and a cruise through the San Juan Islands – Jamie Orr
It was a dark and stormy night….
And noon the day after wasn’t looking too hot either, as Dad and I stowed our gear in Wayward Lass , our faithful Chebacco, and backed her down into the waters of Sidney Channel. It was Friday, July 8 th , and we were off to the 2005 Small Boat Rendezvous in the San Juan Islands. The weather forecast said we might get winds up to 25 knots, so we put in one reef just for luck.
But when we left the wind was still about 15 knots and was perfect for a beam reach to the northern tip of Sidney Spit, three miles away. We used this relatively sheltered stretch to get organized, and get into our foul weather suits as we expected some spray while crossing Haro Strait, between Sidney Island and the San Juans.
Sure enough, once we rounded the end of the spit, we started to feel the effect of the wind blowing unchecked up the Strait, and before long we had the second reef tied in. It was slow going for a while, sailing to windward over a bumpy sea. However, it didn’t last and by 1:45 we shook out both reefs and started to make better time. The log shows that our top speed was over 6 knots, but by the time we reached the entrance to Roche Harbor the wind was gone and we had to motor in to the customs dock, then out again for the second leg of our trip. (It’s about 10 miles from Sidney to Roche, and another 15 to Sucia. There is a rough map of the islands at the very end of this tale.)
The wind came back then, although not as strongly, and the tide was under us, so it didn’t take long to sail down Spieden Channel to President Channel, running northeast between Waldron and Orcas islands with Sucia visible right ahead. We still had the tide, as well as a southerly wind that was just right for the whole (unreefed) sail. The clouds rolled away and I crawled out of my damp foulies, but I had jumped the gun, and was putting them back on half an hour later. Still, it was nice to have a chance to air out, even briefly.
The rain came and went, but the wind stayed fairly steady, and we arrived at Sucia in the early evening. This year we were rendezvous-ing (is that a word?) in Fox Cove, but as we came through the entrance we saw only one boat on the beach, Jim Ballou’s Mill Creek kayak, with Jim standing on the grass above it, waving vigorously. He’d crossed from Orcas the morning before, and it had been so rough since then that he was wondering if anyone else was going to show up!
We didn’t realize it then, but others had already shown up. There were two or three keelboats moored in the bay that were part of our group, but as I recall, we didn’t meet their crews until the following day. These were, I think: Doug and Will from Olympia in their Ranger 23; Thea and Mike Schifsky in their “overgrown H-28”, Raven . And I believe Ryan Shellborn, with his children Thompson and Emily, was already there too, in his 37 foot steel ketch Makoolis .
And there were more coming – before nightfall, Greg and Shelley Stoll arrived in their MacGregor 21, Windisfree , accompanied by Andrew Linn in his Newport 16, Aurors . The final arrivals for the day were Jay Kammerzell and his son in their homebuilt Bolger Micro.
|
|
|
My memory is hazy about who arrived when, but I think everyone else arrived on Saturday afternoon. In no particular order, they were:
Chuck Gottfried and Dean Bishop in Chuck’s Chebacco Full Gallop ;
John Kohnen in his Footloose skiff, Pickle ;
Frank Mabrey in his MFG runabout;
Randy Wheating in his Chebacco Bluster , with his wife Lisa and sons Jacob and Samuel;
Peter Binley and family in their newly-acquired San Juan 23, Java ;
Ron Mueller in his 20 foot Jarcat; and
Bill and Sandy Childs in their 19 foot Bartender.
(I wasn’t thinking ahead, so I don’t have pictures of all of the15 boats in attendance. I’ve posted some at the end, just before the map – my thanks to John Kohnen for letting me use so many of his photos.)
|
|
|
|
Before everyone else arrived, some of us went out for a sail. Jim came along with Dad and I on Wayward Lass , and Windisfree and Aurors were also out. We patrolled between Sucia and Orcas, hoping to meet some of the Saturday arrivals, but were too early and were back in the cove for lunch before they came. The trip over was enough time on the water for most folks, and the rest of the afternoon and evening were spent socializing and admiring each others’ boats. The weather co-operated and we all had a fine time. Greg and Shelley Stoll’s campfire was a gathering point in the evening – I think about half the crews were camped ashore.
|
|
Sunday dawned clear, with nearly everyone looking forward to a lazy day. However, Andrew had to leave that morning, to be back at work on Monday. Things were looking good as he left but a powerful headwind came up shortly after, causing him to have a very long day. His description of it is posted on the Western Oregon Messabout list, the URL appears at the end of this account. Meanwhile, the three Chebaccos, Bluster , Wayward Lass and Full Gallop , plus Jay in his Micro were out sailing together, a real Bolger crowd. We didn’t do any racing, though, we settled for just messing about.
|
| |
| Bluster | |
The wind, while we were outside the cove, was from the north. This, combined with a strong current running southeast kept us from sailing north around the island. It also discouraged us from going very far to the south as we would have had a tough time getting back the cove again, so there was no expedition to another island this year. No one seemed to miss it, though, perhaps because the trip over had been more demanding.
Monday morning, it was time for everyone to leave. One by one they said their goodbyes, pulled up their anchors or pushed off the beach and headed out of the cove. Jim Ballou was the first, we watched him as he paddled the two and a half miles to Orcas Island. Conditions were good for the crossing, but that Mill Creek looked awfully small out there! Most boats were headed southeast to the Lummi ramp or Bellingham, but Wayward Lass , Full Gallop and Makoolis were bound the other way, southwest down President Channel to start a few days cruise in the San Juans.
Pulling up our own anchor, we sailed out of the cove, then paused to watch the remainder of the group leaving. John Kohnen in Pickle , and Frank Mabrey in his MFG runabout, were the very last to go. They didn’t know it yet, but the same wind that made Andrew’s trip a tough slog was going to do the same for Monday’s sailors. See more URLs at the end for details.
With a final wave to John and Frank, our mini-fleet turned southwest and spread its wings. We had a moderate breeze from the south, but sailing close-hauled we were soon separated as each boat and helmsman followed their own path. Wayward Lass was to windward, while Full Gallop was slightly off the wind, presumably to keep her big jib drawing. Makoolis was in the rear – can’t remember why, but Ryan was more or less sailing single handed as his kids aren’t very big, and he had some big sails to handle.
I don’t know if you could call it a race between Wayward Lass and Full Gallop , but we were two similar boats going the same direction, so draw your own conclusions. I know that we in Wayward Lass were keeping a sharp eye on Full Gallop . Both Chebaccos were sailing well and as the wind strengthened, we started to wonder if we could take the time for a reef, or if it would put us irretrievably behind. Wayward Lass had a slight lead but as we drew closer to Waldron Island, it became apparent that the time for reefing was now, not later, so we pointed Wayward Lass into the wind to heave to and we reefed as quickly as we could.
With its cat-yawl rig, a Chebacco doesn’t heave to in the normal way. What I do, and I think most Chebacco sailors do, is point straight into the wind, and sheet the mizzen on the centreline, while letting the mainsheet run loose – it also helps to have the centreboard down. This will keep usually keep her pointing upwind, but allows her to sail backwards. I’ve clocked Wayward Lass at 3 knots, going dead astern, so it’s not a method you should use for riding out a storm. However, it’s more than adequate for reefing or for finding that hidden thermos for a hot drink. One other thing, the rudder should be centred as well, or the boat will veer off to one side or the other. I do this in Wayward Lass by dropping the tiller into a slot cut in the floor boards for the purpose.
Back to President Channel — Full Gallop had stopped to take in a reef too, so our relative positions were unchanged. Wayward Lass was now sailing more easily although there was still some spray flying at times. Looking back at Makoolis , we could see she had heaved to as well, presumably also to reef. Ryan confirmed this later, saying his crew preferred not to sail at too great an angle. Working on his own in that big ketch made reefing a longer job, so Makoolis fell behind before she started sailing again.
Meanwhile, we were now well into the channel between Waldron and Orcas, with Waldron Island to leeward. We could soon see that Wayward Lass was going to get through without tacking, but Full Gallop , being to leeward, had to tack out towards the centre of the channel, putting her well behind. (However, Full Gallop exacted a terrible revenge later in the summer, during the Shipyard Raid….)
From the eastern end of Waldron, we could see the passage between Jones and Orcas Islands directly south of us. We continued on to the southwest a little longer, until we thought we could point at the passage, then tacked. We found we hadn’t gone quite far enough, but the ebbing tide was pushing us still further southwest, so we hoped that would compensate for our early turn.
Makoolis had finished reefing some time before, and was now sailing down the channel towards us. I was amazed at how close to the wind she was sailing – I’d always understood that ketches were not close-winded at all. She was also making excellent speed through the water.
|
| Makoolis Full Gallop |
As we approached the passage between Jones and Orcas (and yes, the tide had given us a nice boost to windward) and started tacking through it, Makoolis continued to gain at a great rate, tacking through unbelievably small angles. And I shouldn’t have believed it – Ryan had had the engine going ever since he stopped to reef. Just idling along, but it had let him sail much closer to the wind than he could have without it, and it boosted his speed as well. A great demonstration of effective motor-sailing, and he certainly had me fooled.
Passing Steep Point on Orcas, we came into sight of Deer Harbor and into more sheltered water. The wind dropped to about five knots, bringing an end to one of the truly great sails, one of the best we’ve had in Wayward Lass .
I wanted to go right into the dock to refill the gas and water tanks. We hadn’t used the engine much, but I had given away a gallon of gas at Sucia, and had spilled almost as much in the transfer (a siphon hose would be a useful (and green) thing to carry in future). The landward side of the fuel dock looked empty, so we slipped past another wharf sticking out from the shore and prepared to make a wide turn and come alongside.
As we turned, though, we saw the reason for all the space — a line of “wet paint” signs stood along the dock, so we aborted and headed back outside.
However, all was not lost. I’d seen a Chebacco-sized space at the very far end of the dock, the windward end. This would be a little harder to get into since the land not only turned the wind, but blocked most of it, leaving us only a light air from the north, dead on Wayward Lass’ nose as she edged in again. This meant we had to tack several times in the narrow space between the dock and the shore. As we got nearer our goal, we gained less and less on each tack, until we didn’t seem to make any progress. I think there must also have been a very slight current coming from further up the harbour that confounded our efforts.
In frustration, on the next tack towards the dock I let out several feet of mainsheet. Perhaps we had a gust of wind at the same time, I don’t know, but Wayward Lass surged forward towards the line of parked boats. I could feel weather helm and didn’t think we could turn downwind in time to clear the boats, so I went with the flow and put the helm down. Wayward Lass turned neatly into the wind and although the sails lost their drive, the speed we’d picked up carried us nicely up towards our berth. The burst of speed had also caught the eye of one of the dock attendants, who came a-running to stop us T-boning someone’s runabout, but no fending off was necessary and he only took our line as we squeezed past the last boat and up to the dock.
It’s all in the attitude – I just behaved as if I’d meant to do that. We even got a couple of compliments on our boat-handling. (Har!)
Once we were fueled and watered, we cast off again, still under sail (well, we had to keep up appearances, didn’t we?). Makoolis had anchored by then, just south of the marina, and Full Gallop was rafted alongside. We did the same on the other side.
| Like a Mama Duck and a pair of fat ducklings.
|
|
The next day was calm, so we motored south and east from Deer Harbour. Shortly after we passed the village of Orcas, a gentle breeze came up, lasting long enough to carry us north around Shaw Island and down between Canoe Island and Flat Point on Lopez. The wind died away then, and since the tide was turning against us, we started engines again and motored the last mile or two into Fisherman Bay
|
| Full Gallop
|
Here I suffered a major disappointment. I’d heard great things about Holly B’s Bakery, and her cinnamon buns – imagine my shock when we learned that the bakery was closed on Tuesdays! We consoled ourselves with cinnamon treats at a restaurant instead, but it wasn’t the same. There’s definitely another trip to Fisherman Bay in my future!
On Wednesday morning, Ryan and his young crew turned Makoolis south towards Cattle Point, at the bottom of San Juan Island, to sail up the west shore looking for Orcas (the killer whales, not the village or the island.) Full Gallop and Wayward Lass went north instead, around the top of Lopez, then out into Rosario Strait to James Island. Both Chuck and I wanted to see James as it was one of the scheduled stops for the Shipyard Raid in September, and both Chebaccos were signed up. We anchored for a short time there, but it’s a poor anchorage, so we motored into the nearby sandy bay on Decatur Island. There we celebrated the sunset with margaritas and other tequila-based rituals. (The Raid didn’t use James either, in the end, but went south to Watmough Bight, a much better anchorage and a jumping off spot for the crossing to Port Townsend.)
|
|
| Full Gallop |
We were nearing the end of our time. In the morning, we said goodbye to Full Gallop’s crew who were bound north and east to Bellingham Channel. It being calm, Wayward Lass motored north up the west side of Rosario Strait to Obstruction Pass then west through the islands again. As we neared the passage between Shaw and Orcas once more, a northerly wind came up and we finished the day with a good sail back to Deer Harbor.
The next morning, our last, was also calm and we started off under power again. We had a look in at Jones Island, another planned Raid stop and an attractive anchorage. A light wind came up from behind (the east) and we sailed slowly along the south side of Spieden Channel. Halfway through the channel, the wind grew confused, but eventually settled in the northwest and we were able to clear the channel before the tide turned. Then we had another slow sail across Haro Strait to just south of Forrest Island, near Sidney Island, where the wind finally left us and we started the motor again. A short time later we were officially back in Canada, ready to go home.
There was one small hiccup that I mention as a warning to others. I must have backed in too far when we launched the week before, and the salt water caused enough corrosion in that short time that the left rear wheel on my van wouldn’t turn.. I tried driving to force it loose, but it just scraped along so I called a tow truck to haul the van to Sidney Tire. The guys there took the wheel off, then whaled away on the brake drum (?) with a big mallet. My kind of mechanics! This freed things up in no time, and there was no damage to be found. They said it wasn’t worth charging for, so three cheers for Sidney Tire! We soon had Wayward Lass on the trailer, and that was the end of our San Juan adventure.
As it was last year, the Small Boat Rendezvous is well documented:
· Andrew Linn’s journey home is at http://groups.yahoo.com/group/MessaboutW/message/8482
· John Kohnen also described his trip http://groups.yahoo.com/group/MessaboutW/message/8475
· Randy Wheating’s account is in the July 16 Chebacco page ( www.chebacco.com if you’re not reading this on the Chebacco page)
· Greg Stoll is publishing his story in Duckworks, the URL for the third part is http://www.duckworksmagazine.com/06/gatherings/sucia3/index.htm and this has links to the first two parts.
· While it’s not part of this story, I’ve mentioned the Shipyard Raid. You can read about it, and what is planned for 2006, at www.shipyardraid.ca/ , which has links to published articles about it.
And here’s a few more photographs of some of the rendezvous boats:
| Bartender | Bluster Fib |
|
| Raven |
| Makoolis |
|
|
| , so go visit their site sometime. It shows the islands very nicely – Sidney, on Vancouver Island, is off to the west as shown. Lummi Island and Bellingham are southwest of Sucia. The red lines show Wayward Lass’ |
Messabouts, Buildings, and Boat storage – Richard Spelling
Here are some pictures from the Arkansas messabout this summer, and a few others. It went over much better than my attempts to have Oklahoma Messabouts. Probably because, on the face of it, I’m not a very sociable person. I like specific people just fine, but not strangers, and certainly not crowds of them. When I go to messabouts I have to force myself to talk to other boat builders, which is the whole reason for going to messabouts! Not a great formula for an event host. Phil Lea doesn’t have this problem. He even married a politician, or a “political advisor”. But then again, I married a preacher, so that probably doesn’t say a whole lot. There were more boats here than I have pictures of, and I only remember a few names. (I am absolutely HORRIBLE with names). So I apologize if I don’t name your boat in the picture. Feel free to send me an email and I will identify you and your boat. Anyway, to pictures.
Some pictures of the local abandoned park. You can sort of get to it by road, but the road leading down to the park has been closed off, so you can only get to within a mile or so of it. The best way is to go by water. It used to be tradition in our family to take the boat here on the 4th of July and watch the fireworks on the lake.
Phil Lea in his Junebug, in the hot dead calm on lake Dardanelle.
JM in his traditional double paddle boat pose
I was convinced this was a production boat. It’s not, it’s a homebuilt, custom, fiberglass job. Neat
cooling tower. LEXX in the for-ground
Max’s AF4. Took it for a spin, nice boat. Totally different than a sailboat. You can actually go places.
extreme carbon fiber double paddle canoe. Phil about to try it.
Phil tries it.
What does it say about the modern world when the most successful advertising for something on ebay is “not the cheap stuff you get at Wal-Mart”? My gray plastic “super tarp” bought on ebay, specifically “not cheap Wal-Mart tarp”, is actually holding up nicely. Better than the expensive nylon/Cordova one, even. Should get another year or two out of it.
By then I will have the overhang on the side of the shop built for the boat. Yes. I spent the last few months in a frantic effort (needed to get the machine shop out of the spare bedroom) to build a shop, something I’ve been planning for years. Collecting parts for, drawing layouts of, etc. It’s 18ft x 35ft with 10ft tall walls. Even put in insulation (which, oddly enough, you put on BEFORE you put the sheet metal on). It could have been bigger, but it’s “cozy”, and easy to heat and cool. The upside is that I now have a 10 foot tall wall that’s 35 feet long to build a shed roof onto, and enclose a nice spot to park the boat. I even have plans for the building’s first paint job, it’s going to get a camo finish, to match the winter woods. In the summer you can’t see the building from the road because of the leaves on the trees, but in the winter you can, sort of. Hence the paint job. Even have a camo key for the building!
And I’m stretching my metal storage shed out as well.
Why the need for all the additional space? Well, the wife is taking a sabbatical from the preaching business, and moving in with me. So we will then only have two homes to maintain! Then she is going to start looking for a position elsewhere. She calls is “sending her papers worldwide”.
My job is going fine, even if it’s 100 miles from my house. (and new shop!) I sometimes get frustrated with the red tape from working for Uncle, but other than that it’s going ok. (we have a saying at work. “They give you a spoon, and tell you to build a castle. Then they hide the spoon). I’m getting pretty disgusted with the prospects for a job in Tulsa, so if the wife finds something “worldwide”, I would be open to relocating.
As I told her when I re-married her, my only requirements are a place to park the boat, and a shop. A man must have priorities, after all!
Chebacco News 36
How to get the best out of your chebacco-20.
Fraser Howell
Bill Samson
These days, probably over 95% of 20 foot sailboats are rigged as Bermudan sloops, with a tall mast, supported by shrouds and spreaders, a triangular mainsail and a jib or genoa foresail, with, possibly, a spinnaker for downwind work.
In contrast, Phil Bolger’s Chebacco-20 is a cat-yawl, with a short, unstayed mast, a high-peaked gaff mainsail with a relatively long boom, and a jibheaded mizzen sail with sprit boom.
There are loads of experienced sloop sailors around, but very few experienced cat-yawl sailors to advise Chebacco owners how to get the best performance out of their boat under a variety of conditions.
The authors have pooled their experience of sailing their Chebacco-20s to produce this little document. We don’t necessarily agree on everything – Chebaccos tend to vary a little, depending on how they were built, how the sails are cut, and so on. Anyway, here goes!
First of all, a table of the rig arrangement that works best for various wind speeds:
| Beaufort Number | Wind speed (knots) | Mainsail | Mizzen |
| 1, 2 and 3 | 1 – 10 | no reefs | set |
| 4 | 11-16 | One reef | set |
| 5 | 17-21 | One reef | furled |
| 6 | 22-27 | Two reefs | furled |
| 7 and up | >28 | Furled | furled (use OB) |
1. You may want to reef earlier (by one Beaufort number) if sailing single handed. The body weight of a crew can make a great difference to how the boat handles.
2. You might be surprised to read that the mizzen should be furled when the main is reefed. You might think that this would lead to lee helm, but in fact we have found that the tendency for the heeled hull to round up into the wind counteracts this and even gives some weather helm.
3. Leaving the mizzen set in strong winds makes the boat heel a lot, adds little to forward drive, and generally makes her harder to handle.
4. Under most circumstances it is perfectly OK to leave the mizzen furled, but you then lose the possibility of heaving to using the mizzen.
The mizzen sail helps you to heave to. All that needs to be done is to release the main sheet and centre up the mizzen so that the boat weathercocks. She won’t lie with her head directly into the wind, but will still lie pretty close, which is helpful if you want to drop the main to take in a reef. If you want to make sure she heaves to on starboard tack, shove the tiller to port – The boat wants to sail backwards when hove to, and this makes sure she settles down on the tack where you have ‘right of way’ – handy when reefing!
It’s much better to reef before setting out, than doing it on the water – especially single-handed. In other words, look at the weather forecast before setting out and reef according to the worst weather you’re likely to encounter on the trip. If you’re caught out, reefing is most easily done by heaving to, using the mizzen to hold the boat head to windward or, if you’ve got a crew, putting on the OB and heading to windward while one of you ties the reef in.
Furling the mizzen
The mizzen is very easy to furl and unfurl. Most people simply slacken off the snotter (the sprit tensioning line), line the sprit up along the leach of the sail (leaving it attached to the clew), then twirl the sprit so that the sail wraps itself around it. The end of the snotter can then be used to tie a half hitch or two around the mast and sail to keep it tidy. Unfurling is even easier; undo the half hitches holding the mizzen furled, and let it unwind (- the wind will help you). Be careful that the sprit doesn’t whack you on the head when eventually it comes out! The final step is to tension the snotter.
The Centerboard
The Chebacco-20 behaves just like a large dinghy. You’ll get the best out of her by lowering the centerboard for beating and reaching, and raising it for running before the wind. With the Chebacco being shallow hulled, though, a little bit of board left down, off the wind, can improve handling.
Partially raising the centreboard can help, too, when heavy weather helm develops.
Of course the Chebacco has a shallow salient keel, and is well mannered even when beating with the board up. She does make a lot of leeway in these circumstances, though.
Sailing Backwards!
If you live among crowded moorings, you might want to master the trick of sailing backwards from your mooring to get into clear water. This is achieved by letting the mainsail fly, and backing the mizzen. You can steer using the tiller – tiller to port to move the back-end of the boat to starboard, and vice versa. Once you’re in the clear, you can harden in the mainsheet and you’re sailing!
The Chebacco is capable of pointing pretty high, and should tack through 90 or 100 degrees in reasonable sailing conditions. It is fatal for performance, though, to strap the mainsail in tight. Remember that the boom is very long and that the main should lie at an angle rather like that of, say, a genoa on a conventional sloop. So the end of the boom should never come inboard of the corner of the transom or all you’ll get is a heeling effect with little forward drive.
The mizzen should be trimmed to give just a little weather helm. When the weather blows up you’ll find that the mizzen needs to be let out to such an extent that it’s flapping. That’s the time to furl it. Some of Phil Bolger’s designs have used fully battened mizzens, on the theory that they can be feathered without slatting. He has had varying reports on how effective this is. This would call for a halyard and other expenses and handling complications.
Using a jib?
It is possible to fit a jib to a Chebacco. Fraser Howell has added a short bowsprit and flies a 60 sq. ft jib which counteracts weather helm nicely, as well as giving extra drive. It is hard to manage the jib without a crew though.
Under Power
Maximum speed under power (4.5 hp) is 5.5 mph. Efficient speed under power is 4.5 mph, at which you’ll get approximately 9 mpg with a 4.5hp motor. The point being made is that a 5hp motor is perfectly adequate for reaching hull speed.
Short shaft motors are OK, but if you are sailing single handed and go forward to adjust things at the mast end, the prop will lift clear of the water. The same will happen in steep seas. If you’ve no worries about the OB grounding, then a long shaft motor may be preferable.
The above notes were prepared by a group of sailors with actual experience of sailing their Chebacco-20s in a variety of conditions. Anybody else with actual experience in a Chebacco is very welcome to add their two cents worth to this document.
Dear Richard,
First of all thank you very much for taking up Bill Samson’s newsletter and setting up such a wonderful new chebacco website. I found the new articles very interesting and looking forward to the next one.
Maybe a nice addition to the site would be some kind of Chebacco registry. It could have basic information (and maybe a picture) of the boat and contact info of the owner.
After a long gestation, KITTY HAWK our lapstrake chebacco, finally hit the water of the Venice lagoon. She has been built as specifed in the plans except for the mast tabernacle (as designed in the “cruising version”) and a bridge deck (a-la-Story). Hull is painted black with cream deck, stained cabin sides and coamings, teak rub-, toe-rails and trims.
I am in the process of learning to sail her (playing around with halyards, outhauls, etc.) to get the most out of the sail). It seems to me that she could use a little more sail area-around here it is mostly light winds (or too much wind) and KITTY HAWK has a little trouble keeping up with the local fleet of flat bottomed traditional luggers. One of these boats of size comparable to a chebacco spreads about 300 sf of canvas! So far I have not been able to break the “5 knots wall” even in 15-20 knot winds”. She does have a bit too much weather helm in stronger breezes, so I think I’ll experiment with a jib (around 50-60 sf) on a bowsprit.
Nevertheless, I’m really impressed by the stability and maneuverability of the boat under sail. She is also great for camping, except for the gloop-gloop-gloop chortle on the laps that resonates in the cabin and takes some getting used to! She is a real beauty and is receiving a lot of attention from the other members of the sailing club where I keep her, which, aside from some handsome trad luggers is mainly populated by ugly duckling fiberglass boats. The tabernacle set up is essential for passing under bridges in and around Venice. It was made according to Bolger’s plans, but the whole thing is awkward to set in place single-handed and might have to be modified. On Sunday Kitty Hawk posed for a photo session under sail and will send you photos as soon as they’re developed.
keep in touch, Vincenzo .
Chebacco News 31
Chebacco news 31 – october 2000.
The Big Trip!
Bill Samson, Jamie Orr and Les Orr
Jamie Orr writes:
The big adventure is over now, we’re all back home, and life is settling back into the normal routines. I thought I’d try and record our (Wayward Lass and crew’s) trip for Chebacco News, with my impressions of how the boatperformed.
This was a watershed event, the first trip in Wayward Lass. This was her fourth time in the water, and the second time the sails were up. It’s about 35 miles from the most Southeastern point of Victoria to Point Wilson, near Port Townsend. Adding another 3 miles to the Boat Haven in Port Townsend, and a bit more to Fleming Beach where we launched, and we probably covered some 85 miles in total, crossing and recrossing the Strait of Juan de Fuca between Vancouver Island and Washington State.
We got away from the launching ramp at 9 am on the 7th. When we left, the weather was overcast, with light to moderate westerly winds. There was a small craft warning at the (western) entrance to the Strait, but conditionswere okay at the eastern end. The forecast was for stronger wind from the south by late afternoon. I hoped we could sail southeast at first, then east along the Washington coast when the wind shifted. We started out on a direct course for Point Wilson, along the Victoria shore until we felt confident that everything was working properly, then changed to a more southerly course to cross the strait, and be able to take advantage of the expected wind change. However, the wind dropped fairly soon, and when it came back it was right on our nose. The sails came down and we got down to some serious motoring.
Visibility wasn’t too great, maybe 3 or 4 miles at this time, but we felt we could find our way with chart and compass – we also had a Garmin II GPS that a friend insisted on lending us, although neither Dad nor I felt comfortable relying completely on that as we hadn’t done much with it. We had 1 to 2 foot waves most of the time. With the fog and overcast sky, it felt chilly until we opened the thermos and had something to eat. (I’m a believer in keeping the furnace fuelled.)
After an hour or two we could see the land well enough to identify Dungeness Spit, which sticks out into the strait from the US side, and turned onto an easterly course for Point Wilson, or at least where the chart and compass said it ought to be. After a while more we identified Protection Island at the mouths of Sequim and Discovery Bays. It took a long time to bring it nearer, but eventually we were level with it, and had definitely identified Point Wilson ahead. About here we tried sailing again, but the wind was just too much from the east to make our course. Since the forecast was for strong southerly winds, and we wanted to get in early enough to find a berth and have a quiet night, we went back to motoring again.
At Point Wilson the wind and tide were both against us, and the GPS, which had reported some 4.5 knots most of the way, dropped until it was only 1 knot right opposite the point. The wind by this time was getting close to the predicted 20 knots, I think. Once around the corner, we hugged the shore to Point Hudson, 2 miles on. Port Townsend is built on Point Hudson, so once there, we had more or less arrived. Around that corner and another mile and we were at the Port Townsend Boat Haven, a big marina well sheltered by a long breakwater. We called US Customs, who were extremely helpful and patient with the rookie skipper, and were assigned permanent vessel identification and PIN numbers, along with a clearance number for this visit. The trip over took 8 hours from dock to dock.
The Fame of Salem

In January of 2001 Michael Rutstien commissioned us to do a preliminary design and detailed cost estimate for a representation of the schooner HANNAH. (America’s first naval warship) What Mike intended to do with this vessel was to use it as a charter vessel out of Beverly, MA. Unfortunately, when everything was added up it turned out that the HANNAH was going to be a larger investment than Michael could afford and the city of Beverly was not quite ready for such an endeavor so Michael started looking at other options.
Later that year Michael found what he thought was a suitable charter vessel on the west coast and negotiated both to buy the vessels and for use of a dock at Pickering Warf in Salem for his charter business. Before Michael went out to close the deal on his new vessel he stopped by the shop and I asked him why he didn’t have me build him a boat. Michael answered “your boats are too expensive.” Of course I replied “the HANNAH was to expensive.” Luckily the surveyors and the coast guard didn’t like the boat Michael wanted as much as he did and we began talking again shortly after that.
Given Michael’s interest in history and the fact that he had located his business in Salem I knew what Michael would want was a representation of a historically important Salem vessel that would fit his business plan and his budget. As luck would have it there was a picture of just such a vessel in Dana Story’s SHIPBUILDER’S OF ESSEX. This vessel was the thirty ton Chebacco boat FAME which went on to become a very successful privateer out of Salem. Because I had already done exhaustive research on Chebacco boats (when I designed and built the LEWIS H. STORY in 1998) I was able to immediately start working out a preliminary design and cost projection while Mike did further research on FAME.
Michael came up with a great deal of information not only about the original FAME but also about those that built and sailed her as well. (See his book FAME A SALEM PRIVATEER for more details) Interestingly enough given FAME’s tonnage the boat I came up with didn’t look anything like the one in Dana’s book and in the end Michael discovered that the boat in the picture was in fact not the 30 ton Chebacco FAME at all but a much larger and earlier vessel. Another little tidbit about the original FAME that Michael came up with was that contrary to what other historians believed was that that vessel was actually pink sterned and not square sterned and so we changed the design accordingly.

Regardless of all the research Mike did, I titled the original drawings for the vessel ” 30 ton Jigger” and not schooner FAME. The reason I did this was to avoid confusion over the fact that there was not nearly enough information about the original FAME for anyone to build an accurate replica. Further I think anyone serious about historic ship design should note that in spite of my efforts to keep the vessel authentic to the period it was my intent to make her first and foremost a safe comfortable and commercially viable charter vessel.
It was for these reasons that we decided to build the hull using sawn frames and trunnel fastenings. These traditional materials and methods are still the most effective and efficient way to produce a low maintenance and long lived vessel. Like wise the decision to use traditional plywood practical purposes as well. Builder Brad Story introduced this type of decking in the Essex yards and they have proven themselves to the point were they are now considered the standard Essex method as opposed to the obsolete plank type deck that has not been seriously used for a generation.
Above the water the new FAME’s looks about like what we believe a typical Chebacco boat would look like. She is full forward, fine aft and caries a high but typical pink stern. For the safety of her passengers she carries a bit more freeboard and slightly higher bulwarks but this is easily hidden by different collared cap rails bulwarks wales and scupper streaks hide her freeboard well.
Although Chebacco boats and pinkies were known for having a slightly raised foc’sle deck, FAME’s fore deck is raised slightly higher than most to allow for six foot two inch head room in her foc’sle and to make the break in her deck chair height for passenger seating. It should also be noted that although constructed in a typical fashion as fish hatches that both the engine room and main hatches are slightly larger than what they would have been and are also at chair height for more passenger seating. Although enormous by the standards of the day the FAME carries a typically proportioned binnacle box just forward of the tiller. This box serves a multitude of purposes. First it’s close proximity to the tiller helps serve as a barricade to keep passengers forward of the helm and sheets in clear view of the operator of the vessel. Secondly, under the binnacle box is housed the engine room ventilation and the required shut-off’s. Thirdly, the binnacle box houses the bilge alarms and bilge pump switches which are required by low to be within in full view of the helmsman. And finally the box houses the engine panel, controls, radar and other electronics necessary for the safe operation of the vessel. Interestingly enough, when all was said and done there was no room in the binnacle box for the binnacle so as the coast guard suggested the owner mounted a modern brass compass on top of the box.

The vessel’s auxiliary power is from a hundred and sixty-horse Yanmar diesel turning a twenty two-inch x 12 inch pitch two-blade propeller.
As far as the vessel’s rig is concerned it is very typical of the type of rig that the original FAME likely carried although it is slightly cut down so that the vessel is easier to handle and so that that she exceeds Coast Guard stability regulations. The standing rigging is made of galvanized with wormed parceled and served and the running rigging is made of three strand Dacron. The spars are made from solid spruce cut on near by Hog Island. And the sails were made of 9oz Oceanus ships cloth in the loft on days when it was to cold to work outside.
Construction started on FAME in October of 2002 and she was launched on June 14, 2003. She made her maiden voyage from Essex to Gloucester on July 4, 2003 during which she was sailed through out of the basin and most of the way down the river. What is more is that she has enjoyed a good career carrying passenger on historic charters out of Salem ever since.
As a final note it should be mentioned that in the spring of 2004 she came back and had her focsle fitted very nicely with 4 bunks, a head, a table and settee and a galley.
H.A. Burnham, Boat Building & Design 11 Burnham Court , Essex, Massachusetts 01929 Phone: 978.768.2569 | Email: [email protected]
Boat Profile
Portage Pram
A towing tender for two adults and their gear
From Issue September 2023
W hen my wife and I decided to start cruising together, we acquired a 19′ Phil Bolger–designed Chebacco gaff cat-yawl and quickly realized that we’d need to find a dinghy as well. Although it will float in a foot of water, the Chebacco’s weight and bulk make shore landing more challenging than we are used to in either our Oughtred Arctic Tern or Adirondack guideboat, both of which can be easily beached. Moreover, we cruise the tidal waters of Oregon and Washington, where the possibility of being stuck aground in an outgoing tide makes it prudent to anchor out and row ashore.
The first season we towed a plastic sit-on-top kayak. It was easy to transport and light enough to carry solo, but it was a wet ride, had no cargo capacity, and was challenging to climb aboard from the Chebacco.
The following winter, I researched other lightweight options, including an inflatable packraft, as well as some plywood boats like the Nutshell Pram. I eliminated the packraft because it seemed it would sit low in the water and be another wet ride. While the Nutshell is a proven design, at 90 lbs it would be too heavy to lift and carry by myself.
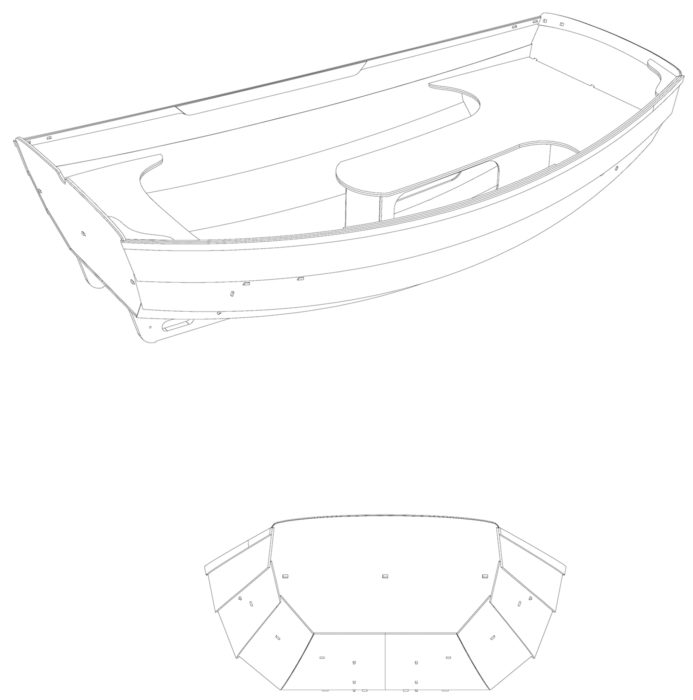
Upon further research, I discovered the 6′ 8″ by 3′ 8″ Portage Pram, available as a kit with CNC-cut plywood parts and having a finished weight of 35 lbs. I borrowed a completed pram that a friend had built, and after a few minutes at the oars I realized that its combination of light weight and good handling would be perfect for our needs.
The design of the Portage Pram has been updated to include a foam gunwale sandwiched between two pieces of plywood. Bulkheads under the seats fore and aft create sealed flotation compartments, which can also be used for dry stowage if access hatches are added.
T he Portage Pram was originally designed for solid-wood construction in the 1970s by Bill Peterson at Murray G. Peterson Associates. Duckworks Boatbuilders Supply prototyped an ultralight plywood version in 2017 and soon after began selling kits. (Recently, Duckworks started offering a sailing version of the kit.)
The rowing-only kit I ordered arrived in a flat-packed crate approximately 7′ × 2′ × 3″. All pieces were precut and required only minor sanding. A 190-page digital manual, illustrated with color photographs and drawings, guides builders through the steps of construction. The manual was helpful, although it was last updated in 2021 and did not represent all aspects of the latest updates to the design (and could be edited for brevity). As an example, the manual showed a previous version of the gunwales, which were composed of 6mm plywood inwales and outwales supplemented amidships by shorter inwale doublers, each made of two layers of 6mm plywood laminated inside the inwale. The kit was delivered with an updated gunwale construction: closed-cell foam pieces to be encapsulated in plywood strips and fiberglass to create a curved bow-to-stern box beam.
Even when a few pounds over the design weight of 35 lbs, carrying the Portage Pram to and from the water is an easy task for one person.
The pram is initially assembled with zip ties, using the stitch-and-glue method. Its benches have precisely cut tabs that connect to slots in the hull. The chines are filleted with thickened epoxy. The gunwales, lower chines, and entire bottom of the pram are covered with fiberglass for strength. Building the pram is straightforward and involves basic woodworking tasks, such as trimming plywood, drilling holes, applying epoxy, and sanding. This makes it an easy project for first-time builders. I spent about 60 hours on the construction, with some extra time figuring out how to assemble the foam-cored gunwales.
The completed pram has a comfortable 11″ × 32″ aft bench. A 40″-long T-shaped forward bench, along with two sets of oarlocks, allows a rower to shift as needed to balance a second person or heavy load in the boat. The 8″-high benches sit atop sealed compartments, each providing about 1.5 cubic feet of flotation or dry storage if ports are added for access. No floorboards or foot braces are specified in the plans. The recommended oarlocks are tubular plastic sleeves installed vertically through the gunwales.
My boat weighs 43 lbs, including a stainless-steel pad-eye for towing, two nylon cleats, two pairs of bronze oarlocks, and two watertight plastic inspection ports. Even as a middle-aged man, I find the pram easy to load onto my car’s roof rack or roll up a beach on a fender. Carrying the boat solo from car to shore is easy.
Trim is all-important in the Portage Pram. With a single rower onboard the twin skegs are not fully submerged, but despite this the boat still holds its course well. With a passenger seated in the stern, the skegs provide excellent directional stability.
G etting in and out of the pram from a dock or a boat is like climbing aboard a large canoe. The pram can slide horizontally if I don’t place my weight in its center but overall is fairly stable. Due to its flat bottom, it rolls very little, especially when we climb aboard or adjust our weight while seated. When using the pram solo on flat water, I find it stable enough to stand up in. It can comfortably hold two adults, a full 3-gallon gas can, and a bag of groceries.
Although no oar length is specified in the plans, I used the Shaw and Tenney oar-length formula and made 6′ 6″ straight-blade cedar oars, which are effective and stow flat on the seats while towing. The two rowing stations function well as designed, and the boat balances nicely, with one or two aboard. At 6′ 1″, I am unable to fully stretch out my long legs when I’m rowing at the center station with my feet braced against the aft bulkhead. When I’m rowing at the forward position, I just rest my feet on the lower strakes. Although I prefer foot braces in a rowing boat, I do not miss them in the pram because their absence keeps the boat light, and I only use the pram to travel short distances. The boat rows comfortably at around 2 knots; at faster speeds the oars and bow splash, getting me, and the inside of the pram, wet. There is a sculling notch in the transom; it works, but with a 6′ 6″ oar, I find it challenging to use while maintaining good trim by squatting near the aft thwart.
The forward seat allows the rower to shift his weight into the bow and thus trim the boat to comfortably carry a passenger. Unusually, for a boat of this size, the pram has two rowing positions, allowing for correct weight distribution.
The pram tracks well with one person aboard, and even better with two. While rowing solo, the rocker allows it to turn quickly and playfully, but it never turns without my choosing to. With a second person aboard, the two skegs on the aft end are better engaged with the water and keep the boat going straight, even in a strong crosswind. The pram tracks and rows comfortably in winds up to about 10 knots; however, splash and spray come on board more often when there is any kind of chop or wake. Surprisingly, while towing it through 2′ to 3′ chop or in crosswinds, the interior can remain almost entirely dry.
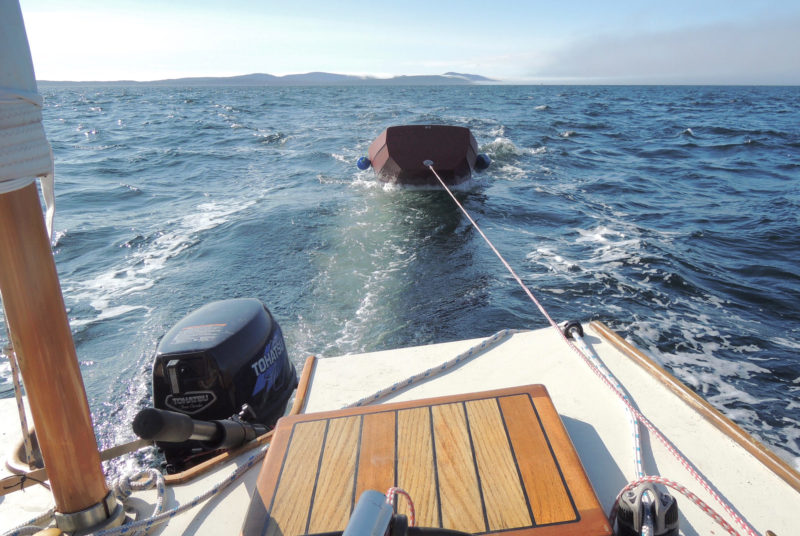
When under tow behind the author’s 19′ Chebacco, the Portage Pram tracks well, following politely whether going straight or turning. Even with a bit of chop or swell, the pram stays dry and upright.
The pram is impressively well mannered when towed by our Chebacco under sail or motor. It follows our track whether going straight or turning, and whether the water is choppy or smooth. Even when faced with multiple large wakes from passing trawlers, the pram rises without tipping or taking on water, then resumes following behind. It never surges forward during rough conditions, threatening to hit our sailboat.
Bruce Bateau , a regular contributor to Small Boats , sails and rows traditional boats with a modern twist in Portland, Oregon. His stories and adventures can be found at his website, Terrapin Tales .
Portage Pram Particulars
Length: 6′ 10″
Beam: 3′ 8″
Weight: around 35 lbs
Portage Pram kits are available from Duckworks for $1,099.
Is there a boat you’d like to know more about? Have you built one that you think other Small Boats readers would enjoy? Please email us!
Share this article
Join The Conversation
We welcome your comments about this article. If you’d like to include a photo or a video with your comment, please email the file or link.
Comments (3)
Are plans only available?
Duckworks implies that you can buy plans, but I could not find anything besides the kit on their website.
Billy Atkin designed a similar little pram that he called “Tiny Ripple,” which was one of the designs in the MoTorBoaTing Ideal series. His was only 6′ long. It had only single plank (i.e. no topside curvature) flaring topsides, instead of the rounded configuration seen here. Atkin always argued for flare–sometimes extreme flare–on the grounds that it increased safety and secondary stability. He claimed that this tiny boat could function as a life boat, with watertight compartments at bow and stern. I never put it to the test.
I quickly realized that the full thwart across the stern made it very uncomfortable for rowing from the center station (even though I am not a tall guy), so I made the aft seat narrow enough that I could comfortably plant my feet against the stern transom. And I built mine out of 1/4″ fir plywood rather than the solid cedar planks Atkin called for. Had Brynzeel or one of the other high-quality marine plywoods been available at the time I would have used something around 4 mm in thickness, thereby saving weight. I made a finger slot in the forward edge of the little stern seat, which made carrying the pram upright the easiest way.
I towed the dinghy behind my little 21′ Ed Monk Sr. cutter all around the San Juan Islands. One time, sailing with a fresh breeze on a broad reach up the Strait of Georgia into swells rolling down from the north, the dinghy was planing with a taught towline. A pair of dolphins picked us up briefly, then one of them dropped back to check out the dinghy. Both the cutter and the dinghy seemed to come alive and did a lively dance in that rare, perfect combination of wind and waves. One of my most cherished memories.
I was always pleased with the rowing qualities of Tiny Ripple. It tracked quite well, even with a small single skeg, and went almost as easily with an extra crew member. In the harbor, I could easily outpace the little Livingston dinghies of similar size. I built at least two of these, including one for my dad. He used his for fishing in the small lakes around Lake Chelan in Washington state, often taking my mother along. I believe he sometimes made it go with a small electric outboard.
Leave a Reply Cancel reply
Your email address will not be published. Required fields are marked *
Stay On Course
More From This Issue
From The Editor
Brother Jim’s Paddle
We both had done long cruises in small boats, though he had done many more and continued even after getting married and having twin daughters. Our fathers were teachers and…
Summer Breeze
Designed to be the most boat from the least materials the Summer Breeze is a robust all-purpose skiff targeted primarily at pleasurable rowing and sailing in protected waters, but also…
We acquired a 19′ Phil Bolger–designed Chebacco gaff cat-yawl and quickly realized that we’d need to find a dinghy as well. Although it will float in a foot of water,…
Jim Schroer
We sailed the sloop to Hawaii. I had rerigged it with two jennies to run downwind, a tradewinds thing, but they overpowered the little boat, so we only used one.…
A DIY Light Bar
Conventional trailer lights have it hard: they are often cheaply made and poorly wired; they are subject to the indignity of regular dunking; and they rely on the metal of…

Product Reviews
A Universal Marine Compass
One boat had a compass that hung in a simple bracket mounted on the forward bulkhead and could be removed to be used as a handheld bearing compass. I researched…
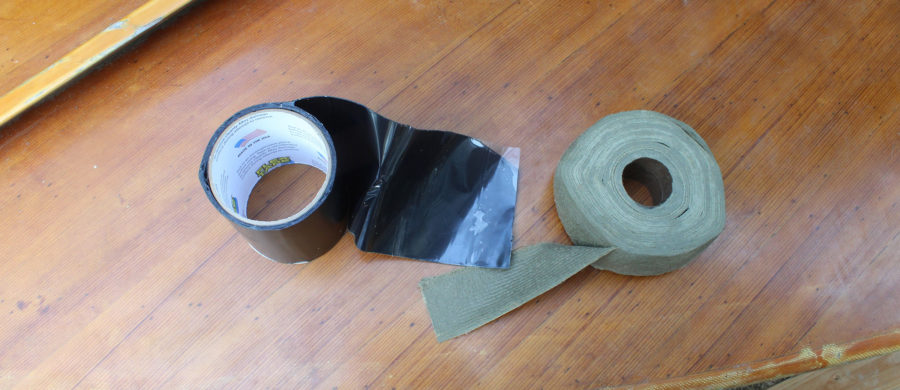
Flex Tape vs. Densyl Tape
If the kayak took on water, it would be easy to get ashore and my safety would never be compromised, but getting back to the launch ramp overland wouldn’t be…
Reader Built Boats
John Greiner, His Way
John Greiner celebrated his 85th birthday in February 2022 and, six months later, sailed his newly launched 24′ boat into a slip at the North Cape Yacht Club in La…
More Boat Profile

Peeler Skiff
The requirements were simple. The boat had to be light enough to tow behind a four-cylinder SUV, small enough to fit in a garage, and capable of getting two and…
Saturday Night Special
I had been hearing about New Zealand boat designer John Welford’s idea for the Saturday Night Special for a few years: a fast beach cruiser so simple to build that…

John Welsford’s Navigator is a 14 1/2′ centerboard beach cruiser and daysailer built in glued-lapstrake plywood. Welsford offers several rigs for this pretty little boat: Bermuda racing sloop, a lug…

Norwalk Islands Sharpie 23
Bruce Kirby deemed his Sharpie-class boats “cruising Lasers for grown-ups.” Kirby’s sharpies are flat-bottomed, centerboard cat-ketches with unstayed masts.
Subscribe Today!
Become a subscriber today and you’ll recieve a new issue every month plus unlimited access to our full archive of backlogged issues.
Already a subscriber? Sign In
Subscribe For Full Access
Flipbooks are available to paid subscribers only. Subscribe now or log in for access.
|
|
| |
|
Ben Ho Fall 2007
| ||
|
|
Camp Cruising sailboat designed by Phil Bolger
Building the sheet-ply chebacco-20.
By Bill Samson
The Chebacco-20 is a trailerable dayboat designed by Phil Bolger, the prolific American naval architect who is perhaps best known for his ‘Instant Boat’ designs for amateur boatbuilders. The design was commissioned by Brad Story, the boatbuilder of Essex, Massachusetts – a few miles along the coast from Phil’s base in Gloucester. The resulting boat is unballasted, with a shallow keel and centreboard, displacing about 1200 pounds (550 kg). She relies on her form, rather than ballast, for stability although some owners have seen fit to put in two or three hundred pounds of ballast. She is rigged as a cat-yawl, with a high peaked gaff main and small sprit-boomed mizzen. The cockpit is huge, for a 20-foot boat, and the cabin minimal – with room for a couple of sleeping bags on the floor. With a simple boom-tent, there’s room for two more to sleep in the cockpit.
Construction is ‘tack and tape’; rather like ‘stitch and glue’ but without the stitches. The plans give accurate dimensions for the bulkheads and panels (- no lofting needed -) and the bulkheads are set up and panels tacked to them.
The joints between the panels are left slightly open and are filled with thickened epoxy. Glass tape is epoxied inside and outside the hull at each joint and the entire hull is sheathed in glass cloth and epoxy. This gives an extremely strong hull, which is as nearly maintenance-free as any form of construction.
Plans for the sheet ply Chebacco-20 are available from Phil Bolger & Friends. You should also get hold of Dynamite Payson’s book “Build the New Instant Boats” which describes lots of useful techniques which are applicable to the sheet-ply Chebacco.
Before starting work on any full size boat, I’d strongly recommend building an eighth scale model, using 1/16 inch ply. This will help to sort out any uncertainties you may have when reading the plans, without costing an arm and a leg if you make a mistake.
People often ask how long it will take to build a Chebacco-20. The answer is ‘It depends . . .’. I bought my plans at the end of 1992 and launched in the spring of 1996. In Scotland there are only 5 or 6 months of the year when epoxy will set successfuly out of doors, where I built my boat. Altogether, I believe I spent about 500 hours on the project, give or take. I used hand tools for just about every operation, apart from sanding. I went for a pretty good finish and probably spent as much as 40% of the construction time sanding and filling. If you’re content with a less fussy finish, you’ll be able to save a considerable number of hours.
Another question that comes up a lot is the cost of materials. I spent about £1200 (about $2000) on materials, but going with the best quality possible you could easily double or even triple that amount. You have a lot of leeway in your choices.
Construction of the Chebacco-20, as designed, takes 22 sheets of half inch ply. The for’ard end of the bilge panels has considerable twist and some builders prefer to laminate this section from two layers of 1/4 inch ply. Builders planning to take this route should buy 20 sheets of half inch and four of quarter inch. There’s something to be said, too, for laminating the cabin roof. If you do that you’ll need 18 sheets of half inch and 8 of quarter inch. This amount of ply assumes that you are building the keel sections as plywood boxes, as shown on the plan, and that the floorboards in cockpit and cabin are made of ply. If you have access to a good bandsaw it is possible to cut the keel from solid timber and save a sheet or so of ply. Similarly if you make the floorboards from timber slats, you’ll save another 3 sheets.
In addition to the ply, you’ll need about 10 gallons of epoxy resin. You can buy this a gallon at a time, as you go. In fact it’s probably best to do this because unless you’re a very quick worker, the construction will probably take over a year – three or four years of spare-time work is typical. About 100 yards of 4-inch wide glass tape is needed, and about 30 yards of 6 ounce glass cloth for sheathing the outside of the hull.
Wood is also needed for framing various parts of the boat and for the spars, but again this can be bought as you go along. Construction-grade fir is perfectly adequate for this job, as it will all be sealed in epoxy. You might even consider finding a yard that re-cycles old timber and save yourself a bit of money – especially for the mast.
A problem for many home boatbuilders is the choice of building site. It is undoubtedly best to build in a shed if one is available. I, and a couple of other Chebacco builders have used a temporary polythene tunnel – although it might get a bit hot in warm climates. If the climate is warm, then you can build out of doors and throw a tarp over the boat when you aren’t working on it. You’ll need at least 3 or 4 feet to move all around the hull for comfort when you are working on it.
A polyethylene boat ‘shed’.
Like most ‘instant’ boats, the Chebacco hull is built upside down. Despite the fact that smaller ‘instant’ boats can be built on a couple of trestles, some kind of backbone is necessary for the constructions of the Chebacco. The style of backbone is up to you. I used a “ladder” made of reclaimed two by sixes, with the “rungs” spaced to match the bulkheads/moulds. I set this up on legs about a foot off the ground with packing under the feet to keep everything level – this is crucially important if you want to avoid building a twisted hull.
The frames and moulds have been set up on a ladder-style backbone. The topsides have been fitted and the bottom is ready to be lowered into place.
Full size lofting of the parts of the sheet ply Chebacco isn’t necessary. The shapes of the bulkheads and transom are marked out on the sheets of ply, following the dimensions given in the plans. Marking out actually takes longer than cutting them out! I found that this was very hard on the knees and would recommend getting knee pads before you start. Incidentally, it’s a good idea to plan the layout of components on the ply sheets before you start, in order to minimise wastage.
The bulkheads and transom are cut out. The temporary moulds can be made from chipboard (particleboard). Most of the cutting out can be done with a hand held circular saw – the curves are pretty gentle. A sabre saw or jigsaw can also be used but gives wobbly edges that need planing up. A hand saw is also perfectly OK a crosscut saw with hardened teeth gets through the wood surprisingly quickly and without the nervous tension that always seems to go with handling power tools. Try it!
It’s not a bad idea, at this stage, to pre-coat all your plywood components with epoxy after cutting them out. It’s much easier to get a drip-free coat on a horizontal surface than a vertical one. The downside is that all the gluing surfaces need to be roughened up and you’ll need to protect the epoxy from UV degradation until you paint it.
There are various ways in which the stem can be made. It can be laminated from fir or mahogany. I’d recommend laminating it from offcuts of half-inch ply (seven layers) glued side by side and liberally coated with epoxy. To save work later, you can cut the bevels roughly on a bandsaw, making sure not to cut too deep. The final bevels will be determined once the stem is set up with the bulkheads and moulds.
Before setting up the bulkheads it’s a good idea to glue on the one and a half by four inch “floors” on bulkheads 4 and 5 and the framing around the transom. Fir is fine for these. The plans give accurate instructions for bevelling the transom and its framing – do this now.
Following the measurements given in the lines plan, the bulkheads, moulds , transom and stem are fixed to the backbone using simple battens and nails which will be removed later. Be very careful to line everything up accurately using a spirit level and double check the heights of the gluing surfaces for the bottom. I found a lot of fiddling was necessary at this stage. Once you’ve fixed on the topsides you are committed and there’s no going back!
The shapes of the topsides and bottom are set out on the ply, using a bendy batten to mark fair curves for their edges. This is vitally important for the finished look of the craft. They are cut out and the parts joined with butt straps as shown in the plans. Again, precoating with epoxy is desirable at this stage.
The positions of stem, moulds, bulkheads and transom are marked out on the topsides and bottom. The topsides can be temporarily fitted to the bulkheads using screws and cleats as necessary. An extra pair of hands helps here though it can be done single-handed by suspending the topsides with string from the shed roof, as shown in the photo above. Some fine adjustments to the heights of the bulkheads will probably be needed at this stage.
Once you are satisfied with the positioning of the topsides, They are glued on and epoxy fillets are applied to strengthen the topsides/bulkhead joints. Notice that there is no need to bevel the bulkhead edges. The epoxy fills the gaps and, indeed, a stronger joint results. The bottom is then fitted in much the same way as the topsides.
Detail of topside/frame joint – epoxy filleted and later taped with glass.
The next thing to do is make the bilge panels. No dimensions are given for these on the plans because the fine adjustments of the previous stages could result in significant variation in the bilge panel shapes. The panels are made a section at a time and then fitted, with butt straps being applied on the boat.
The shape of the bilge panel can be determined by laying a long sheet of wrapping paper (as stiff as possible) along the gap between topsides and bottom that the bilge panel will fill. The shape of this gap is transferred to the paper by rubbing coloured chalk along the edges. It is best to do this on each side of the boat separately, as there are likely to be small differences. Notice that because the bottom and topsides are not bevelled, the shape traced will be too large by about a half inch. This can be trimmed away later as fitting of each panel progresses.
The shape of the for’ard section of the bilge panel is marked out on a sheet of ply and cut out. This section is best fitted starting at the stem and screwing on cleats inside to make it lie against the topsides and bottom, working aft, trimming it to size as you go. There is tremendous twist in this panel and I used a Spanish windlass (twisted rope) attached to a clamp at the aft end of the panel to pull it into position. There is a colossal amount of potential energy in this twisted panel so take care that it doesn’t accidentally come loose and decapitate you! I found that, with the plywood I was using, if I left it clamped in position for a day or so, the plywood took up its shape and had less tendency to spring back when further work was done. Alternatively, this section can be laminated in situ using two layers of quarter inch ply.
These sections of the bilge panels are glued into position, both sides, and epoxy fillets applied as necessary.
The open chine joint is filled with thickened epoxy. This will later be taped, inside and out.
Butt straps are screwed and glued to the for’ard sections of the bilge panels. The other two sections of the bilge panels can then be fitted and glued. This job is easy peasy compared to fitting the for’ard section.
All the joints, inside and out, are taped with 4 inch glass tape and epoxy. (I won’t go into details here – Dynamite Payson explains the process beautifully in “Build the New Instant Boats”.) Two layers of tape inside, and one outside will be more than adequate – stronger than the plywood itself.
The outside of the hull needs to be faired using a power sander ( – I like the dual action type – ) and a long sanding board with 60-grade paper on it. All hollows should be filled and all humps sanded down at this stage. It sounds straightforward but takes ages to do right. Any unfairness at this stage will stick out like a sore thumb on a glossy hull. BE SURE TO USE A BREATHING MASK AND GOGGLES WHEN YOU DO THIS – EPOXY DUST CAN BE VERY BAD FOR YOU!
Fairing the hull with a sanding board
The outside of the hull is now sheathed in glass cloth and epoxy. A layer of six ounce glass cloth ( plain weave or biaxial ) to the outside of the hull, using about three coats of epoxy to fill the weave. Beware of drips, sags and runs! Dynamite’s book again explains the process very well.
Glass cloth draped on the hull, ready to be wet out with epoxy.
Applying epoxy to the glass cloth sheathing with a foam roller.
This is a good time to make the centerboard case (and the centerboard). This is a straightforward bit of joinery and needs no special explanation. NOTE, however, that the case protrudes through the bottom of the boat to the level of the outside of the keel.
The centerboard case is fitted into the hull. This is an awful job as it involves cutting the slot in the bottom and making sure it lines up accurately with the slot in bulkhead 4 and its associated floor. You’ll probably need to use a combination of sabre saw, handsaw, abrasive disk and files along with a liberal sprinkling of four letter words, working inside the hull and sawdust, epoxy dust and glass dust raining down. Goggles are a good idea – I didn’t wear any and had to go to hospital to get a sliver of glass/epoxy removed from my cornea at this stage!
The centreboard case in position ( as seen from inside the cabin).
The keel pieces, cheeks and outer stem can now be made and fitted. Unless you have large-scale woodworking machinery, the built-up ply version shown on the plan will be easiest. As a matter of interest I have once or twice run my Chebacco aground pretty violently and the box section keel survived unscathed.
The box-section keel in place. Note the holes which allow water to drain from the keel.
Some builders have gone for solid wooden keel pieces – fir or oak. The outer stem from two thicknesses of one and a quarter inch thick fir – again easier than working with a single thick piece of timber. The stem and keel can now be sheathed in glass and epoxy.
Fitting the outer stem-piece.
More sanding and fairing is needed at this stage. This shouldn’t be too bad if the last lot was done well. Again take precautions against inhaling the dust.
Once the hull has been sanded and faired it is a good idea to paint it so that there will be no worries about UV degradation of the epoxy. You could use a white epoxy paint undercoat which will show up various irregularities which have been hiding until now (I guarantee it!). You can then use a filler (polyester is fine, and easier to sand than epoxy). This is then topped with marine enamel – I’d recommend a two-part linear polyurethane paint. It’s twice the price of ordinary enamel, but lasts more than twice as long. The finish is unbelievably hard. I used the same stuff on a skiff five years ago and it hasn’t needed repainting, so I claim the extra expense and trouble of these fancy paints is worthwhile. Having said that, most builders use conventional marine enamel on top of the epoxy. So it’s up to you. The waterline needs to be struck at this stage. ( You figure out a good way; I can’t.) The area under the waterline (and 2 or three inches above it) should be painted with antifouling if you are to keep the boat in the water for any length of time. If you put this straight on the epoxy and it should adhere well. Use a long handled roller to apply the paint to the inside of the centreboard case.
The outside of the hull is now finished, so it needs to be turned over. This is most easily done by six or more willing helpers. I rigged up a frame around the hull with ropes and pulleys and managed it single handed (- well, one of the neighbours did help a bit).
Flipping the completed hull using pulleys and ropes.
With the hull right-way-up, the inside joints can be taped, and the remaining floors fitted and glued in.
The next phase of construction is straightforward joinery. The inwales, seat frames, and carlines for decks are fitted.
Framing for side-benches and decks.
The inside of the hull is finished with 3 coats of epoxy before the decks and seats are added. Foam roller application is easiest. Watch out for runs!
The decks, seats, outboard well panels etc. are fitted to the framing. These should be precoated with epoxy and then glued/nailed in place.
The cabin sides are made and glued into position. This is pretty much a cut-and-try operation, since no shapes are given for the expanded panels on the drawings. It’s best to cut the holes for the port lights before fixing them in place.
Framing for the cabin roof is fitted to the cabin sides and faired. The cabin roof is made in two halves and glued/screwed in position. Here’s where two layers of quarter inch plywood would be an easier option, as the transverse curvature of the roof is pretty extreme for half inch ply.
Framing for the coach roof.
The hatch slides can be made (fir or mahogany is fine) and glued/screwed in place. It is vital to make sure that they are parallel, otherwise the hatch will stick and/or rattle!
Finishing touches are now done – hatch, washboards, mast slot cover and so on. This is also a good time to cut ventilator holes in the rear compartments and fix on clamshell covers. Cleats to support the floorboards can be fitted now, too. The mast step is made and fixed securely in place. Heavy galvanised woodscrews are probably the strongest option for fixing the step. The floorboards are made to fit loosely in place – cockpit and cabin.
The decks and cabin roof are now glassed and epoxied in the same way as the hull, and then faired and painted. With painting complete the final parts can be made and added – the rubbing strakes, the stemhead cleat, the rudder.
Rubbing strakes. Note the wooden plugs which hide the screw-heads. These are neatly trimmed later.
The Jonesport cleat at the stemhead – This should be through-bolted to the breasthook.
The rudder and its stock. Note the end-plate which increases the effectiveness of a relatively small rudder. The stock here is only 1″ diameter. The plans specify 2″. 2″ is better if you can find suitable material.
The spars must now be made. Clear spruce or fir is very expensive. Bolger is a conservative designer, however, and less-than-perfect wood such as may be found in any timber yard will be fine. I made mine from reclaimed timber from a demolition yard; £20 the lot!
Sails can be purchased, or made. I made my own and they work very well. There are a number of good books on the market and there’s no reason why anyone with a needle and palm shouldn’t make a perfectly satisfactory set of sails. OK, professional sailmakers make a better job, but then professional boatbuilders make better hulls in most cases, but that doesn’t stop us wanting to build our own.
After fitting cleats, you are ready to go sailing.
Launch day!
The Chebacco handles like a big dinghy. I have sailed in company with Wayfarers and she has similar performance, with more comfort for the crew! She tacks through 90 degrees and goes well on all points of sail. Being slack-bilged, she heels readily in a gust, but stiffens remarkably once the chine goes under. The slack bilges mean that the wetted area is small, so she really flies in a breeze. A reef is needed above force 4, or so, depending on how many crew you have for ballast, and another reef at force 5. Above force 6 I’d be inclined to drop the sails and use the outboard for the homeward trip.
Sailing the Chebacco – It’s all been worth it!
Although she is designed for easy trailering, I keep my Chebacco on a mooring in the Tay estuary from Easter until October. I row out to her in a light dinghy (Bolger’s ‘June Bug’) and can be underway within 15 minutes of going aboard. Tidying up after sailing can be done in similar short order. The mast slot allows the mainmast to be raised single-handed; a great advantage for lone sailors. She has no vices that I’ve found.
Snugged down at her mooring with a tarp over the boom to keep the rain out
Other Chebaccos
This Motorsailer version of the Chebacco was built by Bob Cushing
An open version of the Chebacco-20 with lapstrake hull, belonging to Alessandro Barozzi of Italy.
A lapstrake Chebacco-20 by Marc Lindgren sails into the sunset.
Bibliography
Further information about all the Chebacco boats is to be found in Phil Bolger’s book:
“Boats with an Open Mind”, published by International Marine, Camden, Maine, 1994
The following books describe building techniques that are appropriate for the Chebacco:
Harold “Dynamite” Payson, “Build the New Instant Boats”, International Marine, Camden, Maine, 1985 (Published in the UK by Stanford Maritime)
Samual Devlin, “Devlin’s Boat Building – How to build any boat the Stitch and Glue way”, International Marine, Camden, Maine, 1995
Bill Samson keeps a mailing list for Chebacco owners and builders, and publishes a newsletter 6 times a year. He can be contacted at:
Bill Samson,
88 Grove Road,
West Ferry,
Email:- [email protected]
Share this:
- Already have a WordPress.com account? Log in now.
- Subscribe Subscribed
- Copy shortlink
- Report this content
- View post in Reader
- Manage subscriptions
- Collapse this bar

Building A Boat
The Chebacco Boat Lion

This is a pictorial account of an on-going project to build an historic fishing boat the traditional way. Lion , at 40 feet and approximately 22 tons, is typical of small fishing schooners found in New England waters around 1800.
Each page includes photo galleries arranged in sequence showing the construction process. Most photos are captioned with a short description. The website consists of a page for each stage of construction, as listed in the main menu.
The timing of the project to date has been about like this:
– 1990’s – Shop construction
– Early 2000’s – Gathering plans, wood and other materials
– 2010-11 – Lofting and first wood cut
– 2012-14 – Keel laying, stem, sternpost and deadwood construction
– 2015-17 – Frame construction and setup
– 2017-21 – Planking (about half complete)
– 2022-Present – Deck structure
The JPG link below is a Gantt chart showing the tasks yet to be completed as of April 2024 (click on it to enlarge). The timeline is pessimistic. Hopefully, it can be shortened up with a little help. I will update it as progress is made.

Journalist Michael Hill of NJTV (the local PBS TV Station) produced and aired the following video in 2017. It provides a good summary of the project at that time. As this website documents, progress has been slow since, but still moving along.
. See the Deck page for the most current work.

Comments on either the website or the boat will be greatly appreciated. You can contact me (Mike Danesi) at [email protected].
This site uses cookies to manage functionality of your user experience.

Share this listing with a friend
To protect the data integrity of leads to our boat owners we ask that you have an account to send a share or bookmark a boat.
Please Login or Create an account with the links below.
Save a Boat Bookmark
{{scboatinfo.data.basic.build_year > 0 scboatinfo.data.basic.build_year : ''}} {{scboatinfo.data.basic.manufacturer_name.titlecase()}} {{scboatinfo.data.basic.boat_model.titlecase()}}.
| {{caption.startsWith('Add') ? '' : caption.startsWith('Contact') ? '' : caption}} | |
| {{caption.startsWith('Add') ? '' : caption}} | |
Contact Boat Owner
Send an email to the boat owner directly. All fields are required.
Contact Listing Owners Directly
To protect the integrity of leads provided to our listing customers, we require inquiries be sent from a verified account with Lady Ben. Login or create an account with the buttons below.
Contact information is not provided for sold and archived listings.
Begin Contact Here:
THE WORLD'S FINEST CLASSIC WOODEN BOAT LISTING SITE SINCE 1998
IMAGES
VIDEO
COMMENTS
Chebaccos are a family of camp cruiser sailboats designed by Phil Bolger (1927-2009), one of the world's most prolific and innovative boat designers. Chebacco boats are commonly, but not exclusively, home built. The majority of Chebacco boats are 19'8″ cat yawl rigged double chine ply construction, but other versions include lapstrake ...
Chebacco Sailboats - Designed by Phil Bolger Chebacco News 78 - Richard's interesting project. January 4, 2024 3 Replies. Richard Cockburn wrote to me in November 2022. He had purchased a partly completed hull from Duck Flat wooden boats in Adelaide, Australia. The advertisement is still up on their website https://duckflatwoodenboats.com ...
The Chebacco-20 is a trailerable dayboat designed by Phil Bolger, the prolific American naval architect who is perhaps best known for his 'Instant Boat' designs for amateur boatbuilders. The design was commissioned by Brad Story, the boatbuilder of Essex, Massachusetts - a few miles along the coast from Phil's base in Gloucester.
The added length gave Chebacco a significantly higher top speed than her predecessor, even better ghosting ability, and allows for a really big cockpit and a small, but quite comfortable cuddy. ... much of the improvements I made were simply born of common sense. The boat is as much a pleasure to sail as it is to work on. It is a testament to ...
In 2002, after almost 20 years of experience and reports from owners, a total revamp of the design known as the Raised Deck Chebacco (Bolger design #540RD - 19'8″ long by 7'10.5″) was released by Phil Bolger and Friends. This design offers roomier and more comfortable cruising with a greater range of stability and higher displacement.
How to get the Best out of your Chebacco-20. Fraser Howell. Jamie Orr. Tim Smith. Bill Samson. Background. These days, probably over 95% of 20 foot sailboats are rigged as Bermudan sloops, with a tall mast, supported by shrouds and spreaders, a triangular mainsail and a jib or genoa foresail, with, possibly, a spinnaker for downwind work.
This is Chebacco number one being introduced to the world by Brad Story at the Small Boat Show in Newport, Rhode Island. This is the original cold-molded boat. Visible in the picture are several features that have been changed in the later, more-refined designs: outboard rudder, bolt on outboard motor bracket, rope traveler across the cockpit.
Chebacco. Our annual Journal, Chebacco, is named for a type of boat built in the eighteenth century in Gloucester, Massachusetts and nearby towns. In 1762, Abraham Somes, his wife, and four young daughters sailed in a Chebacco boat to make their home in Somesville and become Mount Desert Island's first permanent Euro-American settlers.
This vessel was the thirty ton Chebacco boat FAME which went on to become a very successful privateer out of Salem. Because I had already done exhaustive research on Chebacco boats (when I designed and built the LEWIS H. STORY in 1998) I was able to immediately start working out a preliminary design and cost projection while Mike did further ...
April 2015 Bolger Chebacco sail on Lake Murray, Homemade sailboat based on a catboat design called Chebacco by Phil Bolger.We tack back and forth from Pine I...
We acquired a 19′ Phil Bolger-designed Chebacco gaff cat-yawl and quickly realized that we'd need to find a dinghy as well. Although it will float in a foot of water, the Chebacco's weight and bulk make shore landing more challenging, and we cruise tidal waters where the possibility of being stuck aground in an outgoing tide makes it prudent to anchor out and row ashore. The Portage ...
Philip C. Bolger (December 3, 1927 - May 24, 2009) was a prolific American boat designer, who was born and lived in Gloucester, Massachusetts.He began work full-time as a draftsman for boat designers Lindsay Lord and then John Hacker in the early 1950s.. The Gloucester Light Dory, one of Bolger's better-known designs. Bolger's first boat design was a 32-foot (9.75 m) sportfisherman published ...
THE CHEBACCO BOAT. During the American Revolution, the British nearly destroyed the New England fishing fleet. Since capital was lacking to build replacement schooners, a low-cost, quickly built vessel was needed. A little two-masted boat, then popular for the inshore fishery, seemed to fit the bill.
Go for a day sail. Launch at Pine island, go toward dam, return.
plywood sailboat. nothin fancy just regular wood, epoxy and stainless screws.flippin it was the scary part, approximately 790 lbs.
One exhibit at the Beale Park Thames Boat Show made the case that the recently deceased designer Phil Bolger should be remembered for his very pretty boats as well as his boxy easy-to-build plans. This is an almost-complete Bolger Chebacco boat, as built by an ex-student of the Boat Building Academy down at Lyme, Connie Mense.
Chebacco describes a series of cuddy cabin sailboat designs, mostly just under 20', often home built and particularly attractive. There are multichine designs, glued lapstrake, modifications for longer cruises, a 25' design and a motorsailer. The design has been very popular with builders and owners across the world for over 20 years.
The design I picked was the Chebacco, a 20 ft cat-yawl designed by Phil Bolger, a designer well-known in the boat-building community. Two year later, after about two thousand hours of mostly enjoyable wood-working labour in my insulated garage, Three River was completed and launched in May 2007. Here are some articles describing the building ...
Bolger Chebacco Sail Data. SKU: X-SD-6813. Quantity. Add to Cart. Complete Sail Plan Data for the Bolger Chebacco Sail Data. Sailrite offers free rig and sail dimensions with featured products and canvas kits that fit the boat.
Building the Sheet-Ply Chebacco-20 By Bill Samson The Chebacco-20 is a trailerable dayboat designed by Phil Bolger, the prolific American naval architect who is perhaps best known for his 'Instant Boat' designs for amateur boatbuilders. The design was commissioned by Brad Story, the boatbuilder of Essex, Massachusetts - a few miles along the coast from…
Building A Boat. This is a pictorial account of an on-going project to build an historic fishing boat the traditional way. Lion, at 40 feet and approximately 22 tons, is typical of small fishing schooners found in New England waters around 1800. Each page includes photo galleries arranged in sequence showing the construction process.
This 1997 Bolger 20 Chebacco Downeast Trawler is a one of a kind custom built Ranger Tugs style boat. She has traveled the fresh water seas thoughout Canada and the United States and sips fuel at less then 4 gallons per day. Custom Ranger Tugs style. Single 2015 Evinrude Outboard Engine 25 HP with Power Tilt, 2 Cycle Auto Oil Feed - Ultra Low ...
Chebacco listed for sale on ladyben.com Classic Wooden Boats For Sale since 1998. This site uses cookies to manage functionality of your user experience. ... To protect the data integrity of leads to our boat owners we ask that you have an account to send a share or bookmark a boat. Please Login or Create an account with the links below. Login ...