- New Sailboats
- Sailboats 21-30ft
- Sailboats 31-35ft
- Sailboats 36-40ft
- Sailboats Over 40ft
- Sailboats Under 21feet
- used_sailboats
- Apps and Computer Programs
- Communications
- Fishfinders
- Handheld Electronics
- Plotters MFDS Rradar
- Wind, Speed & Depth Instruments
- Anchoring Mooring
- Running Rigging
- Sails Canvas
- Standing Rigging
- Diesel Engines
- Off Grid Energy
- Cleaning Waxing
- DIY Projects
- Repair, Tools & Materials
- Spare Parts
- Tools & Gadgets
- Cabin Comfort
- Ventilation
- Footwear Apparel
- Foul Weather Gear
- Mailport & PS Advisor
- Inside Practical Sailor Blog
- Activate My Web Access
- Reset Password
- Customer Service

- Free Newsletter

Mason 33 Used Boat Review

Beneteau 311, Catalina 310 and Hunter 326 Used Boat Comparison

Maine Cat 41 Used Boat Review

Cheoy Lee Clipper 36 & 42 Used Boat Review

Tips From A First “Sail” on the ICW

Tillerpilot Tips and Safety Cautions

Best Crimpers and Strippers for Fixing Marine Electrical Connectors

Thinking Through a Solar Power Installation

Stopping Mainsheet Twist

Working with High-Tech Ropes

Getting a Clue for the Blown-Out Clew

Monel Seizing Wire is Worth the Extra Cost
Fuel Lift Pump: Easy DIY Diesel Fuel System Diagnostic and Repair

Ensuring Safe Shorepower

Sinking? Check Your Stuffing Box

The Rain Catcher’s Guide

Boat Maintenance for the Technically Illiterate: Part 1

Whats the Best Way to Restore Clear Plastic Windows?

Mastering Precision Drilling: How to Use Drill Guides

Giving Bugs the Big Goodbye

Galley Gadgets for the Cruising Sailor

Those Extras you Don’t Need But Love to Have

UV Clothing: Is It Worth the Hype?

Preparing Yourself for Solo Sailing

How to Select Crew for a Passage or Delivery

Preparing A Boat to Sail Solo

On Watch: This 60-Year-Old Hinckley Pilot 35 is Also a Working…

On Watch: America’s Cup

On Watch: All Eyes on Europe Sail Racing

Dear Readers

Chafe Protection for Dock Lines
- Sailboat Reviews
The Magic of Munroes Sharpies

Photo by Billy Black
There is magic in sailing. What is sometimes harder to grasp is the magic in boats.
But it is there. It is undeniably there. It is there when first you step aboard and feel the boat come alive underfoot. It is there when the sails fill and quiet as you come out of the eye of the wind. And it is there when you take the tiller under a dome of stars and realize youre connected to something much, much bigger than a rudder. There IT is, as persistent as a heartbeat: a pulse, a throb, a jolt of I-cannot-explain-this magic.
For me, the most fascinating thing is how this happens. Boat magic isn’t borne from wisps of smoke, or conjurers chants. Some of the best magic evolves out of a most basic need. In the case of Ralph Munroes 28-foot sharpie lifeboat Egret (right ), the need was for a light boat that could skim across the shallow waters of Biscayne Bay, Fla., punch through the steep breakers in East Coast inlets, and, if asked, stand up to a Gulf Stream Norther.
Egret carried the mail, salvaged wrecks, and delivered passengers and goods to Floridas east coast well until the early 1920s.
As Munroe describes it in The Commodores Story, the book he coauthored with lifelong friend Vince Gilpin: Egret served me for several years without mishap as dispatch boat between Biscayne Bay and Jupiter telegraph station, via the Gulf Stream, blow high or blow low, often making the trip when no other boats would attempt either the stream or the surf in the shoal inlets.
One of the early pioneers in South Florida, Munroe was a lifelong sailor, yacht designer, and talented photographer who founded the Biscayne Bay Yacht Club in 1887. He served as the clubs commodore for 22 years, though it seemed an unlikely post for Munroe, who respected true mariners, but oft en poked fun at the yachtsmen of his time. The club he founded is alive today, and it remains a club for mariners, including his great-great grandchildren. His former home in Coconut Grove, affectionately called The Barnacle, is now a state historic site, full of intriguing memorabilia that captures the resonance of Munroes early days on the bay.
Perhaps Munroes most famous contribution to sailing, though, is a round-bilge sharpie design called Presto . An evolution of the New Haven sharpies that inspired Egret , the 41-foot shallow-draft ketch was launched in 1885. When its Staten Island builder, Chris Brown, stepped aboard and nearly buried the rails heat once condemned her, Munroe writes. The next day, Munroe added the 4.5 tons of internal iron ballast as hed intended and sailed off to see a cup race off Sandy Hook, where, in a fresh breeze she handled perfectly and showed no signs of tenderness.
Defying popular assumptions regarding hull form and stability at sea, Presto had performed her first act of magic-a feat that even today, designers are trying to duplicate.
It is, as our boat review reflects, a very tough act to follow.
RELATED ARTICLES MORE FROM AUTHOR

Hinckley 49 Used Boat Review

Hallberg-Rassy 42 Used Boat Review
Leave a reply cancel reply.
Log in to leave a comment
Latest Videos

The Perfect Family Sailboat! Hunter 27-2 – Boat Review

Pettit EZ-Poxy – How to Paint a Boat

The Boat From True Spirit – Sparkman & Stephens

Top 5 Boat Hacks – Boat Maintenance Tips and Tricks
Latest sailboat review.

- Privacy Policy
- Do Not Sell My Personal Information
- Online Account Activation
- Privacy Manager
- THE PRINCESS PASSPORT
- Email Newsletter
- Yacht Walkthroughs
- Destinations
- Electronics
- Boating Safety
- Ultimate Boat Giveaway
From the Yachting Archives: How to Build a Sharpie Sailboat
- By Edwin S. Parker
- Updated: July 21, 2014
Editor’s note: The plans for a sharpie sailboat, as outlined in the December 1930 and January 1931 issues of Yachting, look to us like a great project to teach the grandkids about boatbuilding! Some materials, costs, and methods have progressed since the time of writing, so instead of asking your plumber to cut pipe to just the right length and thread it, you may now be able to go down to Home Depot to find the bolt in question. Marine plywood may also be a good alternative to the wood listed.
Unfortunately, we are not all rich, and we can’t all build Cup defenders. But that is no reason for building a tub or staying ashore. There is always a way to beat the game, and the way to heath the boat game is to build a sharpie. You can do it for under forty dollars.
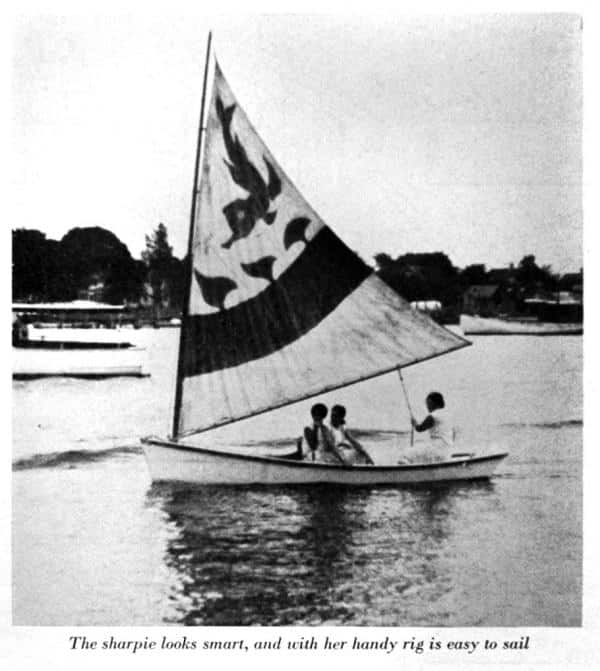
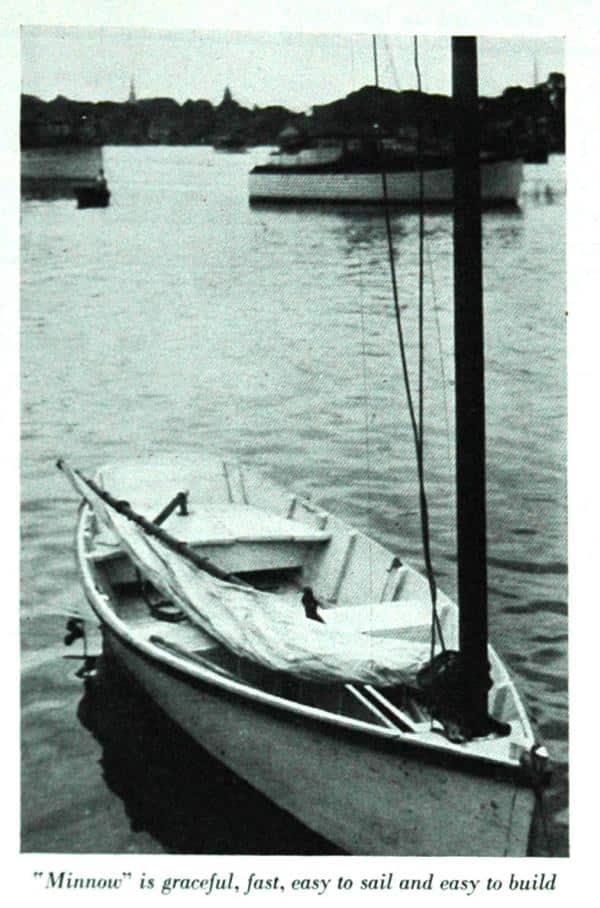
A sharpie represents the most boat for the money. It is graceful, fast, and a joy to sail. It is also eminently seaworthy and stiff. Minnow , fifteen feet over all, makes just over five knots under one reef and a strong wind. I have driven her with all sail in the same wind but I was too busy to do any timing – a considerably larger boat could not catch us.
A sharpie is easy to build. In general, the process is to bend two side boards around moulds, fasten them to stem and stern, screw in a chine batten, plank her crosswise, saw out the centerboard slot, and proceed with the finish (Detail J). If the pieces are carefully made, the process is really very simple. There is nothing that involves experience in boat building or special skill with tools. There are no pieces that go into place with difficulty or won’t stay put. I have built two of them single-handed with success.
Many times I have sailed among the big ships laid up in Oakland Estuary in my 18-footer, lying along the deck with one bare toe hooked carelessly over the tiller. With a gale it required at least two fingers – never more. She would come about like a top anywhere, any time. And one day we worked her up the Alameda Canal against a tide and sailed in San Leandro Bay when it blew in windows in “Frisco.” Add to this regular trips on Frisco Bay (it fairly blows your hair off there in summer) and a season on Monterey Bay, off Santa Cruz, and you have a fair idea of what an 18-footer will do.
I have built three sharpies, besides five smaller craft for fishing or hunting. At the age of nineteen I built the first one along the lines of a sketch my father had of a New Haven sharpie, eighteen feet long, dating from about 1880. The type was taken to the Carolinas from Connecticut by Mr. George C. Ives, and his son, Mr. John B. Ives, of Statesville, N.C., writes the following:
“Father had his sharpie built in 1875 at Fair Haven, Conn., by a famous builder. She was 36 feet long, having a fore and aft mutton leg sail with boom six to eight feet on the mast from the foot of the sail. This made the sail set like a board. This boat was tried out with the fastest boat then in the fleet and beat her. A club of gentlemen wanted to keep her at home and offered a bonus over cost, which father declined as he wanted the boat to pit against what North Carolina boatmen claimed for their clinker built boats which they considered superior.
“He brought two sharpies to North Carolina, and it was not many years till there was a big fleet of them in our waters. They built to 50 and 60 feet, the larger ones schooner rigged and decked, and this style is largely used now in the oyster dredging industry. The fishermen modified the style into deadrise skiffs, gaff sail and jib, and they carried sail like the wind and would almost go into the eye of it. The larger boats superseded the round bottom schooners in some industries, and would beat them in all weather at sea, but motor craft finally took their place.”
The design of a sharpie is a very particular affair. One was published around 1910 which brought down the scorn of my father. “Pumpkin seed,” he called it, for it was fat and flat, an it had a skeg, which would kill any real sharpie. In my first boat the side boards were sawed curved, starting from the bow. She rocked fore and aft too much and pounded in a chop. In the second one I started the curve farther aft, and it worked better, but they both dragged waves behind when going fast. When it came to Minnow I analyzed the design carefully, and I found that the best displacement curve came when the side boards were perfectly straight on both bottom and top, tapering, of course, from bow to stern. So I built her that way. She does not pound, drives to windward regardless of waves, and leaves the water nearly flat. Besides this, it makes building much simpler. So don’t let any wise friend persuade you to cut a curve on the bottom edge – you will get a perfect curve from the bending on the sides on the flare.
It is the experience of the author that textbooks tell you everything but how to get the monkey out of the box. It is the intent of this article to be brief, but comprehensive, covering all small points, even to nail sizes.
All the following directions are important. If you follow each step in its proper order, you will be surprised how quickly the boat will go together. But do not omit any steps or take any short cuts. Remember, a boat has a habit of leaking, even under the best of circumstances.
- cross-cut, rip, keyhole and hack saws
- spoke shave
- light plane
- brace and bits 1/4″ to 3/4″
- screw driver bit and countersink
- twist drills 1/8″, 5/32″, 3/16″
- plain screw driver
- square, metal shears
- three clamps with 2″ openings

LUMBER No list of pieces is given because one usually gets what is available. A few pieces are called for on the details, and if you don’t get enough lumber the first time, order again. Avoid spruce because it rots, and use regular 7/8″ boards, not thinner, to finish 13/16″. Never use tongue and groove boards below the water line. Planking should be 6″ wide.
HARDWARE Hardware should be galvanized. Use 6 penny or 7 penny nails generally, wire rather than cut, with a few 8 penny. Two gross screws 1.5″ No. 10. Get some scraps of heavy galvanized sheet iron from your plumber.
CAULKING Use regular stranded cotton caulking, or get balls of candle wicking from a hardware store. Cotton batting torn into strips will do in a pinch.
SIZE OF BOAT A 15-foot boat will hold two men and a boy. It sails best with three boys or two men. An 18-foot boat holds four men but sails best with three.
COSTS The materials for Minnow cost $45, with no attempt at economy, in 1929. A deck might add five dollars more. The 14-footer cost $20, in 1910. The 18-footer cost $35, in 1907. If you have $30, start work – you will raise the rest as you go along. Be careful of the dimes and quarters if cost is a problem. I have heard that in the Carolinas they used to build them for a dollar a foot plus materials. That, of course, could not be done now.
DIRECTIONS FOR WORK In order of procedure.
MAIN ASSEMBLY 1. Have your saws sharpened by an expert, and sharpen your other tools.
2. Study the plans carefully. Every word and line is on there for business. On the plans certain pieces are identified where they occur, by a number in a circle.
3. Get pieces out at mill, and order lumber (Detail A). You can chop the stem out of an oak piece but don’t do it unless the mill man wants to rob you. They should be able to saw it out.Get a full width side board if you can afford it; mine was redwood. Otherwise, two 12” boards joined carefully as shown (Detail E). Making tight may be a nuisance, but the joint will only be under water when sailing, and slop comes aboard then anyway.

4. Finish side boards complete but do not cut at stern (Details D & E). Saw out as shown, mark for ribs, bore 5/32” for each screw, and countersink. Be sure to make sides opposite hand. Screw ribs in place by the gauge so chine will fit. Use screw driver bit and brace.
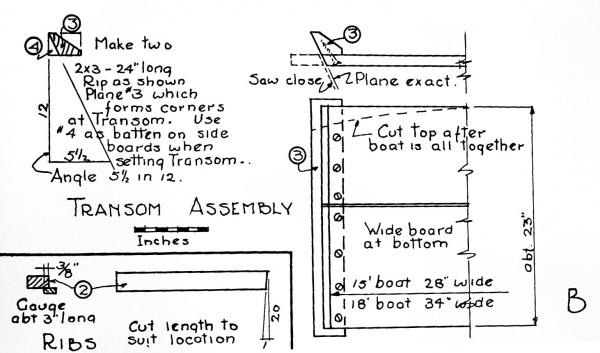
5. Make transom, leaving a wide board at the bottom. Stem is presumably made at the mill. (See detail B.)
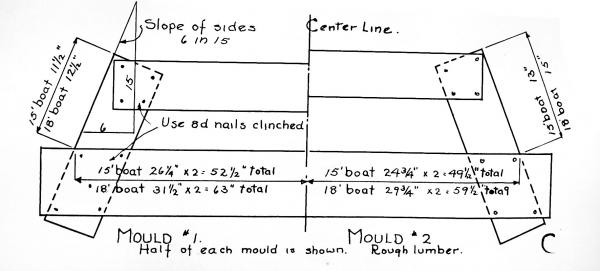
6. Make moulds of rough lumber (detail C).
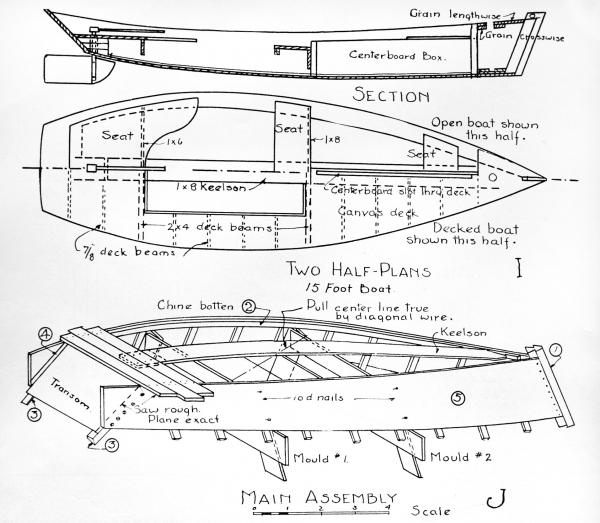
7. Form the boat upside down (detail J). Nail boat side boards securely to the stern. Nail to mould No. 2 with two 10 penny nails each side not driven home. Take rope hitch on after ends of boards and cinch in. Nail in form No. 1. Cinch up by twisting rope and draw tight over transom. The battens on the inside of side boards to set transom will help a lot. Screw transom in place, screws into corner piece rather than in end grain of boards of transom. Have transom extended beyond bottom edge of side boards for bevel planking.
The sides will not bend evenly. Pull the boat true with a diagonal wire or rope. Use a string down center for truing.
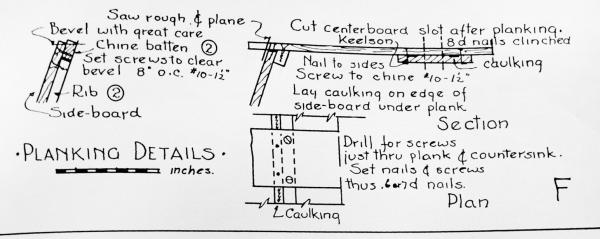
8. Spring chine battens into place with clamps, and screw, beginning at one end and working towards other. Screws go from outside of side boards through, as with ribs. Chine will project beyond edge of board 2/3″ so both will bevel for plank. (Details F, J, and Q.)
9. Bevel edges of side boards and chine exactly to take plank. Work on both sides at once and use strip across for guide. Work down with drawknife and plane carefully. Boat is apt to leak here. Bevel the transom. Cut stem so last plank will lap onto it and finish at line of rabbet. (Details M and N.)
10. Begin at stern and lay three planks. (Details F and J.) Be sure to lay a thin stir of caulking on edges of side boards under planks. Nail plank to sides and screw to chine as shown. Cut plank long and leave trimming till later to be done all at once. Do not lay too close – you want a crack to caulk into.
11. Start keelson at middle of second plank, and let it go loose at bow at first or nail to end of stem lightly. Fit it at bow when half the planks are on (detail J).
12. Complete planking. Watch caulking carefully, and lay it between plank and keelson on each side of centerboard slot (detail F). Saw plank as close to sides as you can without marking sides, and plane true.
13. Mark centerboard slot and saw accurately with cross cut saw through from the bottom. Should be 1.75” wide to take post.
14. Turn boat right side up. Nail in spreaders to sides of ribs for open boat and 2×4 deck beams crowned for decked boat. Also seats. This holds the boat spread when the moulds are taken out, which is done now. (Details M & N.)
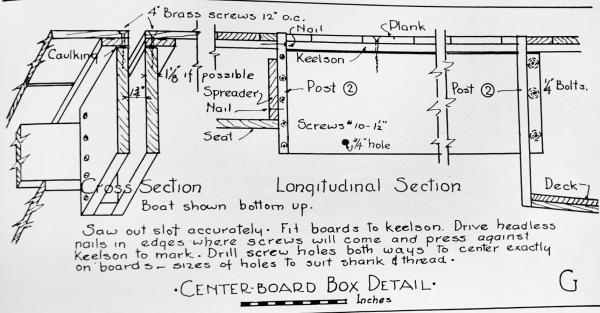
15. Centerboard box (detail G). Fit boards of box to keelson. They should be 1 1/8” thick, if possible but 7/8 can be used with care. It is almost impossible to drill for screw holes through from the bottom and run true into the boards of the box. It is better to drill both ways from the center, but the places must be accurately marked for the holes to meet. So drive some nails in the edges of the boards where the screws are to go, cut off the heads, and press down against the keelson. This will mark the holes, and you can bore the keelson from the inside through the plank, and into the edges of the boards. Use drill through bottom slightly smaller than shank of 4” brass screws, and a smaller hole in edges of boards to hold thread of screw.
16. Fit posts either end of slot, set in white lead, and nail into keelson with one eight penny. Clamp box to posts or nail lightly. Turn boat over and drive screws with brace and screw-driver bit. Be sure you have a thin strip of caulking between keelson and edges of box. Turn boat back, bolt box at bow with 1/4” bolts as there is no room to drive a screw (have holes already), and screw after ends to post, with 1.5” number 10 screws.
This completes the work on the rough hull. In the next issue of Yachting, directions and plans for completing the sharpie will be given in a second and final article ( continued on the next page) .
How to Build a Sharpie Part II The Most Boat for the Least Cost By EDWIN S. PARKER From the January 1931 issue of Yachting.
In the December 1930 issue of Yachting , the plans and directions for building a 15-foot Sharpie were given that carried the work as far as planking the bottom. In the present article the directions for work are continued from that point to completion. Reference is made here to some of the sketches in the first article and it will be necessary to have them at hand for reference in reading this installment.
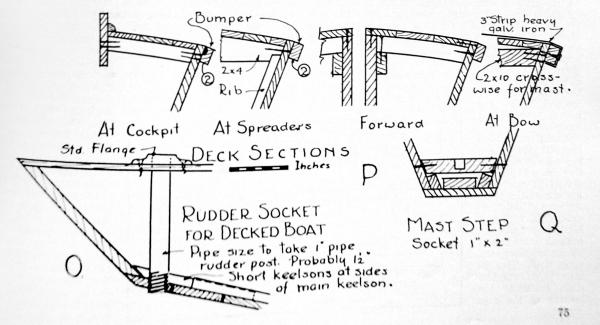
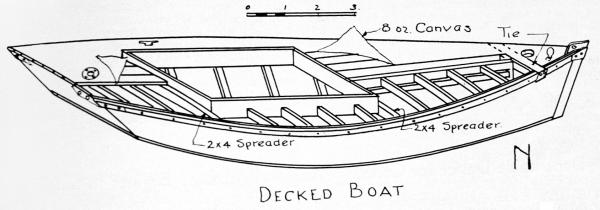
STEPPING THE MAST (Details I & Q) For open boat, build small decking in two layers, top running lengthwise, and lower running across to prevent splitting. Saw mast hole with keyhole saw. Nail this decking securely in place with eight-penny nails. But the strain on the mast is so great that it will spread sides. So later, when the bumpers are on, bend a 3-in wide strip of galvanised sheet metal, as heavy as you can handle, across and around the bumpers, screwing it with two screws each side — 2-in screws preferably—holes drilled in metal and wood. Put some extra screws through sides into bumpers just abaft this. The step is as detailed.
For the decked boat, put 2 by 10 boards across and fur up for crown of deck (Details N & P).
17. DECKING Use 2 by 4 spreaders as already mentioned, crowned as much as you want. The crown is for appearance only. Nail the coaming to this, with the 1 by 6 planking left over, and set in the other deck beams made of 7/8-inch stock, crowned likewise. The coaming supports the adjacent deck. Do not set the edge too high or it will cut one’s knees- two inches will stop all the water necessary.
Use narrow matched boards for the deck -old flooring would be good. Another way is to have 7/8-inch boards ripped to 1.5-inch strips and bent to the curve of the boat, laying edge pieces first and working inwards, nailing together edgewise and into deck beams as well.
Paint deck a sloppy coat, lay canvas and tack to outside of side boards so that the bumper will conceal the edge of canvas. Paint canvas a sloppy coat at once. Use 8-ounce canvas if you can afford it, or anything lighter, down to unbleached sheeting.
18. BUMPERS (Details M, N & P) In the open boat this strip strengthens the edge materially. In any case, it turns a lot of water on a rough day and takes the knocks when landing. Use the hard pine battens No. 2. Taper off the forward ends to about 3/4 of an inch on the inside. In the open boat, clamp in place and screw 8 inches o.c. from the inside of the side boards, as with ribs. In the decked boat, screw through bumper from outside into side boards, countersinking deeply. In either case, bind at bow and stem with galvanized iron to prevent spreading. Make patterns of heavy paper for cutting metal. Drill for nails in metal, and clinch nails where they go through boards.
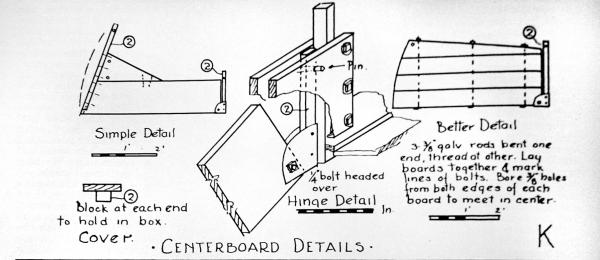
19. CENTERBOARD (Detail K) Make either way, as shown. The board can be pinned through the case for the hinge, as is usually done, but it is very convenient in a small boat to be able to get the board out from the top. The method of hinging shown has proved a good one, and keeps the pivot low. Have a hole in the box aft to take a pin to hold board down when sailing. Make removable cover to go on when board is down (Detail K).
20. RUDDER This is of the balance type. A very small area forward of the post will balance a large area abaft it. Set post by trial if necessary. The detail shown is very cheap and very strong. Either type of socket is good, as shown (Details H & P). The pipe is better for the decked boat, while the built-up one will serve for the open boat, and is less expensive by perhaps a dollar. But have all the seams accessible in case the soft cloth between the pieces of wood does not make tight. This cloth can be slopped with paint when laying. To cut the hole for the post, use a gouge if you have no extension bit, and, in any case, cut through each piece as you lay it and set post in place when screwing down each piece to get hole true.
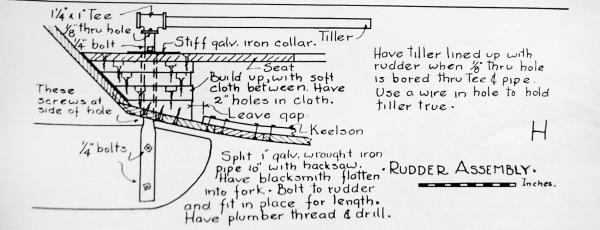
For the rudder post (Detail H) get a couple of feet or so of galvanized 1-inch genuine wrought iron pipe from the plumber’s scrap pile, hacksaw it down the middle, working from sides alternately to keep cut true. Cut down perhaps a foot. This is easy. Do not try to flatten it out cold, as it will split. Have the blacksmith heat and spread and drill for the 1/4-inch bolts. This should cost about 25 cents. Now set the rudder and bolts in place and, with this assembled, place the socket in the boat and mark the position of the bolt which holds the shaft from dropping out, and also place where the tee shall come for the tiller. Take to the plumber, who will cut the pipe, put a long thread on it, screw on a tee which has a larger opening horizontally than vertically – they come standard if you can find them – and with this tee lined up with the rudder so that the tiller will be true, drill a 1/8-inch hole clear through tee and shaft. Through this run a wire to prevent tee from rotating on shaft.
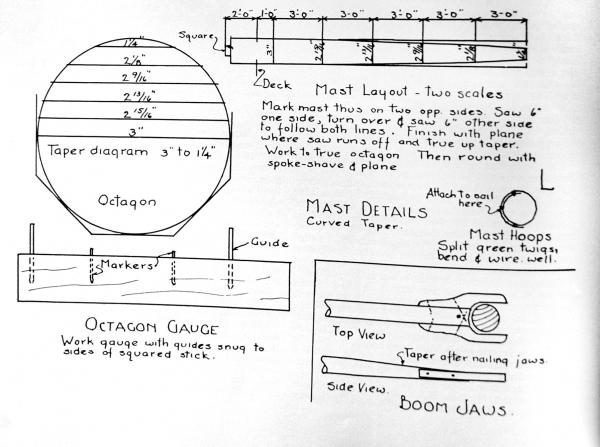
21. SPARS (Detail L) Choose a clear, straight 4 by 6 to cut mast from, preferably western fir. Have mill cut to 3 by 3 and 2 by 2 (Detail A). Mark mast as in diagram… do not taper straight. Tack in brads at taper points, and spring the batten to get true curve. Saw to tapered square, working from both sides alternately to keep the lines, sawing perhaps 6 inches at a time on each side. Have the saw sharp. Where saw breaks out at edge, finish with plane – do no try to hew out, as the grain will tear in and leave a hollow in the mast. But work into a perfect squared stick. Make the octagon gauge, as shown. By twisting this as you go towards the small end you get a true octagon on the mast. cut to this line with drawknife and finish with plane. This will give a true octagon. If this is well done, the work of rounding off is negligible.
Bore hole 5/8 of an inch fore and aft at the head for halyard and work it out with knife so that rope will pass through easily.
Make boom similarly. Jaws of hard wood. The boom tapers very sightly at after end, and flattens out at forward end to take jaws. Make long in case sail stretches. (See detail L).
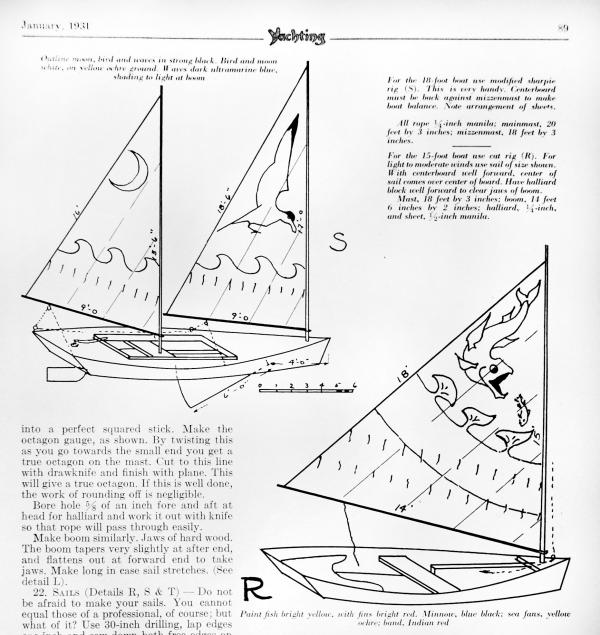
22. SAILS (Details R, S & T) Do not be afraid to make your sails. You cannot equal those of a professional, of course; but what of it? Use 30-inch drilling, lap edges one inch and see down both free edges on a seeing mating, using number 30 thread and a long stitch and tight tension. Pin pieces together about one foot apart to be sure pieces pull alike. Lay the sail out with string on a large surface. Cut the sail to this pattern, selvage on the leach or rear edge, allowing hem at bias edges. Curve the edges you cut (at mast and boom) an inch or two out, especially on the edge next to the mast. Not too much, though, as the sail will bag. Hem bias edges, but leave selvage as is.
Have at hand a piece of 1/4-inch manila rope long enough to go around the edges of sail, with some to spare. Hang it out of doors for a month or more. Sew this to edges of sail with sail twine or knitting cotton, well waxed and double, with a sail needle or any heavy needle, the needle going under one strand of the top each stitch. This is the only tricky part of the process. If the rope is not tight enough, or rather, longer than the edge, the edge will flop curiously. If it is shorter than the edge, the sail will bag. To get even tension, lay sail out and stretch sail and rope together. Catch rope to sail every foot or so, and as you sew the rope on, come out even at each catching. The luff (at the mast) and the foot will be easy, but you may have to do the leach over again, as I did.
Sew on reef points of one-inch tape, 12 inches long, at each seam and two between. Make cover for sail so sun will not rot it.
23. CAULKING In making a boat tight, plan for a good seam and fill it with caulking. The planks may be too close in some cases. Make a hard wood wedge and drive it all along the seam to open the seam slightly. Take the caulking, preferably stranded cotton, and drive it into the seam with the wedge or a putty knife, or at the ends of the seams, with a screw driver. Fill the seams evenly and fairly tight.
DO NOT drive caulking in seam at edges of bottom, between planking and side boards, that is, against mailings. The caulking will swell and pop off the planks. The caulking laid when planking should be sufficient. If leaks develop, fill with plenty of copper bottom paint.
Making tight is not easy. The bottom seldom gives trouble, but at the rudder socket and stern, and at all unexpected places, leaks show up and cause trouble. Make tight with caulking as far as possible. Then use white lead inside and out in corners, drying the boat before applying. A coat of paint does wonders, too, but all this should be done after the caulking is completed.
24. PAINTING Paint inside, thinning for first coat.
Paint bottom with brown copper paint direct on the wood, giving two or three coats. Green looks better, but does not stay on as well.
Paint some kind of a design on the sail (Details R & S), using one-third or one-quarter oil and the rest turpentine. Outline design in black about one-half inch wide. Two are shown, but the possibilitics are endless.
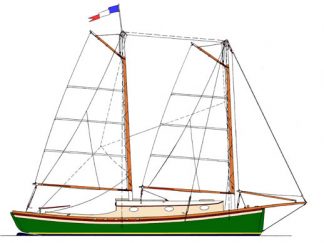
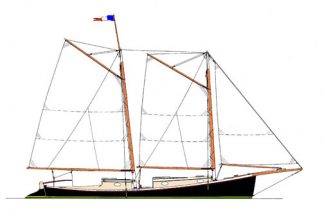
25. MODIFYING THE DESIGN It would be doubtful policy to modify the design of the hull. From Mr. Ives’ letter, it would seem that I have developed the design somewhat along the same lines us the fishermen did, namely, toward a dead rise skiff. The older sharpie had a long overhang aft, but actual analysis of the design does not favor this, and Minnow keeps going right into a sea, as the others did not. Do not put on a skeg, or change the rudder, for it is a joy to sail with the balanced rudder. The centerboard, however, may be moved forward or aft, at will, to suit any sail plan you may prefer.
Personally, I like the two masts on an 18-foot boat, though I never could bring myself to move the boom up the mast and reef along the mast as the old sharpies did. On my 18-footer I had a gaff sail forward, but the gaff was a nuisance. Do not have any stays on the mast – there is a tradition to the effect that the spring of the mast helps the speed.
A sloop rig should be good for the larger boats, but whatever rig is used, be sure the center of the total sail area comes over the center of the area of the centerboard.
If a boat larger than 18 feet is to be built, increase the depth of the side boards as well as merelY lengthening them, as shown, so there will be more freeboard aft.
26. GENERAL POINTS It is well to have the boat decked – you can tip without taking water over the lee rail. A cover on the centerboard box is worth having. as water shoots up in a chop. For a small boat, though, the open model is very handy for rowing.
When sailing before the wind pull up the centerboard. One trial will show you why.
Do not use ballast and try to carry more sail- you lose thereby.
My father’s plan of 1880 is said to have steered with an oar. This should help in a race but I found it a nuisance.
Ready to get building? Click here for a printer-friendly PDF of all the instructions and diagrams. Then write to Yachting to share your experience!
Yachting would like to thank reader Fred Ganley for remembering this article and calling it to our attention. Happy building, Fred!
- More: Classic Yachts , How To , Sailboats , Seamanship
- More Yachts

Azimut Launches the Fly 62

Sunseeker Predator 75 Reviewed

Meet the Emissions-Free Colombo 25 Super Indios E

Offshore Fishing Boats and Insurance Prices

For Sale: Hargrave 96 Skylounge

Reflections on Offshore Sailing

For Sale: Outer Reef 720

For Sale: Prestige 620 Fly
- Digital Edition
- Customer Service
- Privacy Policy
- Terms of Use
- Email Newsletters
- Cruising World
- Sailing World
- Salt Water Sportsman
- Sport Fishing
- Wakeboarding
- Row boat plans
- Sailboat plans
- Power boat plans
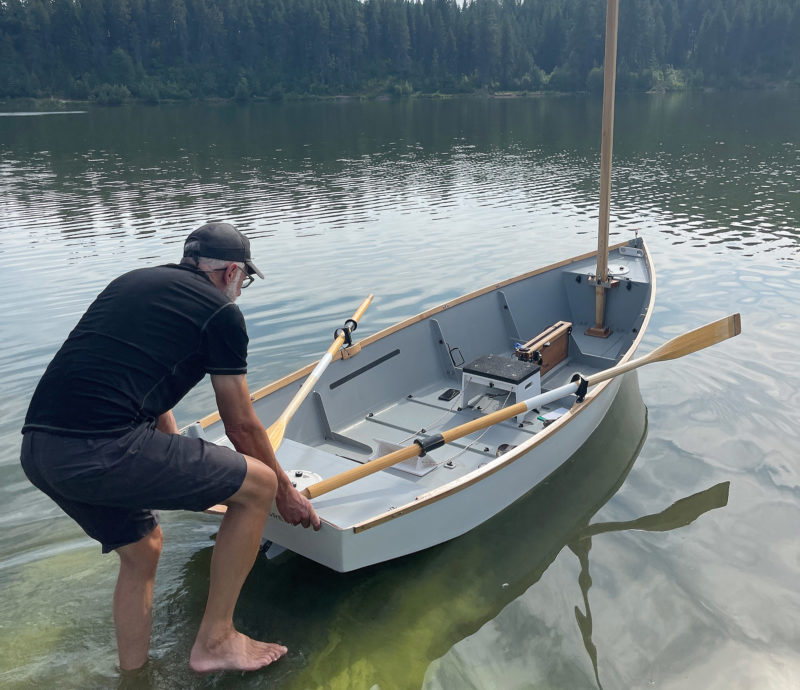
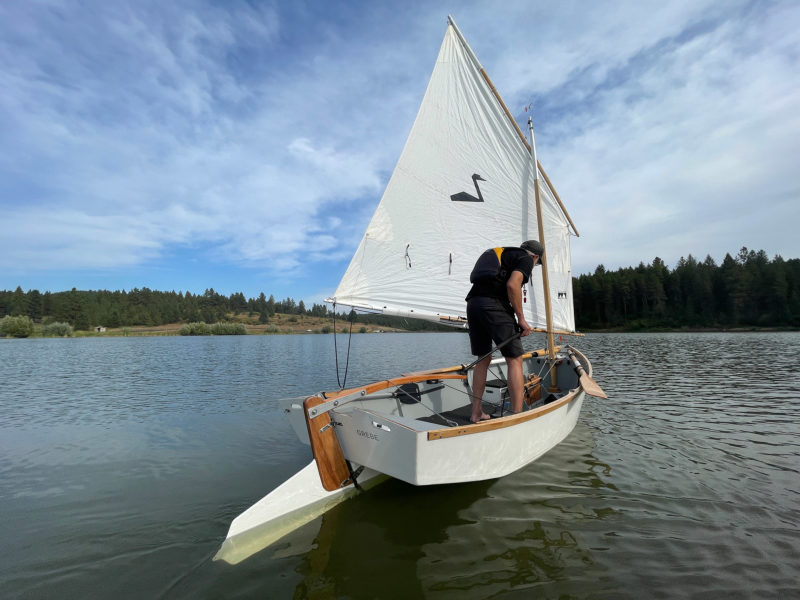
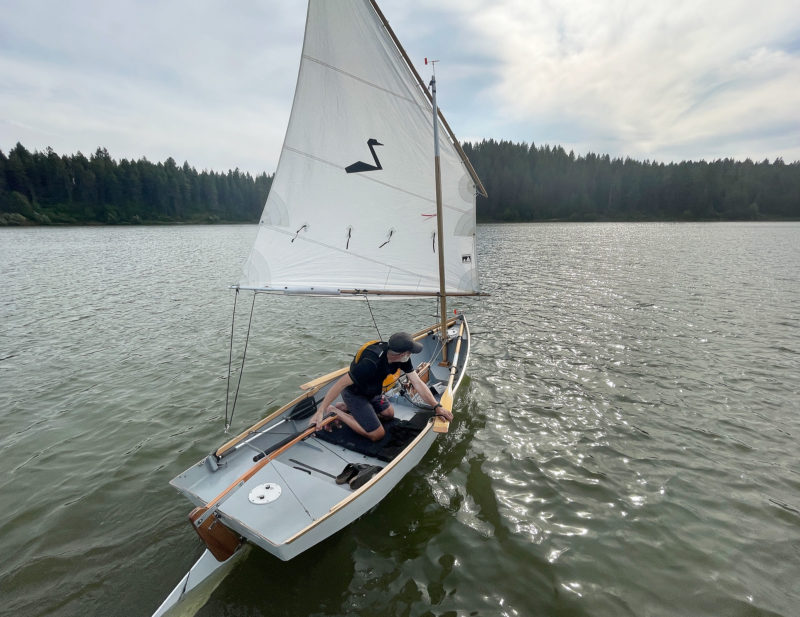
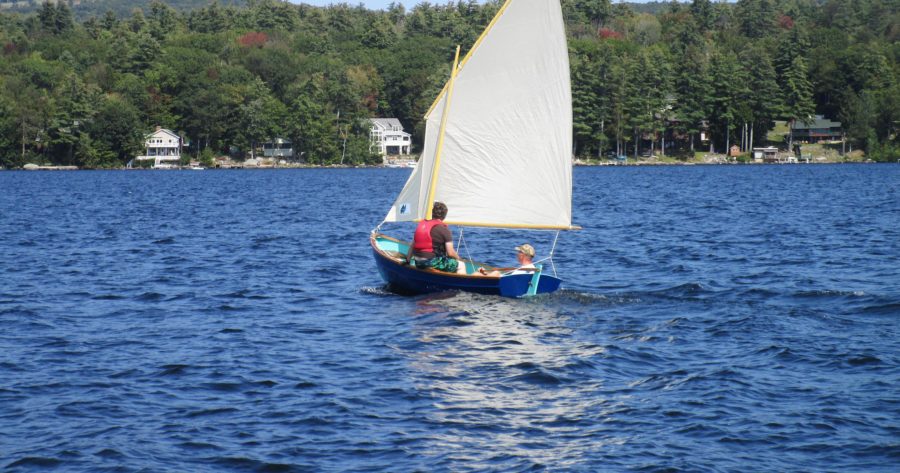
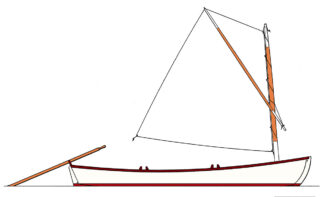
- John's Sharpie
John's Sharpie by Chesapeake Light Craft
A lightweight, fast-sailing sharpie.
| Length overall | ||
|---|---|---|
| Beam | ||
| Draft | ||
| Draft (cb up) | ||
| Weight | ||
| Capacity | ||
| Sail area | ||
| Hull construction | Stich-n-glue | |
URL: http://www.clcboats.com/shop/boats/boat-plans/sailboat-plans/johns-sharpie-wooden-sail-boat-plans.html
Description:
There is certainly no other boat that offers the performance under sail and ease of construction of a sharpie. Developed in southern New England as workboats, their speed, shallow draft, easy handling, and quick construction caused sharpies to quickly spread along the Atlantic Coast.
There have been sharpie designs for homebuilders almost as long as there have been sharpies. John's Sharpie is similar in proportion to the sharpies used around New Haven, Connecticut for oyster tonging in the 19th century. Rendered in modern materials, this 21st century sharpie is fast, light, easy to handle, and easy to build. Renditions of John's Sharpie have been built from CLC kits and plans all over the world, from the 15th floor of an apartment building in South Korea to Coniston Water in the UK.
"It is a tribute to John Harris's successful combination of the various design requirements that none of us felt anything but total satisfaction with the basic overall concept, her sailing performance or elegant appearance on the water," said Water Craft magazine while sailing the Sharpie around Coniston Water. Read the entire review.
John C. Harris, CLC's CEO and a lifelong sharpie fan, designed the Sharpie for his own use on the Chesapeake Bay. Light weight and clean lines yield a boat capable of high average speeds, dinghy-like handling, and great pointing ability. The unstayed cat-ketch rig is efficient and beautiful, and without a jib there are no sheets to handle when tacking: just put the helm over and you're done. Extremely low wetted surface and a big rig means the Sharpie will whisper along in the lightest of air. Tie in a reef when whitecaps appear if you want to stay reclined inside the cockpit, or hike out on the comfortable side decks if you feel like exploiting the Sharpie 's heavy air speed.
The Sharpie uses a daggerboard to get to windward. It's more efficient than a centerboard, takes up less space, and is easier to build. With the board raised and the rudder kicked up, it's easy to sail the sharpie onto the beach or pull it above the high tide line. With the board halfway up the boat will still point well, allowing you to sail in the shallowest water.
The interior is laid out for leisurely daysailing or overnight camp-cruising. The separate cockpits encourage relaxed sprawling, and are easy to cover with boom tents while camping. Ideal crew is 2-4 adults.
While John's Sharpie is a bigger project than our other small boats, woodworking hobbyists will find construction fast and straightforward. Construction time seems to average about 180 hours. No frames or strongbacks are required; the hull is of 9mm okoume bent around permanent bulkheads, then stitched and glued like a big kayak. The tapered masts are solid spruce or cedar.
Interviewed about this 1996 design in May 2011 on the blog 70.8%, John Harris had this to say about the Sharpie :
"I designed that boat to win the traditional boat race at MASCF. Its beguiling good looks were meant to look right on the St. Michael's waterfront, but conceal the speed and handling of a racing dinghy. I was 23, and it was a good 23-year-old's boat. I like that it's hard to find an angle from which the proportions don't look good. It's got razor-sharp handling upwind and down. Unfortunately, you get the bad with the good - John's Sharpie is wicked fast but also a little cranky. It was a good design lesson, including that two tall masts weigh twice as much as one tall mast. I'm not the only skipper to have capsized one. Many builders soon shipped a pair of sandbags either side of the daggerboard trunk to settle her down."
Boats about same size as John's Sharpie
| / |
| / |
Questions? Suggestions? Contact us at: [email protected]
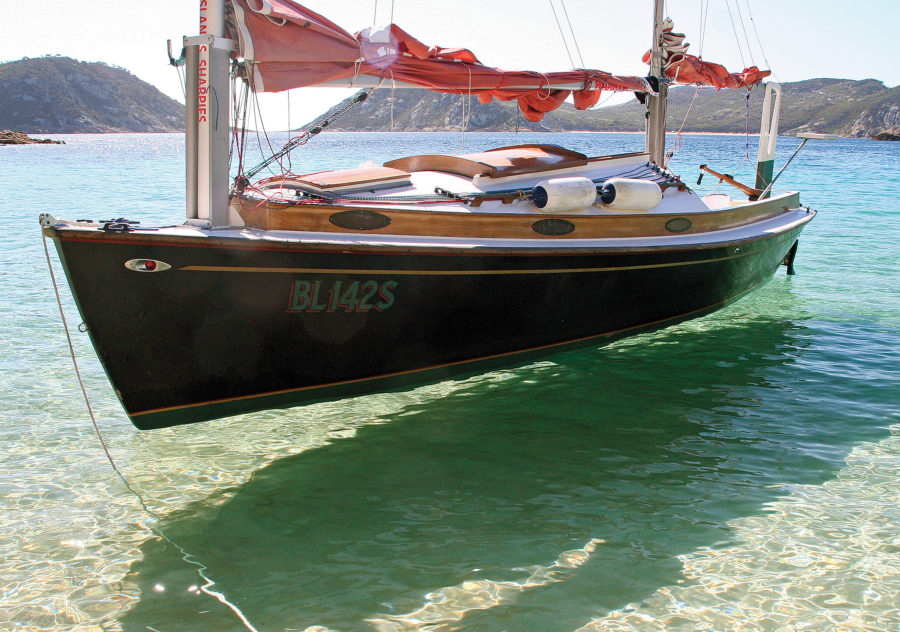
Milford Boats

Sharpies developed along the Connecticut shore of Long Island Sound, especially in and around New Haven, during the middle 19th century. They featured a long narrow hull, flat bottom with shallow draft, often two masts, “leg ‘o mutton” sails and a rounded stern which made it easier to tong for oysters in the shallow water
The Milford 20 is a modern interpretation of the sharpie type, and was inspired by the Floridays design of noted naval architect Mark Fitzgerald of Thomaston, Maine.
This design has been developed with the amateur builder in mind. Construction is ply over a timber frame. Intended as a safe, easy to sail recreational vessel for sheltered waters, her shallow draft will allow adventures where bigger boats can’t venture. As a camp cruiser, she will provide cosy accommodation for two, or alternatively carry some camping gear and step ashore.
- Length overall: 6250 mm. (20′ 6″)
- Beam: 1620 mm. (5′ 5″)
- Draft: 250 / 1000 mm. (10″ / 39″)
- Sail Area: 150 sq.ft.
- Displacement: 600 kg. (1300 lbs.)
- Towing weight: 650 kg. (including trailer)
See reviews page for details of magazine reviews
Click to buy plans:
Click to download Study Plans:
- ABOUT THIS SITE
- NEWSLETTER SIGNUP
Wednesday, January 15, 2014
Reuel parker egret 31.5 sharpie build blog.

No comments:
Post a comment.

Popular Posts

All Posts by Topic
- wharram catamarans (35)
- boatbuilding (28)
- boat design (20)
- sailing (15)
- voyages (14)
- boat designers (13)
- boat for sale (11)
- kayaking (11)
- boating gear (7)
- book review (7)
- canoeing (6)
- seamanship (6)
- boat buying (5)
- cruising (5)
- launchings (5)
- online resources (5)
- boat camping (4)
- boat refit (4)
- boatbuilding materials (4)
- magazines (4)
- monohulls (4)
- my books (4)
- rivers and swamps (4)
- sailboats (4)
- survival (4)
- Gulf of Mexico (3)
- James Wharram (3)
- boat shows (3)
- sailing fiction (3)
- sharpies (3)
- Cape Dory 27 (2)
- Caribbean (2)
- Carl Alberg (2)
- Kruger Canoes (2)
- Kruger Sea Wind (2)
- Reuel Parker (2)
- boat maintenance (2)
- boat review (2)
- gear review (2)
- marine carpentry (2)
- multihulls (2)
- navigation (2)
- oil spill (2)
- other stuff (2)
- paddling (2)
- projects (2)
- Sailing the Apocalypse (1)
- beachcruising (1)
- book giveaway (1)
- circumnavigation (1)
- cruising destinations (1)
- environment (1)
- expeditions (1)
- great deals (1)
- living aboard (1)
- rowing craft (1)
- the sea (1)
Archive of All Posts by Month
- January (1)
- September (1)
- December (1)
- November (1)
- September (2)
- January (2)
- February (1)
- October (1)
- October (3)
- January (3)
- December (5)
- December (2)
- November (2)
- February (5)
- January (18)
Great choice! Your favorites are temporarily saved for this session. Sign in to save them permanently, access them on any device, and receive relevant alerts.
- Sailboat Guide
1995 Norwalk Island Sharpie 23
- Description
Seller's Description
Go to Sailing Texas classifieds for current sailboats for sale Norwalk Island Sharpie 23, 1995 Designer: Bruce Kirby Excellent build (1995, well documented) Excellent condition except for deteriorating exterior brightwork No hull leaks, bone dry Self-righting (all inside lead bars under deck total 600 lbs) Tabernacle enables mast stepping/unstepping on trailer
LOA 22’ 11” LWL 19’ Beam 7’ 3” Draft: CB up 8” CB down 4’ 7” Displacement 1.800 lb
Main 160 sf Mizzen 56 sf Total 216 sf
Mariner 5 hp outboard Trailer included Currently in the water in Tampa, FL
Rig and Sails
Auxilary power, accomodations, calculations.
The theoretical maximum speed that a displacement hull can move efficiently through the water is determined by it's waterline length and displacement. It may be unable to reach this speed if the boat is underpowered or heavily loaded, though it may exceed this speed given enough power. Read more.
Classic hull speed formula:
Hull Speed = 1.34 x √LWL
Max Speed/Length ratio = 8.26 ÷ Displacement/Length ratio .311 Hull Speed = Max Speed/Length ratio x √LWL
Sail Area / Displacement Ratio
A measure of the power of the sails relative to the weight of the boat. The higher the number, the higher the performance, but the harder the boat will be to handle. This ratio is a "non-dimensional" value that facilitates comparisons between boats of different types and sizes. Read more.
SA/D = SA ÷ (D ÷ 64) 2/3
- SA : Sail area in square feet, derived by adding the mainsail area to 100% of the foretriangle area (the lateral area above the deck between the mast and the forestay).
- D : Displacement in pounds.
Ballast / Displacement Ratio
A measure of the stability of a boat's hull that suggests how well a monohull will stand up to its sails. The ballast displacement ratio indicates how much of the weight of a boat is placed for maximum stability against capsizing and is an indicator of stiffness and resistance to capsize.
Ballast / Displacement * 100
Displacement / Length Ratio
A measure of the weight of the boat relative to it's length at the waterline. The higher a boat’s D/L ratio, the more easily it will carry a load and the more comfortable its motion will be. The lower a boat's ratio is, the less power it takes to drive the boat to its nominal hull speed or beyond. Read more.
D/L = (D ÷ 2240) ÷ (0.01 x LWL)³
- D: Displacement of the boat in pounds.
- LWL: Waterline length in feet
Comfort Ratio
This ratio assess how quickly and abruptly a boat’s hull reacts to waves in a significant seaway, these being the elements of a boat’s motion most likely to cause seasickness. Read more.
Comfort ratio = D ÷ (.65 x (.7 LWL + .3 LOA) x Beam 1.33 )
- D: Displacement of the boat in pounds
- LOA: Length overall in feet
- Beam: Width of boat at the widest point in feet
Capsize Screening Formula
This formula attempts to indicate whether a given boat might be too wide and light to readily right itself after being overturned in extreme conditions. Read more.
CSV = Beam ÷ ³√(D / 64)
This listing is presented by SailingTexas.com . Visit their website for more information or to contact the seller.
View on SailingTexas.com
Embed this page on your own website by copying and pasting this code.
- About Sailboat Guide
©2024 Sea Time Tech, LLC
This site is protected by reCAPTCHA and the Google Privacy Policy and Terms of Service apply.
| |||||||||||||||||||||||||||||||


COMMENTS
Sharpie (boat) Sharpies are a type of hard chined sailboat with a flat bottom, extremely shallow draft, centreboards and straight, flaring sides. They are believed to have originated in the New Haven, Connecticut region of Long Island Sound, United States. They were traditional fishing boats used for oystering, and later appeared in other areas.
Learn about the history and design of Munroes sharpies, a type of round-bilge sailboat that can handle shallow waters and rough seas. Read how these boats combine speed, stability, and seaworthiness with a touch of magic.
John C. Harris, CLC's CEO and a lifelong sharpie fan, designed the Sharpie for his own use on the Chesapeake Bay. Light weight and clean lines yield a boat capable of high average speeds, dinghy-like handling, and great pointing ability. The unstayed cat-ketch rig is efficient and beautiful, and without a jib there are no sheets to handle when ...
The NIS class ranges from 18′ to 31′ and was designed by the late Bruce Kirby, who is best known for creating the globally popular Laser. He deemed his Sharpie-class boats "cruising Lasers for grown-ups.". Kirby's sharpies are flat-bottomed, centerboard cat-ketches with unstayed masts. Prior to getting my hands on a Norwalk Islands ...
Learn from the December 1930 and January 1931 issues of Yachting how to build a sharpie sailboat for under forty dollars. A sharpie is a fast, seaworthy and simple boat that can be sailed in any weather and any place.
John's Sharpie is a modern version of the traditional New England sharpie, a shallow-draft, easy-to-build sailboat. Learn about its design, performance, construction, and see photos and reviews of this 18-foot cat-ketch boat.
The Milford 20 is a modern interpretation of the sharpie type, and was inspired by the Floridays design of noted naval architect Mark Fitzgerald of Thomaston, Maine. ... Sail Area: 150 sq.ft. Displacement: 600 kg. (1300 lbs.) Towing weight: 650 kg. (including trailer) See reviews page for details of magazine reviews ...
Based on the original 28-footer made famous by Commodore Munroe in Florida, this 31.5-foot version offers much better cruising accommodations, although like all sharpies, still minimal for it's size. Reuel said it was the most boat that could be built for the money and pointed out that it would be quick to build, trailerable and yet capable of ...
It takes into consideration "reported" sail area, displacement and length at waterline. The higher the number the faster speed prediction for the boat. A cat with a number 0.6 is likely to sail 6kts in 10kts wind, a cat with a number of 0.7 is likely to sail at 7kts in 10kts wind. KSP = (Lwl*SA÷D)^0.5*0.5
The Sharpie That Got Away. By John C. HarrisMay 2020. The 20-foot sharpie I drew for Bill and Matt. In 2007 my colleagues Bill and Matt, father and son, were looking for a daysailer to build as an evening project. They suggested that a sharpie would be fun. A sharpie is a flat-bottomed sailboat with a single chine, usually fairly narrow.
1965 33' Hershoff Meadowlark Sharpie sailboat for sale in St Petersburg Beach Florida
Seller's Description. Go to Sailing Texas classifieds for current sailboats for sale Norwalk Island Sharpie 23, 1995 Designer: Bruce Kirby Excellent build (1995, well documented) Excellent condition except for deteriorating exterior brightwork No hull leaks, bone dry Self-righting (all inside lead bars under deck total 600 lbs) Tabernacle ...
Sharpie preowned sailboats for sale by owner. Sharpie used sailboats for sale by owner.
Preowned racing, cruising, dailsailer, and multihull sailboats for sale, including Beneteau, Burger , Cal, Catalina, C & C, Cheoy Lee, Columbia, Coronado, Corsair ...
The sail-powered sharpie was a hard-chined, flat bottom, shallow draft vessel, with a centerboard and some flare in the sides. The style spread up and down the Atlantic coast in the 19 th century, according to the noted maritime historian Howard I. Chapelle.
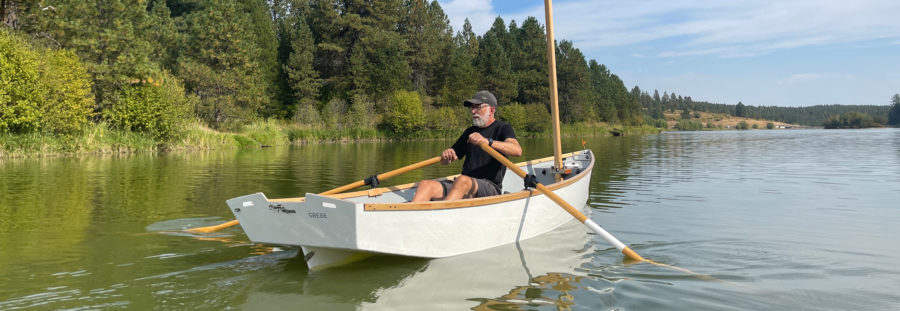
Selway-Fisher's 13' sharpie is a big boat in a small package and accommodates all the gear I need for overnight camping trips; I could probably pack enough in GREBE for a weeklong trip. Building a Drake 13 would be a straightforward project for an experienced builder and a suitable first boat for someone with some woodworking experience. This little sharpie is easy to store and move, even ...
I built this skiff based loosely on several designs in Raul Parker's Sharpie Book. Chesapeake Oyster Skiff, Mississippi River yawl, and Crab skiff. The sail ...
The Sharpie Catalogue includes 30 sailing sharpie designs and 3 power sharpies. Construction is plywood/epoxy/fabric of the simplest kind. These vessels are intended to be built by amateurs in the garage or back yard. Most are flat-bottomed; a few are V- or arc-bottomed; all sailboats are centerboarders. The larger sharpies can be built in steel […]
1979 Marine Innovators 32 Sandpiper Sharpie The Sandpiper 32 Sharpie was inspired by Bill Munroes Sharpie designs, built to be single handedly sailed in shallow water. Her Cat Ketch rig and wish bone booms, combined with rotating masts, allow you to set sail or reduce it by simply rolling the twin sails out or in.
Tackling Moscow by Train and Boat Our first full day in Moscow started fairly late since we were still catching up on sleep. Around 1, we finally were able to get our act together and get out the door. We stopped by a cafe to get some breakfast and headed over to the Red Square. Since the festival is going on, we had to go through metal detectors.
Get warmed up for the World Cup final and see the sights with this awesome set from the legend that is Paul Oakenfold on the #buboat in Moscow.
On this map you can see the details of the longest and most classic of the Flotilla Radisson boat tours: 2. Companies that do boat tours on the Moskva River. There are many companies that do cruises on the Moskva River, but the 4 main ones are: Capital River Boat Tour Company (CCK) Mosflot. Flotilla Radisson.