The most beautiful and accurate model of the famed Canadian schooner
The most famous schooner of all time is the Canadian schooner Bluenose. This beloved vessel won the annual International Fishermen's Trophy race for Canada numerous times in the period between the two world wars.
In 1920, an America's Cup race was cancelled because a wind of 23 knots was considered too dangerous for the racing yachts of the time, which were made fragile by the towering sails they carried. The fishermen of the New England and Maritime fleets considered this a disgrace and resolved to hold their own competition for men and ships who were ready and able to face the sea.
The Halifax Herald newspaper donated a cup and established the rules for the contest, and in the years that followed, the International Fishermen's Trophy would become a source of considerable national pride as ships from the great fishing fleets of Gloucester, Massachusetts and Lunenburg, Nova Scotia vied for the title. Nova Scotia was the home of the greatest deep-sea fishing fleet in the world, and proud of its shipbuilding and fishing heritage. Its rival was Gloucester, Massachusetts, which shared the same kind of pride. For generations, the "Yanks" and the "Novies" had delighted in racing each other to the fishing grounds. The prospect of formalizing those races excited both towns.
In 1920, the first competition for the Trophy was won by a vessel from Gloucester. To the tremendous chagrin of the Lunenburg fleet, a design was commissioned from William J. Roue, a young naval architect from Halifax, for a schooner that would meet the high standards of the Lunenburg fishing fleet but that could also capture the Trophy.
Learn more about Bluenose here: https://en.wikipedia.org/wiki/Bluenose
The Bluenose was a fishing and racing gaff rig schooner built in 1921 in Nova Scotia, Canada. A celebrated racing ship and fishing vessel, Bluenose under the command of Angus Walters, became a provincial icon for Nova Scotia and an important Canadian symbol in the 1930s, serving as a working vessel until she was wrecked in 1946. Nicknamed the “Queen of the North Atlantic”, she was later commemorated by a replica, Bluenose II, built in 1963. The name Bluenose originated as a nickname for Nova Scotians from as early as the late 18th century.
She was constructed by Smith and Rhuland in Lunenburg, Nova Scotia. The schooner’s keel was laid in 1920. The Governor General the Duke of Devonshire drove a golden spike into the timber during the keel-laying ceremony. She was launched on 26 March 1921, and christened by Audrey Smith, daughter of the shipbuilding Richard Smith. She was built to be a racing ship and fishing vessel, in response to the defeat of the Nova Scotian fishing schooner Delawana by the Gloucester, Massachusetts fishing schooner Esperanto in 1920, in a race sponsored by the Halifax Herald newspaper.
The ship was completed in April 1921 and performed her sea trials out of Lunenburg. On 15 April, the schooner departed to fish for the first time. Bluenose, being a Lunenburg schooner, used the dory trawl method. Lunenburg schooners carried eight dories, each manned by two members of the crew, called dorymen. From the dories, lines of strong twine up to 2.5 kilometres (1.6 mi) long which had 0.91-metre (3 ft) lines with hooks on the end spaced every 3 metres (9.8 ft) were released, supported at either end by buoys which acted as markers. The dorymen would haul in the catch and then return to the ship. This was done up to four times a day. The fishing season stretched from April to September and schooners stayed up to eight weeks at a time or until their holds were full.
Her captain and part owner for most of her fishing and racing career was Angus Walters. As Walters only had master’s papers for home waters, Bluenose in some international races was sometimes under the command of the deepsea Lunenburg captain George Myra until the schooner reached the racing port. The crew of Bluenose during her fishing career were mostly from Lunenburg but also included several Newfoundlanders.[16] Crew were paid either by the size of the catch when they returned to port or some took a share in the vessel, known as a “sixty-fourth”.
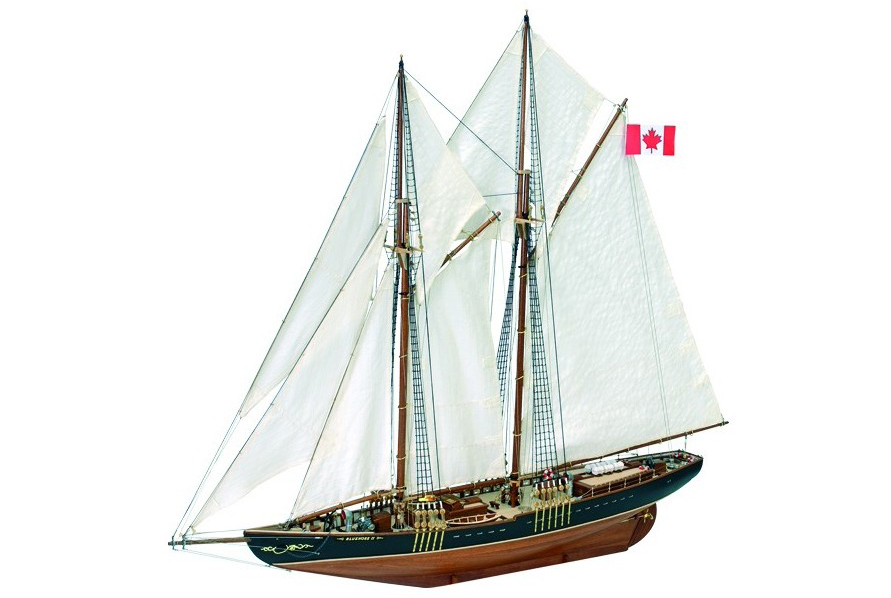
Amati’s plank on bulkhead kit uses laser cut basswood for keel, stern reinforcements, hull supports and other components. Thin flexible basswood strips are used for hull and deck planking. Trim pieces are beautiful dark walnut. Fittings consist of true-to-scale Britannia metal, brass and hardwood parts. Two diameters of rigging line, cotton sailcloth and colorful Canadian flag. Detailed plans and step-by-step illustrated instruction manual from start to finish.
(AM1447) Length 19-1/2″/ Height 17″ / Scale 1:100
Bluenose model sailboat kit an Amati plank on bulkhead kit uses laser cut basswood for keel, stern reinforcements, hull supports and other components.
Join over 5,000 readers of our monthly newsletter!
Example: Yes, I would like to receive emails from . (You can unsubscribe anytime)
View Catalog
Order catalog, download catalog, hours of operation.
Everything Nautical proudly presents the Bluenose Model Sailboat - 24". With a sleek elegance that won her numerous titles in both racing and fishing competitions, this brilliant model livens up any room or office. Amazing craftsmanship and attention to detail bring this fully assembled model yacht to life, adding a majestic piece of both Canadian and sailing history to your life.
Built by hand by master craftsmen and artisans
Extensive Detail from hull design to mast rigging and complete with Canadian flags High Quality Wood construction; made from fine hard woods Significant research to guarantee accuracy of these model sailboats includes sources such as photos, historical plans, and original artwork
Dimensions: 24" Long x 4" Wide x 20" High
Handcrafted from solid wood by our master artisans
Fine Craftsmanship, includes:
High quality woods used in construction of hull
Beautiful, vintage wood grain clearly visible
Delicately curved hull, keel and rudder
Thick, sturdy canvas used for all sails
Suits any room with vintage decor
Pre-assembled, simply attach the masts and display
Ready to display in less than 10 minutes
Separate pre-assembled hull and sails ensure safe shipping and lower cost
Insert mast in designated hole and clip brass rigging hooks as shown in illustrations
Sails and rigging already complete
In the early part of the 20th century, the fishing fleets in the Maritime provinces and the New England states operated under sail. The Banks were the favored fishing grounds of both Canadian and American fishermen. Their vessels were strongly constructed to weather the rigorous challenges of the North Atlantic fishing grounds but were also built for speed and holding capacity. During this era, a popular topic of discussion in the few free time hours that these fishermen had was the America's Cup races. These had started in 1851 and were a test of seamanship between the best British and United States racing schooners. In 1919, after years of domination by the Americans, a race was cancelled because of 25 knot winds and this created much distain among the rugged Banks fishermen. They suggested that the racing schooners had become too fragile and a better test of seamanship would be a competition involving the sailing ships and men who fished the Grand Banks.
It was the owner of a Halifax newspaper, William H. Dennis, who finally put the enthusiastic talk of the fishermen into concrete action. He donated a trophy towards a race for working sailors called the International Fishermen's Race. Canadian eliminations were held near Halifax on October 11, 1920. The Delawana, skippered by Thomas Himmelman emerged as the winner, just beating out the Gilbert B. Walters captained by Angus Walters. The American eliminations near Gloucester resulted in a victory by the Esperanto, skippered by Marty Welch. A best of three races was set to start at Halifax on October 30, 1920. The Esperanto won handily in two straight races, the first by nearly twenty minutes and the second by just over seven minutes. Many Nova Scotians were shocked to be so badly beaten and plans were quickly drawn up to build a better schooner. The vessel had to meet specific conditions as a working, economic fishing vessel but more speed was foremost in the minds and dreams of the maritimers.
W. J. Roue, a young naval architect, was selected to design such a fishing schooner to try to restore some of the badly eroded Canadian pride. A sleek looking craft, designed to meet the race rule specifications of 145 feet overall maximum length and racing trim water line length not exceeding 112 feet, was constructed at the Smith and Rhuland Yard in Lunenburg, Nova Scotia. She was christened the Bluenose and launched with great fanfare on March 26, 1921. The Bluenose was financed by Captain Angus Walters and four Halifax businessmen at a cost of $35,000. The launch was well in time for the Bluenose to complete a successful fishing season on the Atlantic Banks. She soon proved to be an excellent sailing vessel as the Bluenose handily won the 1921 Canadian trials over seven other competing schooners. That year, the American trial winner was the Elsie, captained by Marty Welch. Two exciting races were held in late October, both won by the Bluenose to bring the International Fishermen's Trophy back home!
Captain Walters and the skilled Bluenose crew again won the cup in 1922, beating the American challenger, the Henry Ford but after closely winning the first race in 1923 against Captain Ben Pine's Columbia, the Racing Committee awarded the second race, protested because the winning Bluenose passed a buoy on the wrong side, to the Columbia. Captain Walters refused to accept the Sailing Committee's decision and left for Lunenburg in a counter protest with the 1923 race series tied at one win each. This disagreement caused a seven year lapse in the International Fishermen's competition. During this period, the Lunenburg fleet was severly battered by rough seas, including the Bluenose. However, repairs were made and in 1930, the Bluenose accepted a race challenge in Gloucester, USA, to compete against a new American schooner, the Gertrude L. Thebaud, captained by Walters' old rival, master sailor Ben Pine. This time, the Bluenose lost two out of three races, resulting in absolute jubilation amongst the New Englanders, who called for a resumption of the International Fishermen's Race series. This indeed occurred in the fall of 1931 when the Bluenose met the Thebaud in Halifax waters. The Bluenose prevailed, surging ahead in two straight races and was once again named the queen of the North Atlantic fishing fleet!
A depression in fish markets was especially noticeable in 1932 as many vessels were left tied at the docks rather than losing money out on the fishing grounds. The Bluenose began a new career as a showboat, touring the Great Lakes and even crossing the Atlantic where Captain Walters was invited to attend the Silver Jubulie of England's King George V and Queen Mary. Finally in 1938, when fishing under sail had all but ended, the last International Fishermen's Cup was held off Gloucester as a test of the best of five races. The first race was won by Captain Walters' long time rival, the Thebaud, crossing the finish line two minutes, fifty six seconds ahead of the Bluenose. However, the Bluenose honour was redeemed in the second race four days later on October 13, 1938 by a handy twelve minute margin. Light winds delayed the next official race by some ten days when the Bluenose again won, this time by just over six minutes. Not to be outdone, in boisterous seas the next day, the Thebaud beat the Bluenose by some five minutes over a thirty five nautical mile course. The final race was held on October 26, 1938. In light winds, the Bluenose prevailed by a margin of just under three minutes and for the final time, took the International Fisherman's Trophy back home to Canada!
Various challenges were then made for further races but sadly, that was not to be. A sailing schooner could no longer earn a living against more economic diesel powered fishing vessels and Captain Walters lost control of the Bluenose. She was eventually sold for coastal trading in Caribbean waters and on a dark January night in 1946, the grand champion Bluenose struck a reef in waters just off Haiti. She was wrecked beyond repair although all hands were saved and so ended a glorious era of sailing history. In time, a replica ship, the Bluenose II, was built in the same Lunenburg shipyard. Thias sailing ship was launched on July 24, 1963, as a momento to the golden age of fishing schooners competing for the International Fisherman's Trophy. The original Bluenose was commemorated on a Canadian fifty cent stamp in 1928 and her likeness can still be seen today on our Canadian ten cent coin. One thing is absolutely certain, the Bluenose legacy lives on in the hearts and minds of many Canadians!
Buy the Bluenose Model Sailboat - 24" today from Everything Nautical. We are your most trusted source for all of your nautical decor needs. Serving thousands of customers since 1998, we are a family run, U.S. based company. You can always count on accurate and easy to understand personal service, like no one else.
Product Videos
Custom field, product reviews, write a review.
Recommended
Bluenose II Model Sailboat - 35"
Bluenose II Painted Model Ship 47" with Optional Personalized Plaque
Bluenose II - Schooner - with Optional Personalized Plaque
Bluenose II Model Ship - Assembled - with Optional Personalized Plaque
All Power Tools
Airbrush Accessores
Compressors
Bench Tools
Chisels & Carvers
Drills & Rotary Tools
Machine Tools
Mini Power Tool Line Accessories
Power Tool Accessories
Sanders & Grinders
Soldering & Electrical
Woodworking
Ultrasonic Tools
Vacuums & Vacuum Forming
All Hand Tools
Carvers, Scrapers, & Chisels
Handles & Blades
Knives & Cutters
Saws & Miter Boxes
Scissors & Shears
Hand Drills & Pin Vises
Screwdrivers & Nut Drivers
Measuring & Marking
Magnifiers & Work Lights
Pliers, Nippers, & Cutters
Taps & Dies
Tweezers & Grabbers
More Hand Tools
Airbrush Paint
Brush-on Paint
Enamel Paint
Paint Accessories
Paint Brushes
Airbrushes & Compressors
All Model Trains
N Scale Locomotives
HO Scale Locomotives
On30 Scale Locomotives
O Scale Locomotives
G Scale Locomotives
Z Scale Rolling Stock
N Scale Rolling Stock
HO Scale Rolling Stock
Rolling Stock Kits
N Scale Train Sets
HO Scale Train Sets
00 Scale Train Sets
N Scale Track
HO Scale Track
On30 Scale Track
O Scale Track
Model Train Tools
All Model Kits
Aircraft Model Kits
Car & Truck Model Kits
Military Model Kits
Outdoor Hobbies
Plastic Modelers Essentials
Sci-Fi Kits
Scientific Models Brand
Laser Art by Scientific
Fully Built Ships
Plastic Ships
Wooden Ships
Ship Modelers' Tools
All Hobby Supplies
Applicators
Books & Prints
Electronics & Motors
Miniature Hardware
Plating & Etching
All Cosplay
Prop Making
Casting and Molding
All 3D & Laser
SLA Printers
Filament & Resins
3D Printing Accessories
3D Design Software
CNC Machines
Laser Cutters
Novelty & Gifts
All Closeouts
Almost Gone!
Model Shipways Bluenose Canadian Fishing Schooner Wood & Metal Kit, 1:64 Scale
Model shipways bluenose canadian fishing schooner wood & metal kit, 1:64 scale.
Plank-on-bulkhead construction uses laser cut basswood parts for a perfect fit. Flexible basswood strips are supplied for planking the hull.
Fittings are true to the originals, and include wooden blocks and deadeyes, brass ring and eyebolts, plus Britannia metal bilge pump, fife rail and anchors
Three diameters of rigging line and cotton sailcloth ensure an impressive finished model
Length: 32" / Height: 26-1/2" / Scale: 3/16" = 1 ft (1:64). Detailed instructions and parts list included
Made in the USA
The schooner Bluenose was built in Nova Scotia in 1921 to fish the rough waters off the coast of Newfoundland. A salt banker type, she stayed out until her holds were full, using salt to preserve the catch. Bluenose was lost on a reef near Haiti in 1946, but an exact replica was launched in 1963. Model Shipways' kit is the most authentic representation of any Bluenose available. And now, thanks to newly drawn plans and revised instruction book by Ben Lankford, it's ever more accurate and easier to build. Plank-on-bulkhead construction uses laser cut basswood parts for a perfect fit. Flexible basswood strips are supplied for planking the hull. Fittings are true to the originals, and include wooden blocks and deadeyes, Brass ring and eyebolts, plus Britannia metal bilge pump, fife rail and anchors. Three diameters of rigging line and cotton sailcloth ensure an impressive model. (Display base with brass pedestals not included.) MODEL SPECIFICATIONS Length 32" Height 26-1/2" Scale 3/16" = 1 ft (1:64) Previous modeling experience helpful.
We hope you will be completely satisfied with your order...but, if an item does not meet your expectations, you may return it in as-new condition within 30 days of delivery for a replacement, exchange or refund of the purchase price.
You may want to know...
Brand: Model Shipways
Item Weight: 5.5 lb
Item Dimensions: 26 x 10 x 3 inches
List Price: $274.99
Manufacturer ETA:
Most orders are shipped complete within 2 business days; however, if we must ship a partial order due to an out-of-stock situation, merchandise will not be charged to your credit card until shipment is made.
Customer Reviews
I HAVE SPENT THE BETTER PART OF A YEAR WORKING ON THIS AND I FIGURE I HAVE ABOUT ANOTHER 6-12 MONTHS TO GO .SUPER NICE DETAIL THE ONLY DOWN SIDE IS THE INSTRUCTIONS ARE NOT VERY CLEAR SO THIS MODEL WOULD BE FOR THE MORE ADVANCED MODELER AND IT HELPS TO HAVE A MECHANICAL APTITUDE .
Great transaction, super fast delivery, perfect communication, all at a great price for a beautiful locomotive! What more can you ask for ? And this Atlas GP40 is a total beast! Thanks Micro-Mark!
Great tool!
Unlike any air dry clay I've used . Very easy to manipulate , doesn't stick to your fingers . Can be made into paper thin sheets that hold their shape .
Thick sections will take well over 24 hours to dry out ; high water weight when fresh . Evaporation slows down considerably once the outer " crust " dries on thick pieces .
After 24 hours @ 78 degrees and about 60% humidity , the 3.1 gram sample I experimented with weighs 1.2 grams . .. and after 48 hrs weighs just 1/2 gram ,, and I don't think it's fully dry yet .
Definitely worth the price . Very versatile .
My only complaint is the bag it comes in . It is a zipper lock bag but you need to remove a fair amount of the product before you'll be able to engage the zipper . It's stuffed full when new . I fit the bag into a plastic container ( Folgers coffee 43.5oz can ) with an inch of water at the bottom to ensure it doesn't dry out until I use enough to be able to close the bag . Most likely keep it in that can regardless , just to be safe .
Click here to visit the Bluenose II Website
Bluenose Model
$265 00 $265.00 Unit price / per
"Almost 100 years ago when men went to sea in wooden ships, she was the Queen of the North Atlantic. The Bluenose was the fastest fishing schooner to ever sail the grand banks and together with her Captain, Angus Walters, they were undefeated sailing champions for two decades in the International Fisherman's Trophy races. When she sailed her final race against a much younger American schooner, it was her finest yet and she set a world record for her speed, cementing her place in the history books and in the hearts of Canadians forever".
Our Bluenose models come with the hull already assembled, all you have to do is hoist the sails! While there are instructions included, they may not be as detailed as some might need. We are always happy to help you with assembly, should you require assistance. You can reach us via email at [email protected], or by telephone 1-855-640-3177.
Please Note - The length of our models is measured from bow sprit to gaff (total length once assembled).
We Also Recommend
Puzzle - Bluenose II Under Full Sail
Playing Cards - Under Full Sail
Puzzle - Bluenose II Ready For Rigging
Grohmann Yachtsman Knife
Weems & Plath Barometer
choosing a selection results in a full page refresh
Arts, Crafts & Sewing
Model & Hobby Building
Pre-Built & Diecast Models
Enjoy fast, free delivery, exclusive deals, and award-winning movies & TV shows with Prime Try Prime and start saving today with fast, free delivery
Amazon Prime includes:
Fast, FREE Delivery is available to Prime members. To join, select "Try Amazon Prime and start saving today with Fast, FREE Delivery" below the Add to Cart button.
Cardmembers earn 5% Back at Amazon.com with a Prime Credit Card.
Unlimited Free Two-Day Delivery
Streaming of thousands of movies and TV shows with limited ads on Prime Video.
A Kindle book to borrow for free each month - with no due dates
Listen to over 2 million songs and hundreds of playlists
Unlimited photo storage with anywhere access
Important: Your credit card will NOT be charged when you start your free trial or if you cancel during the trial period. If you're happy with Amazon Prime, do nothing. At the end of the free trial, your membership will automatically upgrade to a monthly membership.
Return this item for free
We offer easy, convenient returns with at least one free return option: no shipping charges. All returns must comply with our returns policy.
Go to your orders and start the return
Select your preferred free shipping option
Drop off and leave!
Returnable
Yes
Resolutions
Eligible for refund or replacement
Return Window
30 days from delivery
Refund Timelines
Typically, an advance refund will be issued within 24 hours of a drop-off or pick-up. For returns that require physical verification, refund issuance may take up to 30 days after drop-off or pick up. Where an advance refund is issued, we will re-charge your payment method if we do not receive the correct item in original condition. See details .
Late fee
A late fee of 20% of the item price will apply if you complete the drop off or pick up after the ‘Return By Date’.
Restocking fee
A restocking fee may apply if the item is not returned in original condition and original packaging, or is damaged or missing parts for reasons not due to Amazon or seller error. See details .
Return instructions
Item must be in original condition and packaging along with tag, accessories, manuals, and inserts. Unlock any electronic device, delete your account and remove all personal information.
This item has been tested to certify it can ship safely in its original box or bag to avoid unnecessary packaging. Since 2015, we have reduced the weight of outbound packaging per shipment by 41% on average, that’s over 2 million tons of packaging material.
Image Unavailable
To view this video download Flash Player
NAUTIMALL 26" Wooden Sailboat model sailing Yacht BLUENOSE Schooner Ship Scale Replica Nautical home decor Display Collection Watercraft (26")
Purchase options and add-ons
Brand
NAUTIMALL
Color
Black/White/Orange
Theme
家居装饰
Item dimensions L x W x H
26 x 3.4 x 22 inches
Material
Wood
About this item
NOT A KIT! MOSTLY ASSEMBLED WITH KNOCKDOWN PACKAGING!! (Requires 10-20 minutes for assembly)
Bluenose was a fishing and racing gaff rig schooner built in 1921 in Lunenburg, Nova Scotia, Canada. A celebrated racing ship and fishing vessel, Bluenose under the command of Angus Walters, became a provincial icon for Nova Scotia and an important Canadian symbol (commonly seen on the back of the Canadian Dime) in the 1930s, serving as a working vessel until she was wrecked in 1946. Nicknamed the "Queen of the North Atlantic", she was later commemorated by a replica, Bluenose II, built in 1963.
Material: Basswood hull with sail; Scale: 1/66
This Display Model Ship- BLUENOSE replica measures 26" long and requires 5 days of expert craftsmanship to create, including decent hand carving and 5covers of hand painting. Set upon the included wooden stand, this is a beautiful representation of the historical sailing yacht.
NAUTIMALL Ship Model - Exclusive to the NAUTIMALL brand, this replica model of the ATLANTIC is perfect for proud home display and it makes a great addition to nautical décor. This Collectible Museum Replica Model measures 26"W.
Gift ideas: Enhance your personal space or surprise a loved one with this delightful sailboat model. It also makes for a thoughtful and unique gift idea for special occasions like housewarmings, birthdays, or weddings.
Similar items that may deliver to you quickly
Product information
Brand
NAUTIMALL
Color
Black/White/Orange
Theme
家居装饰
Item dimensions L x W x H
26 x 3.4 x 22 inches
Material
Wood
Seasons
All Seasons
Item Weight
1 Pounds
Size
26"
Number of Pieces
1
Paint Type
Decorative
Style
Nautical
Model Name
Bluenose-66
Scale
1/66
Manufacturer
NAUTIMALL
Product Dimensions
26 x 3.4 x 22 inches
Item model number
Bluenose-66
ASIN
B0CHB3F7QC
Customer Reviews
4.7 out of 5 stars
Item Weight
1 pounds
Country of Origin
China
Date First Available
October 24, 2023
Warranty & Support
Fields with an asterisk * are required
: : : : : Please select province : : to provide feedback. \n' + ' ' ); } function getThankYouDiv(thankMsg) { return ( ' \n' + ' ' ); } function getLoadingGifDiv() { return '
Product Description
Bluenose was a fishing and racing gaff rig schooner built in 1921 in Lunenburg, Nova Scotia, Canada. A celebrated racing ship and fishing vessel, Bluenose under the command of Angus Walters, became a provincial icon for Nova Scotia and an important Canadian symbol (commonly seen on the back of the Canadian Dime) in the 1930s, serving as a working vessel until she was wrecked in 1946. Nicknamed the "Queen of the North Atlantic", she was later commemorated by a replica, Bluenose II, built in 1963. The name Bluenose originated as a nickname for Nova Scotians from as early as the late 18th century.
Looking for specific info?
Customer reviews.
3 star
0%
2 star
0%
1 star
0%
Customer Reviews, including Product Star Ratings help customers to learn more about the product and decide whether it is the right product for them.
To calculate the overall star rating and percentage breakdown by star, we don’t use a simple average. Instead, our system considers things like how recent a review is and if the reviewer bought the item on Amazon. It also analyzed reviews to verify trustworthiness.
Sort reviews by Top reviews Most recent Top reviews
Top review from the United States
There was a problem filtering reviews right now. please try again later..
Amazon Newsletter
About Amazon
Accessibility
Sustainability
Press Center
Investor Relations
Amazon Devices
Amazon Science
Sell on Amazon
Sell apps on Amazon
Supply to Amazon
Protect & Build Your Brand
Become an Affiliate
Become a Delivery Driver
Start a Package Delivery Business
Advertise Your Products
Self-Publish with Us
Become an Amazon Hub Partner
› See More Ways to Make Money
Amazon Visa
Amazon Store Card
Amazon Secured Card
Amazon Business Card
Shop with Points
Credit Card Marketplace
Reload Your Balance
Amazon Currency Converter
Your Account
Your Orders
Shipping Rates & Policies
Amazon Prime
Returns & Replacements
Manage Your Content and Devices
Recalls and Product Safety Alerts
Conditions of Use
Privacy Notice
Consumer Health Data Privacy Disclosure
Your Ads Privacy Choices
Search forums
Follow along with the video below to see how to install our site as a web app on your home screen.
Note: This feature may not be available in some browsers.
Ships of Scale Build Logs
SOS Build Logs from Kits - Wood
Model Shipways Bluenose, 1/64 scale by Hightflight [COMPLETED BUILD]
Thread starter Highflight
Start date Jul 13, 2020
Watchers 11
Tags completed build
Jul 13, 2020
Administrator
Hi ,I can see you have issues how to post and use the forum,here are the tutorials,they short videos ,they will make way easier to get around in the forum https://shipsofscale.com/sosforums/forums/sos-tutorials-and-videos.127/
Bluenose Build Log
Jul 14, 2020
Mike I have just viewed your Log on your Bluenose build and left you a comment. Thank you
Attachments
Highflight said: I decided to build a small round hopper described in the plans as an unidentified object Click to expand...
Highflight said: My next task was building the booms. Click to expand...
sanderson59
Jul 18, 2020
Exquisite added details! I am totaling stealing your ideas for my Bluenose build. Of course, I am a rank noob, and you clearly are not, but I hope that I can do as well as you are. Keep up the awesome work and thank you for sharing this great build.
Highflight said: Time to step the Masts. After agonizing over whether to just step the masts and secure with the stays and shrouds, I decided to glue the masts in place with epoxy. The main mast is raked at 3 degrees and the fore mast at 0 degrees. I made sure the masts were both aligned with the center of the ship by attaching a weighted line to each side of the spreaders at the same distance from the center, I projected these same measurements to the deck which confirmed that both masts were in alignment and perpendicular. This is the latest on my Bluenose build. Since the beginning May 25, 2017 I have logged 623 hours. It has been a long process and at times slow either due to being away together with this being my first build. I am on the final stretch and will share the completed build in my next update. View attachment 164470 View attachment 164471 View attachment 164472 View attachment 164473 View attachment 164474 View attachment 164475 Click to expand...
Aug 3, 2020
El Blog de Artesanía Latina
Construyendo maquetas juntos desde 1970 – Building models together since 1970 – Construisant des maquettes avec vous depuis 1970
Sailboat Model Bluenose II: One of the Most Famous Regatta and Fishing Schooners in History
Firstly, it must be emphasized that the sailboat model reproduces the beauty of the original schooner in the most careful and precise way . In addition, its construction system using false keel and frames brings the assembly of the naval model closer to the construction of the real ship. Before we get to know the kit contents, let’s review the fabulous history of this beautiful ship.
HISTORY OF BLUENOSE SCHOONER: THE FASTEST SAILBOAT
Its name is due to the nickname given to the inhabitants of Nova Scotia (blue nose), where the schooner was launched on March 26, 1921. In this sense, it was built at the Smith & Rhuland .
The Bluenose was operating in the Grand Banks region along with dozens of other vessels. This is a peculiar area of the North Atlantic, comprised between the coast of Canada and Labrador . It is subject to periodic mists that make it an Eden for fishermen. There, hake, cod, salmon and tuna are found in prodigious quantities. That is why this schooner is also known as ‘The Queen of the Grand Banks’ .
He was going to fish in Newfoundland waters but his destiny changed. It was seen that this fast schooner won all the regattas that were organized on the east coast of the United States . These fishing boats, especially because of their sails, are conditioned to reach great speed.
Thus, the Bluenose was winner of the North Atlantic International Fishermen’s Trophy in all the races held between 1920 and 1938. Captain Angus Walter , at the forefront. In 1942, despite the efforts of this captain and many others who tried to keep the ship in Nova Scotia, the Bluenose was sold to carry cargo in the West Indies. On January 28, 1946, when running aground on a coral reef off the coast of Haiti.
Lastly, the Bluenose II, built in 1964, is an exact replica of the original and the last of the tall Schooners. Now he is an ambassador, symbol and tourist attraction of the city of Lunenburg, where he continues to sail today. Want to visit? Take a look at his official page .
SAILBOAT MODEL: KIT CONTENTS OF BLUENOSE II
The sailboat model Bluenose II (22453) is made of wood and metal with high quality parts . As can be seen in this image of the stern, its finesse and elegance, no doubt. It’s a legend scale model to build!
That is why the modeling kit with the Bluenose II sailboat model contains high-precision laser-cut board parts – they fit perfectly -, hardwoods , brass, cast iron, threads and cotton sails sewn by hand ready to be placed .
Lots of beautiful and real details are included in this modeling kit. These give the Bluenose II a perfect appearance compared to the original ship.
Also, its precise step-by-step instructions on DVD for computer format will help you effectively during the process of building the sailboat model. Also, you can download for free the digital assembly guide in the Bluenose II product sheet . Available languages? Spanish, English, French, Italian, German, Portuguese and Dutch.
On the video below , our modelers friends can see the contents of the 1:75 scale wooden naval modeling kit from Bluenose II (22453). Please note that paper instructions are no longer available , we are sending them on DVD to help prevent global logging . One of the fundamental commitments of Artesania Latina in the 21st century.
In short, the sailboat model Bluenose II in wood, an exact replica of the Canadian regatta and fishing schooner , is unavoidable for any modeller. Build it and tell us about your experience!
Comparte esto:
Author: Administrador DelBlog
View All Posts
Leave a Reply Cancel reply
Your email address will not be published. Required fields are marked *
Save my name, email, and website in this browser for the next time I comment.
Blue Nose Model Ship Kit – Amati (1447)
Reference Number:
Please fill out the fields below to request a quote
USD $ 138 Original price was: USD $138. USD $ 86 Current price is: USD $86.
Click below to Bundle with Model Kit!
Essentials Tools Bundle - TB1
New Micro Tools Bundle - TB3 With Pin Pusher
Specialist Tools Bundle - TB2
Click below to Bundle with Paint Set!
Putty, Bitumen, Primer & Varnish Pack (90549)
Water Based Basic paints, dye pack and brushes (90547)
Complete Water Based paints Pack with brushes (90548)
Want to show off your completed model?
Oak stand base + metallic supports - Occre (19164)
Quantity:
Specification
Additional information
Dimensions L x H x W
30 × 70 × 15 cm
Size
Scale
Difficulty
Hull Type
R/C Compatible
Language
Description
About the Bluenose Ship
The Bluenose was built in Canada in 1921, becoming a celebrated racing and fishing boat. Under the command of Angus Walters, it became an important symbol in Canada until its wreckage in 1946.
Unique in its appearance, the Bluenose was constructed using Nova Scotian pine, spruce, birch and oak. Always racing to the finish line, you can now have a piece of Bluenose history all for yourself with this fantastic model kit.
About the manufacturer
Established in 1879, Amati’s roots can be found in the cultural city of Turin, Northern Italy. The company went on to create a new line of naval models, which is known as their speciality. Catering to all tastes, they are known for their precision and dedication to the quality of their craft. With that in mind, you can be sure this model kit will be up to a standard approved by the most expert of model makers!
About the Bluenose Ship Model Kit
The Bluenose Ship model kit includes everything you need for the ultimate ship building project. At Premier Ship Models, we put the utmost care into providing you the perfect maritime experience – it’s our biggest passion and something we are incredibly knowledgeable about! More details for this specific kit include…
Step by step instruction manual for a streamlined building experience
Hull type: plank on frame
Difficulty: intermediate
Laser cut model pieces to allow a more precise final model
Includes all parts to complete the model
Building tools and accessories not included
Tools for your ship building project
Whether you’re a beginner or a pro, having the right tools will make all the difference to your model making adventure. We offer a range of necessary tools including hammers, pins, scissors, needles, acrylic paint, glue and much more. Explore our range of model ship tool kits and discover the right products for the assembly of your model kit.
Recommended Accessories
Fast Clamp Tool - Amati (7389)
Keel Clamper Tool - Amati (7382)
Loom-a-line Tool - Amati (7380)
Multipurpose Vice Tool - Amati (7387)
Plank Bending Tool (PTK 8040)
Building Slip for Plank On Frame Boats (Billings B397)
18 Piece Hobby and Craft Tool Set (PTK 1018)
Rigging Tool (PDT 5004)
Strip Clamp (Mantua Models 8155)
Precision Toolset - Amati (7012)
Information.
Delivery & Packaging
Cookie Consent
Secure Payment
Legal Notice
Terms & Conditions
Follow us to keep up-to-date using our social networks
Fair American
Tools and Techniques
Kit Database
Bluenose Canadian Schooner
Making Sails for Model Ships
December 3, 2017
On my Model Shipways Bluenose build , I debated whether or not to make the sails. Many (most?) ship models do not include full sails. The Model Shipways kit was designed with sails, and includes the sail cloth as part of the kit. The inclusion of sails was actually one of the factors that led me to select this kit for my second build.
With the booms and gaffs rigged and installed, I would basically be finished with the build if I omit the sails. The remaining rigging is all attached to sails, so I’d leave it off if I didn’t include sails. However, the sails really do add something to the model, especially for a schooner like this.
So, I decided to make sails. I’ve never made sails before, so this will be a learning experience. Here’s how I ended up doing it…
Choosing How Sails are Displayed
An important decision to make before you start is how you’ll be displaying sails. There are three different ways you can go:
For Display
(I made those last two names up).
Furled sails are sails that are lowered. Many modelers choose to do furled sails on their ships. The advantage is that the sails don’t cover everything up and make a model look like a bunch of cloth. When doing furled sails, you typically don’t make the full sail, instead making smaller version. The sail is put in place, but is bunched up and tied to the appropriate boom or gaff.
Realistic sails try to show the sails rigged and set as they would be while the ship is actually at sea. Ships adjusted their sails depending on the situation. In most cases, some sails would be raised while others would be lowered. Some sails might be set off to one side. Realistic sails would try to show the ship in some kind of ‘real’ sailing state.
Making sails simply ‘for display’ is what I’m doing. I’m making all the sails, and installing them all in their raised state. I’m not going to set any sails off to the sides – everything is just going to be installed straight and even. You’d probably never see a ship at sea actually set like this, but I think it works well for a model.
When to Make Sails
From what I can tell, the general practice is to make the sails before rigging and installing the booms and gaffs. Several of the sails need to be laced onto the booms and gaffs, and that is nearly impossible to do directly on the ship.
The standard process seems to be:
Build the booms and gaffs.
Make the sails based on the plans.
Attach sails to the booms and gaffs as appropriate.
Install and rig the booms and gaffs.
Add the additional rigging for each sail.
I’m not confident that all my booms and gaffs are 100% accurately sized, and I suspect that the dimensions of my sails might need to be adjusted to fit my particular ship. So, I intentionally put off making sails until I had installed all the booms and gaffs.
Once I had everything installed on the ship, I could make templates for the sails that take into account both the plans and the size/shape of my actual build.
Of course, this means that I had a bunch of rigging for the booms and gaffs that would need to be un-done so the booms and gaffs could be removed. That was fine with me, because I had avoided the use of glue when securing the rigging. Everything was either tied off (easy to un-tie), or attached with a hook or shackle (easy to remove).
So, my process is:
Build the booms and gaffs .
Install and rig the booms and gaffs .
Make the sails based on the actual layout of my ship.
De-rig the booms and gaffs, and remove them from the ship.
Re-install the booms and gaffs, and their rigging.
For me, this approach (while more work) has several advantages:
Initially, I’m able to focus on getting the booms and gaffs properly installed and rigged, without the sails getting in the way.
I can start with sail templates based on the plans, and adjust as necessary to fit the exact size/shape of my ship.
Once sails are ready to install, I can quickly get them rigged without spending any time on the other rigging for the booms and gaffs, since those runs are already done and just need to be re-tied/attached.
Paper Templates
Making the actual sails starts with making paper templates. Some of the sails were too big to use normal paper, so I picked up a roll of white craft paper.
For each sail, I took a piece of paper and laid it over the plans. I marked the corners of the sail, then used a ruler to draw lines between the marks, giving me the outline of the sail. Some sails have curves that I had to hand-draw.
Once the shape was laid out on the paper, I cut the paper to shape.
A paper template for the jib sail.
Next I positioned the paper template on the actual ship in the correct spot. I took note of anything that didn’t fit just right, and adjusted the template as necessary. Some sails needed to be made slightly smaller, while some had to be made slightly larger.
To help me visualize the sail, I also marked where the hems on the edges will go, along with any other key elements of the sail. For the edge hems, I’ll be folding the fabric over and sewing it. I’ll be shooting for a 1/16″ hem, so I used that size for the markings on the template.
The actual sails on the ship were made from strips of cloth, not one big piece. To simulate this, I’ll just be sewing lines onto the cloth. For some of the sails, I went ahead and marked these lines on the template since they need to be oriented correctly according to the plans.
The main and fore sails also have reef bands , which run horizontally along the lower portion of the sail. These were marked as well.
Preparing the Sail Cloth
Once I was satisfied with the template, I got out the sail cloth. Model Shipways includes sail cloth with the kit. This cloth is a medium weight cotton cloth in an off-white color. The kit includes enough to make all the sails, assuming you get everything right on the first try. I knew that wasn’t going to work, so I ordered two more packages of sail cloth from them. It was relatively inexpensive – about $7 for each package of cloth.
Sails on a ship were rarely bright white. I’ve seen that many modelers will dye their sail cloth to get a desired shade. There are many tricks for this, like dipping the material in coffee. I felt that the off-white color of the Model Shipways cloth was fine, so I didn’t dye my cloth.
If you’re wanting to use other sail cloth, look for something lightweight. Almost all fabric is going to be too thick and out of scale, so just do the best you can. I actually used some fabric from a local hobby store for a few ‘test runs’, and learned a few things. Look for fabric with a tight knit, so the fabric doesn’t start to come apart as you cut it. Also look for something without too much stretch, as stretchy fabric can distort the shape of the sails as you sew them.
Ideally, you want to wash, dry, and iron the sail cloth before you start. Most fabric will shrink a little during this process, so you want this out of the way before you start cutting things to size. Doing this will also release any wrinkles in the fabric. (I was too excited to get started, and didn’t do this.)
Once you’ve got your fabric ready and your template sized, you’re ready to cut some fabric.
I used a fabric marker to do all the markings on the fabric. I picked this up at a local hobby store in the sewing section for a couple dollars. This marker uses special ink that disappears as it evaporates. This means I can draw all over the fabric, and within a few hours the ink is gone. I found this to give much better results than using a pencil and trying to erase markings.
The paper template is used to mark up the fabric being used for the sail.
A note on marking fabric…since I’m going to be folding over the edges of the sail to create hems, one side of the sail is going to look better than the other. Often, you pick a ‘display side’ of the ship, and put ugly stuff (like the worse sail side) so it isn’t visible from the display side. I found that with the way I was marking, folding, and sewing the cloth, I wanted the markings on the display side. Making sure I marked the display side ensured that I as I worked I ended up with all the ugly stuff on the back.
First the outline of the sail is marked on the fabric. Be sure to leave extra space on all sides outside of the sail.
A second outline is made 1/16″ outside of the first outline. This is the hem that I want to end up with on the finished sail.
A third outline is made 1/2″ outside of the second outline. This one doesn’t have to be perfect…this is just a guide for cutting the fabric.
You can also mark the reef lines and strips at this point if desired. I typically didn’t mark the strips, since I was able to position those accurately using my sewing machine.
The fabric is trimmed, leaving excess material around the edges.
Once everything is marked, I cut the fabric along the outer-most outline. I used a rotary cutter (like a pizza cutter), which gave much better results than scissors.
To make sails you have to do a lot of sewing. I have no experience sewing. Doing all this by hand with a needle and thread was not practical, so I bought a cheap little ‘hobby’ sewing machine. That machine was junk, and broke within the first 20 minutes. Since I’m hoping to keep this hobby going for a few decades, I decided to go ahead and invest in a real sewing machine.
At my local hobby store, the staff helped me select a good quality machine. I got it for under $200. The advantages of a real machine include:
It won’t jam.
Variable speeds.
Selectable stitch length and width (critical for trying to get the stitching remotely close to ‘scale’).
Many different computer-controlled stitch types, so you can do more than just a simple straight stitch. This would end up making the reef bands much better.
It took me a few hours to get the hang of using the machine, but my skill level increased quickly. While I certainly couldn’t sew a shirt or a pair of pants, by the second or third sail I was flying along like a pro.
Since you’ll be sewing, you’ll need thread. There are three main considerations with the thread.
First is the color. This is a matter of personal preference. I’ve seen some models where the stitching on the sails was very high-contrast (dark brown thread on white cloth). I’ve also seen some where the thread was the same color as the cloth. I felt like the stitching shouldn’t stand out too much , and I wanted to rely on the texture of the thread to define the lines rather than the color. So, I went with a ‘natural’ color thread that ended up being really close to the color of the cloth.
The second consideration is the thread material. A hobby store will likely have hundreds of different kinds of thread. There are synthetic materials and natural materials. I went with a cotton thread. Why? No really good reason except that all my rigging lines are cotton and the sail cloth is cotton, so it seemed like a good idea.
The final consideration is quantity. I have no idea how to predict the amount of thread that will be needed (there may be some ‘trick’ to it that the pros know). Initially I bought one spool of the thread. That only made two sails. When I went back to by more, they were out of that exact thread, so I had to order more online. That caused a week delay in making sails. Obviously you wan the thread to be the same on all the sails, so buy a lot of the same thread up front. Thread is cheap, and it is better to have some leftover than to run out.
Sewing the Edges
On to sewing.
The first step is to sew the hems on the edges. I start with the longest edge first, then do the opposite edge, continuing on until all edges are sewn. The cloth is folded over at the first outline (the line that defines the actual edge of the sail) and pinned into place. The 1/16″ line that indicates the edge of the hem should be inside the sail. Since the cloth was cut 1/2″ past that line (on that third outline), there is some extra material here that makes pinning easier. I’ll cut that off later.
The edges are folded over to create a hem and pinned in place.
The hem is sewn on the edge.
The cloth then goes into the machine and gets stitched up. I used the machine’s reverse feature to double-stitch the first couple stitches to secure the thread, then just ran a straight stitch down the edge, staying between the edge of the sail and the 1/16″ hem marking. I used a small stitch length so things weren’t too out of scale.
My machine lets me set the position of the needle, allowing me to get really close to the edge.
Once the stitch was complete, the extra thread was clipped off. I used a pair of sharp scissors to carefully cut off the extra cloth along the 1/16″ hem line.
A completed edge hem, about 1/16″ wide.
This was repeated for each edge.
Two edges meet in a corner.
Adding ‘Strips’
To simulate the strips of material, some modelers simply draw lines on the cloth. I decided to run a stitch for each strip instead. It is more work, but it goes pretty fast
The ‘strips’ of sail sail cloth are simulated with stitches. Each sail has a unique strip layout shown on the plans.
The width of the strips is indicated on the plans, as well as the layout of the strips. It turned out that the width of the strips matched with space between the needle on my sewing machine and the edge of the ‘foot’. So I didn’t need to mark the strips on the fabric – I just positioned the fabric under the foot and ran the material through the machine.
Reef Bands and Points
The large lower sails (main sail and fore sail) have reef bands . These are horizontal bands across the sails. My sewing machine has a setting that creates a stitch that looks like a ladder (or railroad tracks?). I adjusted the stitch length and width to get the desired size, then ran this stitch across the sail to create the reef bands.
I ran this right over the strip lines. This is easier than doing the reef bands first and trying to start/stop the strip lines at the bands, and you can’t really tell the difference.
Reef bands were sewn in using a different stitch pattern on my machine.
At each point where a strip line crosses the reef band, there is a short rope that goes through the sail. These ropes were used to secure the sail when it was lowered and bundled up. I cut a bunch of 1″ long pieces of 0.008″ tan rigging line and punched them through at the appropriate spots. I used a small bit of fabric glue on each side to keep these ropes flat against the sail instead of sticking out.
Corner Attachment Points
The sails typically have rigging lines attached to the corners of the sails. This means you need something in each corner to attach a rigging line to. From my research, it looks like most sails had a rope that ran around the outside edge of the sail, and that rope would form an eye at the sail corners to create the attachment points.
I decided not to add this rope. I wasn’t confident I could make it look good, and I thought the tan line would stand out too much.
So, I simply sewed brass rings (made from wire) into each corner. This was done manually with a needle and thread.
Anchor points in the corners were made from brass wire and sewn in.
Finishing Up
Once everything is sewn and I’m happy with the results, there are a few final steps.
I do a final pass to trim anything that looks bad (edges of hems, loose threads, etc.).
After all my disappearing fabric markings have evaporated and disappeared, I iron the sail to flatten it out and remove any remaining wrinkles.
Finally, I use some fabric glue along any exposed fabric edges (like the hems) to keep them from fraying. I also use a little fabric glue on the ends of stitches to ensure they don’t come loose.
Schooner Bluenose II Wooden Model 29.5" Sailboat Fully Built Rigged
Wooden Bluenose Model Sailboat 35
The Model Boatyard
Bluenose 1921 Fishing Schooner Sailboat Yacht, Model Sailboat, Sailing
Schooner Bluenose II Wooden Ship Model 47" Sailboat Fully Assembled
Bluenose Model Sailboat
VIDEO
March 27, 2019 Bluenose rigging part 3 w Captain Pete
sailboat model #boat #sailboat #sailboatmodel #shortvideo #shorts #shortsvideo #boatlovers #sailing
Int'l One-Design Sailboat Model
BLUENOSE II PAINTED L Model Yacht
Bluenose Model Build, How To Use Use Tarnishing Fluid
Bluenose II sail past Cape Smokey, Nova Scotia
COMMENTS
Bluenose model
She remains a beautiful reminder of the greatest schooner of all time. This primarily wood Bluenose model is 31.5" long x 25" tall x 6" wide $2,925 Shipping and insurance in the contiguous USA included. Canada $200. Other countries, $350 flat rate. This model is in stock and can be shipped within 5 business days.
Model Shipways BLUENOSE CANADIAN SCHOONER 1:64 SCALE
BRIEF HISTORY. Bluenose was a Canadian schooner from Nova Scotia, a celebrated racing ship and a symbol of the province.The name "bluenose" originated as a nick-name for Nova Scotians. Designed by William Roué and built by Smith and Rhuland, Bluenose was launched at Lunenburg, Nova Scotia on March 26, 1921, as both a working cod-fishing schooner and a racing ship.
The Bluenose model sailboat kit Amati
Bluenose (AM1447) Length 19-1/2″/ Height 17″ / Scale 1:100. The Bluenose was a fishing and racing gaff rig schooner built in 1921 in Nova Scotia, Canada. A celebrated racing ship and fishing vessel, Bluenose under the command of Angus Walters, became a provincial icon for Nova Scotia and an important Canadian symbol in the 1930s, serving as ...
SAILINGSTORY Wooden Sailboat Model Ship Bluenose 1/85 Scale Replica
SAILINGSTORY Wooden Sailboat Model Ship Bluenose 1/85 Scale Replica Schooner Sailboat Decor Medium . Visit the HOME DECOR SAILINGSTORY Store. 4.3 4.3 out of 5 stars 42 ratings. $95.00 $ 95. 00. FREE Returns . Return this item for free. Free returns are available for the shipping address you chose. You can return the item for any reason in new ...
Bluenose Ship Model Kit for sale
Scientific The Schooner Bluenose Wood Ship Model Carved Hull Cast Metal Fitting. Opens in a new window or tab. Pre-Owned. $39.99. or Best Offer +$14.99 shipping. Vintage Bluejacket Ship Crafters 'Bluenose' Fishing Schooner Wooden Boat Kit, Mo. Opens in a new window or tab. Pre-Owned. $149.50.
Bluenose Model Sailboat
The original Bluenose was commemorated on a Canadian fifty cent stamp in 1928 and her likeness can still be seen today on our Canadian ten cent coin. One thing is absolutely certain, the Bluenose legacy lives on in the hearts and minds of many Canadians! Buy the Bluenose Model Sailboat - 24" today from Everything Nautical.
SAILINGSTORY Wooden Sailboat Model Ship Bluenose 1/60 Scale Replica
SAILINGSTORY Wooden Sailboat Model Ship Bluenose 1/60 Scale Replica Schooner Sailboat Decor Large . Visit the HOME DECOR SAILINGSTORY Store. 3.9 3.9 out of 5 stars 20 ratings. Lowest price in 30 days -5% $138.00 $ 138. 00. Was: $145.00 $145.00.
schooner bluenose model ship for sale
Old-school Scientific The Schooner BLUENOSE wood ship model with carved wood . Opens in a new window or tab. Pre-Owned. $29.99. or Best Offer +$44.70 shipping. CANADA Model Ship Replica Wood Blue Nose Schooner 15" Assembled Sailing Ship . Opens in a new window or tab. $22.00. 0 bids · Time left 5d 9h.
Wooden Model Ship Kit: Canadian Schooner Bluenose II 1:75
Build your 1:75 scale model ship of Bluenose II, fishing and regattas schooner. Its system of construction by means of false keel and frames about the assembly of your model to the construction of the real ship. Once it is built, this faithful miniature replica measures 27.16'' (690mm) length, 4.33'' (110mm) width and 22.44'' (570mm) height. ...
Bluenose II Sailboat Model Kit
Bluenose II Sailboat Model KIT. Wooden Model Ship Kit includes: pre-cut wooden parts, double planking on bulkhead construction, wooden and metal fittings, masts, spars, rope and sail cloth. Scale 1:100 - Total Length cm. 54 (21.3") Historic Past: The Bluenose II was built in Nova Scotia and launched July 24th. 1963.
Model Shipways Bluenose Canadian Fishing Schooner Wood & Metal Kit, 1:
Model Shipways Bluenose Canadian Fishing Schooner Wood & Metal Kit, 1:64 Scale. Plank-on-bulkhead construction uses laser cut basswood parts for a perfect fit. Flexible basswood strips are supplied for planking the hull. Length: 32" / Height: 26-1/2" / Scale: 3/16" = 1 ft (1:64). Detailed instructions and parts list included.
Latina 1/72 Bluenose II Wooden Model Ship Kit
The Latina Bluenose II Wooden Model Ship Kit is a highly detailed scale model of a Canadian Fishing and Regattas Schooner ship. This 1/72 model of the 1964 Bluenose II features laser cut boards, wood, brass, cast iron and fabric to give you parts that are as accurate as possible. Included is a DVD format instruction manual.
Bluenose Model
You can reach us via email at [email protected], or by telephone 1-855-640-3177. Please Note - The length of our models is measured from bow sprit to gaff (total length once assembled). "Almost 100 years ago when men went to sea in wooden ships, she was the Queen of the North Atlantic.
NAUTIMALL 26" Wooden Sailboat Model Sailing Yacht Bluenose Schooner
This Display Model Ship- BLUENOSE replica measures 26" long and requires 5 days of expert craftsmanship to create, including decent hand carving and 5covers of hand painting. Set upon the included wooden stand, this is a beautiful representation of the historical sailing yacht.
Bluenose II XL Sailboat Yacht Wood Model
Bluenose II Sailboat Model Admiral size. This is the largest model sailboat, schooner, or ship model you will find anywhere! 100" L x 15"W x 84"T. You are looking at a hand built wooden model sailboat. It is made of all natural wood with hundreds of feet of linen rigging. The Bluenose II is carefully constructed using the plank on frame method ...
Bluenose II, Wooden Model Sailboat, 40-1/2" Long, Y075
In 1963, the government of Nova Scotia commissioned the two-masted gaff topsail schooner Bluenose II, an exact replica of the original ship. Hand Built, Fully Assembled museum quality model with Display Stand. Measures 40-1/2" in length, 32-1/2" in height and 9" wide. Beautifully constructed of exotic woods such as ebony, rosewood, yellow and ...
Model Shipways Bluenose, 1/64 scale by Hightflight [COMPLETED BUILD]
Berwick, NS Canada. Jul 13, 2020. #1. Welcome to the Bluenose build. This ship is the famous racing schooner that appears on the Canadian dime. This kit is from Model Shipways and is 1/64 scale. I started the build my first on May 25, 2017 and have so far found the challenge very rewarding. First, I laid the keel and made sure all was straight ...
Bluenose Canadian Schooner
The Bluenose was built in 1921 in Nova Scotia, Canada. It served primarily as a fishing and racing boat. The boat became an icon for Nova Scotia, later appearing on the Canadian dime. The boat was lost in 1946. In 1963, a replica of the Bluenose was built - the Bluenose II. The Bluenose II has gone through a couple complete refits, and still ...
Amazon.ca: Bluenose Ship Model
For:Model Ship For: Bluenose Model Sailboat 1: 72 730 mm Wooden Boat Model Kit Best Gifts For Friends And Family. $458.25 $ 458. 25. $2.99 delivery Jul 16 - Aug 7 . SAILINGSTORY Wooden Sailboat Model Ship Sailboat Decor Yacht Enterprise 1/100 Scale 1930 America's Cup Replica. 4.0 out of 5 stars 22.
Sailboat Model Bluenose II: Very Famous Regatta and Fishing Schooner
The sailboat model Bluenose II (22453) at 1:75 scale, one of the regatta and fishing schooners most famous in history. Of Canadian origin, the wooden modeling kit will delight modellers with at least an intermediate level of skills. Once built, this spectacular vessel measures 27.16" (690mm) length, 4.33" (110mm) width and 22.44" (570mm ...
Blue Nose Model Ship Kit
About the Bluenose Ship. The Bluenose was built in Canada in 1921, becoming a celebrated racing and fishing boat. Under the command of Angus Walters, it became an important symbol in Canada until its wreckage in 1946. Unique in its appearance, the Bluenose was constructed using Nova Scotian pine, spruce, birch and oak.
Bluenose Sailboat Model
Handmade Bluenose Wooden Sailboat Model (4.5k) Sale Price $357.25 $ 357.25 $ 396.95 Original Price $396.95 (10% off) FREE shipping Add to Favorites BLUENOSE SAILBOAT Model / Wooden Miniature Boat with Sails / Vintage Art / Nautical Deco / Home Decoration / Table & Library Decoration ...
Making Sails for Model Ships
On my Model Shipways Bluenose build, I debated whether or not to make the sails. Many (most?) ship models do not include full sails. The Model Shipways kit was designed with sails, and includes the sail cloth as part of the kit. The inclusion of sails was actually one of the factors that led me to select this kit for my second build.


 at 1:75 scale by Artesania Latina: Regatta and Fishing Schooner.")
.")
 at 1:75 scale by Artesania Latina: Regatta and Fishing Schooner.")
 at 1:75 scale by Artesania Latina: Regatta and Fishing Schooner.")
 at 1:75 scale by Artesania Latina: Regatta and Fishing Schooner.")
 a escala 1/75 de Artesanía Latina: Goleta de Regatas y Pesca.")


")
")
")
")
")
")
")
")
")
")
")
")


IMAGES
VIDEO
COMMENTS
She remains a beautiful reminder of the greatest schooner of all time. This primarily wood Bluenose model is 31.5" long x 25" tall x 6" wide $2,925 Shipping and insurance in the contiguous USA included. Canada $200. Other countries, $350 flat rate. This model is in stock and can be shipped within 5 business days.
BRIEF HISTORY. Bluenose was a Canadian schooner from Nova Scotia, a celebrated racing ship and a symbol of the province.The name "bluenose" originated as a nick-name for Nova Scotians. Designed by William Roué and built by Smith and Rhuland, Bluenose was launched at Lunenburg, Nova Scotia on March 26, 1921, as both a working cod-fishing schooner and a racing ship.
Bluenose (AM1447) Length 19-1/2″/ Height 17″ / Scale 1:100. The Bluenose was a fishing and racing gaff rig schooner built in 1921 in Nova Scotia, Canada. A celebrated racing ship and fishing vessel, Bluenose under the command of Angus Walters, became a provincial icon for Nova Scotia and an important Canadian symbol in the 1930s, serving as ...
SAILINGSTORY Wooden Sailboat Model Ship Bluenose 1/85 Scale Replica Schooner Sailboat Decor Medium . Visit the HOME DECOR SAILINGSTORY Store. 4.3 4.3 out of 5 stars 42 ratings. $95.00 $ 95. 00. FREE Returns . Return this item for free. Free returns are available for the shipping address you chose. You can return the item for any reason in new ...
Scientific The Schooner Bluenose Wood Ship Model Carved Hull Cast Metal Fitting. Opens in a new window or tab. Pre-Owned. $39.99. or Best Offer +$14.99 shipping. Vintage Bluejacket Ship Crafters 'Bluenose' Fishing Schooner Wooden Boat Kit, Mo. Opens in a new window or tab. Pre-Owned. $149.50.
The original Bluenose was commemorated on a Canadian fifty cent stamp in 1928 and her likeness can still be seen today on our Canadian ten cent coin. One thing is absolutely certain, the Bluenose legacy lives on in the hearts and minds of many Canadians! Buy the Bluenose Model Sailboat - 24" today from Everything Nautical.
SAILINGSTORY Wooden Sailboat Model Ship Bluenose 1/60 Scale Replica Schooner Sailboat Decor Large . Visit the HOME DECOR SAILINGSTORY Store. 3.9 3.9 out of 5 stars 20 ratings. Lowest price in 30 days -5% $138.00 $ 138. 00. Was: $145.00 $145.00.
Old-school Scientific The Schooner BLUENOSE wood ship model with carved wood . Opens in a new window or tab. Pre-Owned. $29.99. or Best Offer +$44.70 shipping. CANADA Model Ship Replica Wood Blue Nose Schooner 15" Assembled Sailing Ship . Opens in a new window or tab. $22.00. 0 bids · Time left 5d 9h.
Build your 1:75 scale model ship of Bluenose II, fishing and regattas schooner. Its system of construction by means of false keel and frames about the assembly of your model to the construction of the real ship. Once it is built, this faithful miniature replica measures 27.16'' (690mm) length, 4.33'' (110mm) width and 22.44'' (570mm) height. ...
Bluenose II Sailboat Model KIT. Wooden Model Ship Kit includes: pre-cut wooden parts, double planking on bulkhead construction, wooden and metal fittings, masts, spars, rope and sail cloth. Scale 1:100 - Total Length cm. 54 (21.3") Historic Past: The Bluenose II was built in Nova Scotia and launched July 24th. 1963.
Model Shipways Bluenose Canadian Fishing Schooner Wood & Metal Kit, 1:64 Scale. Plank-on-bulkhead construction uses laser cut basswood parts for a perfect fit. Flexible basswood strips are supplied for planking the hull. Length: 32" / Height: 26-1/2" / Scale: 3/16" = 1 ft (1:64). Detailed instructions and parts list included.
The Latina Bluenose II Wooden Model Ship Kit is a highly detailed scale model of a Canadian Fishing and Regattas Schooner ship. This 1/72 model of the 1964 Bluenose II features laser cut boards, wood, brass, cast iron and fabric to give you parts that are as accurate as possible. Included is a DVD format instruction manual.
You can reach us via email at [email protected], or by telephone 1-855-640-3177. Please Note - The length of our models is measured from bow sprit to gaff (total length once assembled). "Almost 100 years ago when men went to sea in wooden ships, she was the Queen of the North Atlantic.
This Display Model Ship- BLUENOSE replica measures 26" long and requires 5 days of expert craftsmanship to create, including decent hand carving and 5covers of hand painting. Set upon the included wooden stand, this is a beautiful representation of the historical sailing yacht.
Bluenose II Sailboat Model Admiral size. This is the largest model sailboat, schooner, or ship model you will find anywhere! 100" L x 15"W x 84"T. You are looking at a hand built wooden model sailboat. It is made of all natural wood with hundreds of feet of linen rigging. The Bluenose II is carefully constructed using the plank on frame method ...
In 1963, the government of Nova Scotia commissioned the two-masted gaff topsail schooner Bluenose II, an exact replica of the original ship. Hand Built, Fully Assembled museum quality model with Display Stand. Measures 40-1/2" in length, 32-1/2" in height and 9" wide. Beautifully constructed of exotic woods such as ebony, rosewood, yellow and ...
Berwick, NS Canada. Jul 13, 2020. #1. Welcome to the Bluenose build. This ship is the famous racing schooner that appears on the Canadian dime. This kit is from Model Shipways and is 1/64 scale. I started the build my first on May 25, 2017 and have so far found the challenge very rewarding. First, I laid the keel and made sure all was straight ...
The Bluenose was built in 1921 in Nova Scotia, Canada. It served primarily as a fishing and racing boat. The boat became an icon for Nova Scotia, later appearing on the Canadian dime. The boat was lost in 1946. In 1963, a replica of the Bluenose was built - the Bluenose II. The Bluenose II has gone through a couple complete refits, and still ...
For:Model Ship For: Bluenose Model Sailboat 1: 72 730 mm Wooden Boat Model Kit Best Gifts For Friends And Family. $458.25 $ 458. 25. $2.99 delivery Jul 16 - Aug 7 . SAILINGSTORY Wooden Sailboat Model Ship Sailboat Decor Yacht Enterprise 1/100 Scale 1930 America's Cup Replica. 4.0 out of 5 stars 22.
The sailboat model Bluenose II (22453) at 1:75 scale, one of the regatta and fishing schooners most famous in history. Of Canadian origin, the wooden modeling kit will delight modellers with at least an intermediate level of skills. Once built, this spectacular vessel measures 27.16" (690mm) length, 4.33" (110mm) width and 22.44" (570mm ...
About the Bluenose Ship. The Bluenose was built in Canada in 1921, becoming a celebrated racing and fishing boat. Under the command of Angus Walters, it became an important symbol in Canada until its wreckage in 1946. Unique in its appearance, the Bluenose was constructed using Nova Scotian pine, spruce, birch and oak.
Handmade Bluenose Wooden Sailboat Model (4.5k) Sale Price $357.25 $ 357.25 $ 396.95 Original Price $396.95 (10% off) FREE shipping Add to Favorites BLUENOSE SAILBOAT Model / Wooden Miniature Boat with Sails / Vintage Art / Nautical Deco / Home Decoration / Table & Library Decoration ...
On my Model Shipways Bluenose build, I debated whether or not to make the sails. Many (most?) ship models do not include full sails. The Model Shipways kit was designed with sails, and includes the sail cloth as part of the kit. The inclusion of sails was actually one of the factors that led me to select this kit for my second build.